


English-29
English
3. Reducing the environmental temperature is effective for long life use.
When Protection board (glass, acryl) is installed over the LCD surface, enclosed into the box / wall, or stack the monitor, please utilize the
temperature sensors inside monitor.
To reduce the environmental temperature, the monitor should be set Low Brightness or Cooling Fan "ON" by using Screen sever Function.
4. Please use "Screen Saver Mode" of monitor.
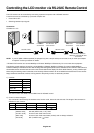
NOTE 2: MONITOR ID and IR CONTROL
Using the one PC or one infra-red wireless controller, you can control up to 26 MultiSync LCD4010 / MultiSync LCD4610 that are
connected by daisy chained RS-232C.
1. Connect a PC and MultiSync LCD4010 / MultiSync LCD4610.
Connect a PC’s RS-232C control output to the MultiSync LCD4010’s / MultiSync LCD4610’s RS-232C input.
You can connect other MultiSync LCD4010 / MultiSync LCD4610; Connect MultiSync LCD4010’s / MultiSync LCD4610’s RS-232C output
to other MultiSync LCD4010’s / MultiSync LCD4610’s RS-232C input. (Refer to page 30).
2. Set Monitor ID.
Set “MONITOR ID” in the “ADVANCED OPTION” menu.
“MONITOR ID” should be set to a unique number on all daisy chained MultiSync LCD4010 / MultiSync LCD4610 from 1 to 26.
We recommend numbering continuously from 1 in a sequential number.
Set “PRIMARY” to “IR CONTROL” in the “ADVANCED OPTION” menu on the first of the daisy chained monitors.
Set “SECONDERY” to “IR CONTROL” on other monitors.
3. Press “DISPLAY” button aiming at the “PRIMARY” monitor then ID select OSM will be shown at top left side of the screen.
ID: 1 <- ID number itself.
ID No.: 1 <- ID number of the controllable monitor.
Press “+” button to increase this “ID No.”.
Press “-” button to decrease it.
If you control all the daisy-chained monitors at the same time,
please select “ID No.” “ALL”.
4. Operate wireless remote controller with aiming at the “PRIMARY” monitor.
The “MENU OSD” will appear on the selected ID No.’s monitor.
NOTE: If “ID No.” select OSM is showing at the “PRIMARY” monitor, press “DISPLAY” button to clear this OSM.
HINT: If you lost control by a reason of wrong setting “IR CONTROL”, keep pressing during 5 sec or more the “DISPLAY” button.
The monitor will reset “IR CONTROL” to “NORMAL”.
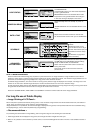
NOTE 3: HOW TO SETUP SCHEDULE
Using the “SCHEDULE” function allows you to set up to seven different scheduled time intervals when the LCD Monitor will be activated.
You can select the time the monitor turns on and turns off, the day of week the monitor is activated, and which input source the monitor will
use for each scheduled activation period. A check mark in the box next to the number of the schedule indicates that the selected schedule
is in effect.
To select which schedule to set, use the up/down arrows to move the red bar vertically under the number (1 to 7) of the schedule.
Use the (+) and (-) buttons to move the red bar horizontally within the particular schedule. The “SET” button is used to make a selection.
If you create a schedule but do not want to use a power on time, select “--” in the “ON” time slot.
If you do not want to use a power off time select “--” in the OFF time slot.
If there is no input selected (“--” showing in the input spot) the input from the previous schedule will be used.
The selection of EVERY DAY within a schedule takes priority over other schedules that are set up to operate weekly.
When schedules are overlapping, scheduled Power ON time has priority over scheduled Power OFF time.
If there are two schedules programmed for the same time, then the highest numbered schedule has priority.
When the “OFF TIMER” (see page 25) is set, the “SCHEDULE” function is disabled.
Monitor ID
"Monitor ID" which
you want to control
ID: 1
ID No: 2