


8
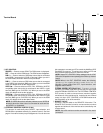
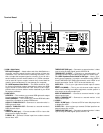
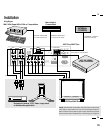
Terminal Board
5
6
7 5
6
VIDEO 1 VIDEO 2 RGB AUDIO RGB 1
THROUGHPUT
REMOTE
EXTERNAL CONTROL
VIDEO RGB PROCEED
EXIT
DIP SW
AC IN
SPEAKER SELECT
EXT SPEAKER
RGB 2
AUDIO AUDIO
IN/OUT
HIGH 75Ω
R
MONO
IN
THROUGH
OUT
THROUGH
OUT
IN
BNC S
HIGH 75Ω
THROUGH
OUT
IN
R
THROUGH
OUT
IN
R
THROUGH
OUT
IN
BNC S
HIGH 75Ω
IN
THROUGH
OUT
R G B H/CS V
HIGH 75ΩHIGH 75Ω
SPEAKRES MUST
HAVE MORE THAN
5WATT RATING
INPEDANCE 8 OHM
RIGHT LEFT
INT EXT
IN
THROUGH
OUT
1
2
1
2
12345678
ON
()
L
MONO
()
L
MONO
()
L
MONO
()
L
5 KEY CONTROL
PROCEED.....Press to access OSM. The OSM screen is displayed.
EXIT.....Press to exit the OSM mode. The OSM screen disappears.
RGB 1/+.....Press to select an RGB video source that is connected
to the RGB 1 input terminal (D-SUB 15 pin type). When you are in
the OSM mode, this button works as the plus button.
RGB 2/-.....Press to select an RGB video source that is connected
to the RGB 2 input terminals (BNC type). When you are in the OSM
mode, this button works as the minus button.
VIDEO 1/▲.....Press to select an NTSC, PAL, SECAM or M-NTSC
compatible video source that is connected to the VIDEO 1 input
terminal (BNC type or S-VIDEO 1 IN). When you are in the OSM
mode, this button works as the up button.
VIDEO 2/▼.....Press to select an NTSC, PAL, SECAM or M-NTSC
compatible video source that is connected to the VIDEO 2 input
terminal (BNC type or S-VIDEO 2 IN). When you are in the OSM
mode, this button works as the down button.
NOTE: S-VIDEO IN terminals will take preference over VIDEO IN
terminals when the video source is connected to each terminal
and VIDEO 1 or 2 selected.
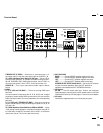
6 EXTERNAL CONTROL IN(D-Sub 15-pin)
This terminal is used when power ON/OFF, input selection, and
DEGAUSS are operated externally (by external control). See also
page 41 for external control port pin assignments. You can also use
this connector to connect your PC to control the MultiSync XP37
Plus/XM37 Plus monitor. This allows you to utilize your PC and
serial communication protocol to control the monitor.
NOTE: Select EXT. CONTROL ON by setting pin No. 6 of DIP
SW to the ON position when operating the monitor by external
control.
NOTE: When in the EXT. CONTROL mode, the following
operations of the supplied wireless remote control are not
possible: Power control ON/ OFF, Input selection, and
Degauss switch ON/OFF.
EXTERNAL CONTROL OUT (D-Sub 15-pin).....Connect to a second
monitor’s EXTERNAL CONTROL input to relay the signal input
at the EXTERNAL CONTROL IN. The EXTERNAL CONTROL
OUT terminal is used to connect several monitors together
and allows all of the monitors to be controlled by one external
control. No. 6 pin (EXT. CONTROL) of DIP SW must be set to
the ON position on all of the monitors.
7 REMOTE IN/OUT
Connect a remote cable to the REMOTE IN terminal. The
REMOTE OUT terminal is used to connect several monitors
together and allows all of the monitors to be controlled by one
remote control.
NOTE: Up to 50 monitors can be connected in the serial
connection.