


Get Started
13
AC750 WiF Range Extender
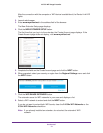
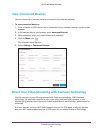
9. In the Password (Network Key) field, type the existing WiFi network password (also called
passphrase or security key) and click the NEXT button.
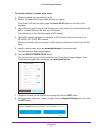
10. Set the network name (SSID) and password for your new extender WiFi network and click
the NEXT button.
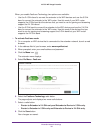
11. Use a WiFi network manager on the computer or WiFi device to connect to the new
extended WiFi network.
Repeat this step for all of your computers and WiFi devices.
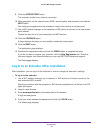
12. Click the CONTINUE button.
A message displays confirming that the extender is connected to the new extended WiFi
network.
13. Click the NEXT button.
The registration page displays.
14. Complete the registration fields and click the FINISH button to complete the setup.
If you do not want to register your extender, click the Skip Registration link. Note that
you must register your extender before you can use NETGEAR telephone support.
The Status page displays.
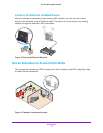
15. Unplug the extender and move it to a new location closer to the area with a poor WiFi signal.
The location that you choose must be within the range of your existing WiFi router
network.
16. Plug the extender into an electrical outlet.
Wait for the Power LED to light amber and then turn green.
If the Power LED does not light, press the Power On/Off button.
17. Use the Router Link LED to help you choose a spot where the extender-to-router connection
is optimal.
The extender connects to your existing router’s WiFi network.
18. Repeat Steps 1–17 to connect the second extender.
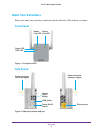
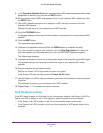
Find the Best Location
If the WiFi signal is weak, the first time you join the extender network, the Router Link LED or
Device Link LED is amber or red. If this happens, adjust the position of the extender:
• If the Router Link LED is amber or red, move the extender closer to the router.
• If the Device Link LED is amber or red, move the computer or WiFi device closer to the
extender.