


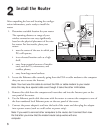

Install the Router
After unpacking the box and locating the configu-
ration information, you’re ready to install the
router.
1. Determine a suitable location for your router.
The operating distance or range of your
wireless connection can vary significantly
based on the physical placement of the wire-
less router. For best results, place your
router:
• near the center of the area in which your
PCs will operate,
• in an elevated location such as a high
shelf,
• away from potential sources of interfer-
ence, such as PCs, microwaves, and
cordless phones,
• away from large metal surfaces.
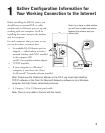
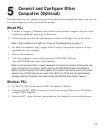
2. Locate the Ethernet cable currently going from the DSL or cable modem to the computer
that you use to access the Internet.
Note: You must use this cable to connect the DSL or cable modem to your router
since this may be a special cable even though it looks like other LAN cables.
3. Remove this cable from the computer and insert that end into the Internet port on the
rear panel of the router.
4. Use the Ethernet patch cable that came with the router to connect the computer to one of
the four numbered local Ethernet ports on the rear panel of the router.
5. Connect the power adapter’s cord into the back of the router and then plug the adapter
into a power source (such as a wall socket or power strip).
Note: If you want to connect other computers to the router, don’t connect them now.
Do that after you know that the modem/router setup works with one
computer.
6
12VDC 1.2A
4321
LOCAL
10/100M
INTERNET
DSL modem
802.11a Wireless Router
2
2