)NSTALLATION'UIDE
NETGEAR ReadyNAS 1100
Start here
Follow these instructions to install your NETGEAR® ReadyNAS™ 1100. Then, consult
the ReadyNAS Setup Manual on your Installation CD for instructions on installing the
RAIDar utility and using the FrontView Setup Wizard to configure the ReadyNAS.
Access the ReadyNAS User Guide on the Installation CD to configure any advanced
features. The ReadyNAS User Guide is also on the NETGEAR support site at
http://www.netgear.com/support.
Warning: If you purchased a diskless unit, please read the optional disk installation
section before installing the RAIDar™ utility or connecting ReadyNAS to the network.
First, check your package contents
Before starting installation, check your package contents:
• ReadyNAS 1100
• Four hard disk trays (not included with diskless units)
• Installation Guide
• Warranty Card
• Power cable
• Ethernet cable
• ReadyNAS Installation CD
• 16 screws for hard disk installation (included only with diskless units)
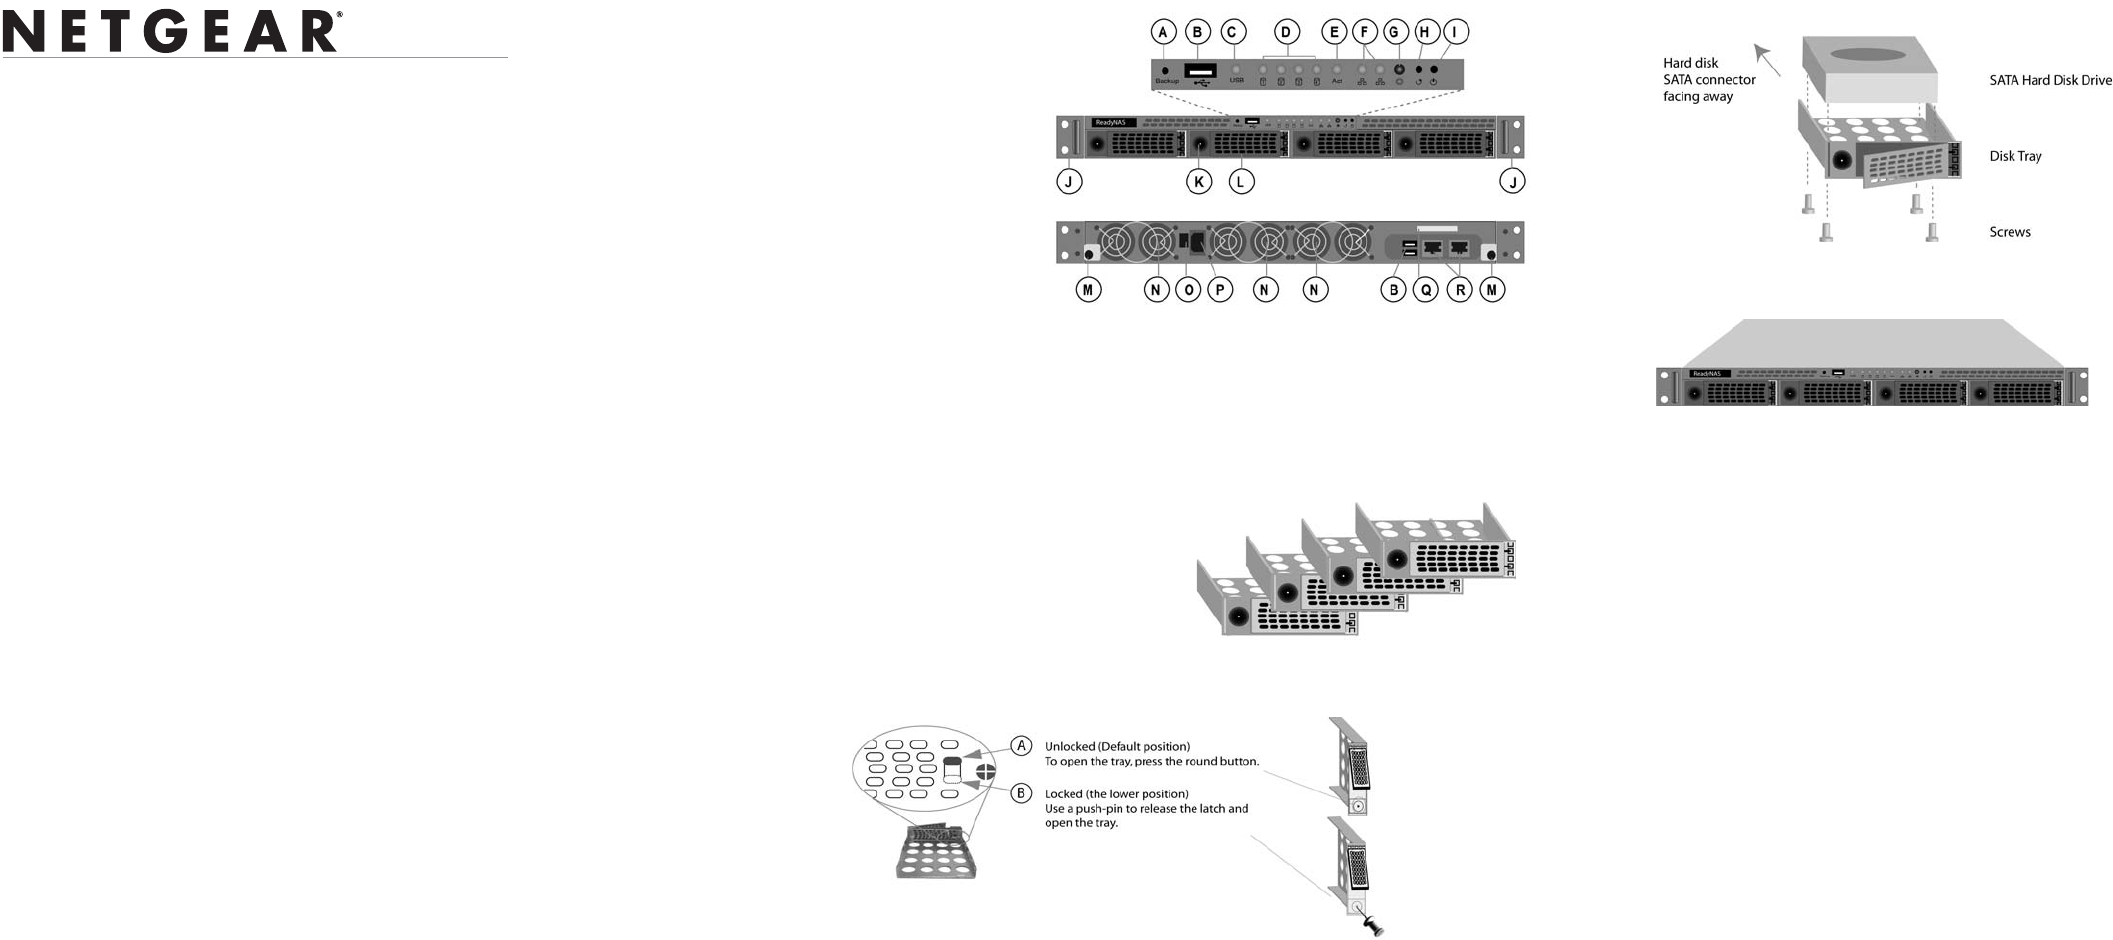
Then, take a moment to identify the features of your
ReadyNAS 1100
A. Programmable backup button
B. USB ports (3)
C. USB activity light (1)
D. Disk LEDs (4). Green for disk online.
E. Activity LED. Blinks for disk access.
F. Ethernet activity LEDs (2)
G. Power LED
H. System reset button
I. Power Button (To power off, depress
for 5 seconds or until LED blinks.)
J. Mounting ear for 2-
post rack mounting
K. Disk tray door access
L. Disk tray with lock-on
latch
M. Thumb-screw latch
(system module access)
N. Cooling fans
O. Power switch
P. Power connection
(100~240VAC,
50/60 Hz)
Q. Label (includes serial number and MAC address)
R. Ethernet ports (2)
Install the hard disks (optional)
This is an optional step, required only if you purchased a diskless unit.
1. Remove disk trays from the unit:
a. Open the door.
b. Press to release the latch.
c. Pull out the tray.
2. Set the lock before installing the hard
disk into the tray (optional).
3. Install the hard disks into the trays.
4. With the latch in the open position, slide the disk trays into the unit completely,
securing the latch and closing the door.
Finally, install the RAIDar utility
Your Installation CD contains the RAIDar utility for Windows, MAC and Linux. See the
ReadyNAS Setup Manual for installation instructions. When you complete installation of
the RAIDar utility, you are ready to connect ReadyNAS to your network and then power
on ReadyNAS.
Connect ReadyNAS
When connecting ReadyNAS, please note the following:
• ReadyNAS connected directly to your network: If your client has a static IP
address, make sure it is on the same IP address subnet as the ReadyNAS device. You
can do this by configuring your client to obtain its IP address via DHCP. Even if your
network does not have existing DHCP service, the ReadyNAS device will assure that
you will get an IP address.
• ReadyNAS connected directly to your PC: If you are connecting a PC directly to
ReadyNAS (and not through a network), first set a static IP address on your PC in the
192.168.168.xxx subnet, subnet mask 255.255.255.0. You can then use RAIDar to
detect ReadyNAS, or you can open a browser and enter the ReadyNAS default IP
address https://192.168.168.168/admin to connect to the ReadyNAS.
