


17
Setting the LAN Setting of Projector
5. Setting the LAN Setting of Projector
5
3
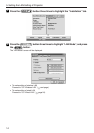
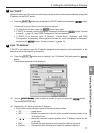
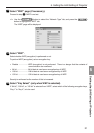
Set “DHCP”.
Check this check box if the network to which the projector is to be connected automatically assigns the
IP address via the DHCP server.
<1> Press the
SELECT ̄
button once to highlight the “DHCP” check box and press the button.
A check will be given if there is no mark found in the box.
• To clear the check box, press the button once again.
• If “DHCP” is checked, move the highlight to “Advanced” and press the button. Proceed
to step 9 ( page 19). Input “DNS Configuration” field as necessary.
• If “DHCP” is not checked, input “IP Address”, “Subnet Mask”, “Gateway”, and “DNS
Configuration” as necessary. After each item has been set, move the highlight to “Advanced”
and press the button. Proceed to step 9 ( page 19).
4
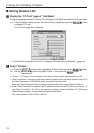
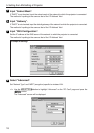
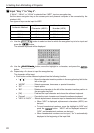
Input “IP Address”.
If “DHCP” is not checked, input the IP address assigned to the projector by the administrator of the
network to which the projector is connected.
<1> Press the
SELECT ̄
button once to highlight the “IP Address” field and press the
button.
The software keyboard will be displayed.
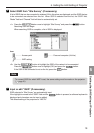
<2> Use the
SELECT ̄̆
̇̈
button to select a number to input, and press the button.
The characters will be input.
<3> Repeat step <2> above to input the IP address.
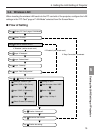
• Each button on the software keyboard has the following function.
• “SP”.................. Inputs space.
• “BS”.................. Deletes one character to the left of the character insertion position in the
“IP Address” field.
• “ ”“ ” ........... Moves the character insertion position in the “IP Address” field to the left
or the right.
• [OK] .................. Finalizes the input character and closes the software keyboard.
• [Cancel] ............ Cancels the input character and closes the software keyboard.