


the screws to the mounting surface. TAKE CARE NOT TO
OVERTIGHTEN THE SCREWS, WHICH COULD DAMAGE
THE HOUSING.
3. Locate the connector plugs (and remove them if they are
plugged in).
4. Strip 1/4" of insulation from the end of each wire. Tightly
twist the end of each wire until no frayed ends remain.
5. Use a small flathead screwdriver or your thumbnail to raise
the locking tabs, exposing the holes on the removable con-
nector plug.
6. Insert each wire into the appropriate hole on the removable
connector plug, and snap the locking tab down.
NOTE: Maintain proper phasing. Connect the positive termi-
nals on the VCS HUB8 to the positive terminals on the ampli-
fier or receiver, and on the volume controls. Connect the neg-
ative terminals on the VCS HUB8 to the negative terminals on
the amplifier or receiver, and on the volume controls. To help
you avoid improper phasing, the connector plug is keyed.
Insert the smooth side of the connector plug into the smooth
side of the socket. Don’t force the scalloped side of the con-
nector plug into the smooth side of the socket.
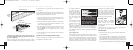
7. Plug the connectors into the VCS HUB8 as shown. See
Figure 4. The single connector plug at lower right is the input
from the amplifier or receiver. The other connector plugs are
the outputs, each leading to a specific volume control.
V OLUME C ONTROL D ISTRIBUTION H UB
65
V OLUME C ONTROL D ISTRIBUTION H UB
SPECIFICATIONS
Mounting
In a structured-wiring cabinet, using convenient snap-in
“Christmas tree” plugs (supplied)
On a wall or other flat surface, secured with drywall screws
(not supplied)
W
iring Requirements
14-18 gauge, two individual runs of two-conductor speaker
wire, or one run of four-conductor speaker wire.
Unit Dimensions
6.85" wide x 3" high x 1.3" deep
CONTENTS
VCS HUB8
• VCS HUB8
• Snap-in “Christmas Tree” plugs X2
• Removable speaker connector X9
DS00312BCN/VCS HUB 8 11/12/03 10:40 AM Page 7