5
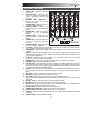
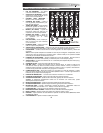
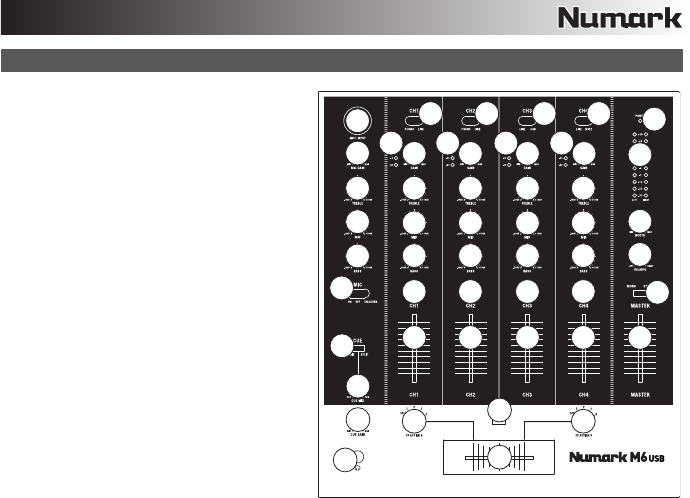
TOP PANEL FEATURES
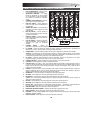
1. POWER LED – Illuminates when the
mixer is on.
2. INPUT SELECTOR – Selects the input
source to be routed to the corresponding
channel. Input jacks are located on the
rear panel.
3. CHANNEL LEVEL INDICATOR –
Displays the audio level of the
corresponding channel.
4. CHANNEL GAIN – Adjusts the channel's
pre-fader and pre-EQ gain level.
5. CHANNEL TREBLE – Adjusts the high
(treble) frequencies of the corresponding
channel.
6. CHANNEL MID – Adjusts the mid-range
frequencies of the corresponding
channel.
7. CHANNEL BASS – Adjusts the low
(bass) frequencies of the corresponding
channel.
8. CHANNEL CUE – Sends pre-fader audio
to the Cue Channel for headphone
monitoring.
9. CHANNEL FADER – Adjusts the audio
level on the corresponding channel.
10. CF ASSIGN – Selects which input channel will be heard when the crossfader is moved towards this
knob. All channels not assigned will remain active.
11. CROSSFADER – Blends audio between the channels assigned to the left and right side of the
crossfader.
Note: The crossfader is user-replaceable if it should ever wear out. Simply remove the facepanel, then
remove the screws holding it in position. Replace the fader with a quality authorized replacement from
your local Numark retailer only.
12. CF SLOPE – Adjusts the slope of the crossfader curve. Flip switch to the left for a smooth fade
(mixing) or to the right for a sharp cut (scratching).
13. HEADPHONES – Connect your 1/4" headphones to this output for cueing and mix monitoring.
14. CUE GAIN – Adjusts the audio level of the Cue channel.
15. CUE MIX / SPLIT – When this switch is in the SPLIT position, the headphone audio will be "split" such
that all channels sent to CUE are mixed to mono and applied to the left headphone channel and the
Program mix is mixed to mono and applied to the right channel. When the switch is in the MIX position,
Cue and Program audio will be "blended" together.
16. CUE MIX – Turn to mix between Cue and Program in the Headphone channel. When all the way to the
left, only channels routed to CUE will be heard. When all the way right, only the Program mix will be
heard.
17. MIC 1 INPUT – Connect a microphone to this input with an XLR cable.
18. MIC GAIN – Adjusts the audio level of the microphone signal.
19. MIC TREBLE – Adjusts the high (treble) frequencies of the microphone channel.
Tip: If you experience feedback when using a microphone at loud levels, try turning down the high
frequencies.
20. MIC MID – Adjusts the mid-range frequencies of the microphone channel.
21. MIC BASS – Adjusts the low (bass) frequencies of the microphone channel.
22. MIC ON / OFF – Turns the microphone input on or off. "TALKOVER" reduces the combined levels of
Channels 1-4 to -12dB (an appropriate "talkover" level).
23. MASTER FADER – Adjusts the output volume of the Program mix.
24. STEREO LEVEL INDICATOR – Displays the audio level of the Program mix.
25. MONO / STEREO – Adjusts the Program mix for stereo or mono operation.
26. BALANCE – Adjusts the balance of right to left audio in all outputs (MASTER, RECORD, and ZONE
OUTPUTS).
27. BOOTH VOLUME – Adjusts the Booth output level.
1
2
3
4
5
6
7
5
6
7
5
6
7
5
6
7
8 8 8 8
9 9 9 9
23
26
27
24
25
10
11
13
14
16
15
17
18
19
20
21
22
12
10
4 4 4
3 3 3
2 2 2


