


Page 2-7
1
2
3
4
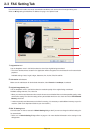
2-4 Default Setting Dialogue Box
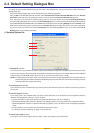
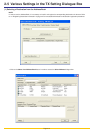
(1) Sending Options Tab
By setting the transmission conditions that you use most in this dialogue box, you can minimize the need to change the
settings each time.
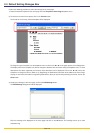
* The Default Setting dialogue box can be accessed using the following procedure:
Click on Start in the Windows Task Bar and then select Control Panel, Printer and other Hardware and then Printers
and Faxes in that order from the successive menus in order to access the Printers and Faxes dialogue box.
Then, right-click on the name of the machine that you want to use as the network fax and select Printing Preferences
from the resulting dropdown menu. Click on the Fax TX Settings button in the Printing Preferences window. (With systems
such as Windows 98 and Windows Me, click on Start in the Task Bar and then selecting Settings and then Printers in that
order from the successive menus in order to access the Printers dialogue box. Right-click on the name of the machine that
you want to use as the network fax and select Properties from the resulting dropdown menu. Then, click on the Fax TX
Settings button in the Properties window.)
1 Delayed TX checkbox
Put a check mark in this checkbox in order to make the time fields to the right of the checkbox active whenever you want
to set the time that your documents will be transmitted. The desired time setting can be entered directly with the keyboard
or by clicking on the ▲ and ▼ arrows. Enter the time on a 24-hour time basis (00:00 - 23:59).
NOTE: If you designate a time that is earlier in the day than the time that is actually displayed in the fax machine itself, the
transmission operation will be carried out the following day at that time. Be sure to check the time setting in the fax
machine itself before making this setting.
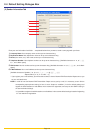
2 Concurrent print checkbox
Put a check mark in this checkbox when you want to print out the documents at the fax machine same time as you send
them by fax.
3 Save TX Original checkbox
Put a check mark in this checkbox when you want to save documents in the computer that was registered under the
“Network FAX Registration” settings in the fax machine.
* For more information on saving the data for transmitted fax documents, refer to the following:
• KM-3035/4035/5035/C850: “Section 9 Network FAX Settings (Option)” in the Fax Edition of that Operation Guide
• KM-2530/3530/4030: “Section 8 Network FAX Settings (Option)” in the Fax Edition of the corresponding Operation
Guide
* For the procedure to save the data for transmitted fax documents, refer to
“3-1 Summary of Delivery Settings” on page 3-2 of this manual.
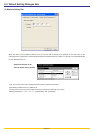
4 Attach Cover Page checkbox
Put a check mark in this checkbox when you want to add a cover page to your transmission.