7
EN
3 Press the
PLAY
(`) button.
• The “Hour” indicator flashes.
4 Press the
+
or
–
button to set the
“
Hour
”.
5 Press the
PLAY
(`) or 9 button
to accept the “
Minute
”.
• The “Minute” indicator flashes.
• Pressing the 0 button enables
the “Hour” setting again.
6 Press the
+
or
–
button to set the
“
Minute
”.
• Repeat steps 5 and 6 to continue
to set the “Year”, “Month” and
“Date” in the same way.
7 After setting the “
Date
”, press the
PLAY
(`)
or 9 button.
• This completes the time and date
setup procedure.
Notes:
• You can switch the time indication
between the 12-hour system and
the 24-hour system by pressing the
DISP/MENU button while you are
setting the hour or minute.
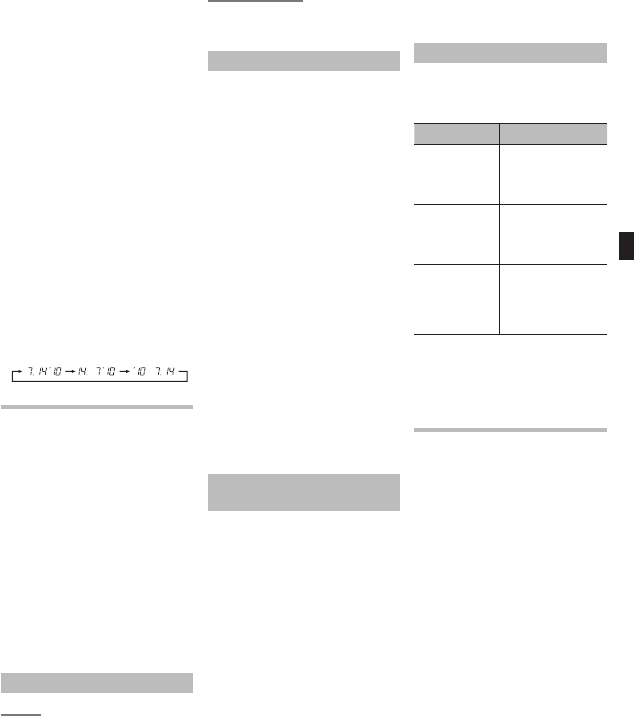
• You can change the order of the
date indication by pressing the
DISP/MENU button while you are
setting the year, month, or day.
Example: July 14, 2010
Recording (Fig. 6)
1 Press the
FOLDER
/
INDEX
button to
select the desired folder.
2 Press the
REC
(s) button to start
recording.
• The record/play indicator light
turns red, and recording starts.
3 Press the
STOP
(4) button to stop
recording.
• New recordings are saved as the
last file in the folder.
1 Current microphone sensitivity
2 Current folder
3 Current recording mode
4 Current file number
5 Recording level meter
6 Recording time
7 Remaining recording time
To Pause Recording (Fig. 7)
To Pause:
While the recorder is during recording mode,
press the
REC
(s) button.
• [PAUSE] appears on the display
and the record/play indicator light
ashes.
To Resume Recording:
Press the
REC
(s) button again.
• Recording will resume at the point
of interruption.
Notes for Recording
• If [FULL] appears on the display, you
cannot record in the selected folder. In
such a case, erase unnecessary les.
• If the recorder is placed directly on
a table when recording a meeting, it
tends to pick up table vibrations. Put
a notebook or other item between
the table and the recorder so that the
vibration is not easily transmitted for
clearer recording.
• Even if you press the DISP/MENU
button, the display will not change
to current recording time if the
remaining recording time is 5
minutes or less.
• When remaining recording time is
less than 60 seconds, the record/
play indicator light starts ashing
in red. When the recording time is
decreased to 30 or 10 seconds, the
light ashes faster.
• The recorder will enter Stop mode
if it has been left paused for 60
minutes or longer.
• I n cas e o f di cult acoustic conditions
or low speaker’s voice, recording
in [HQ] is recommended. Also,
usage of an external microphone
(sold separately) could improve the
quality of recordings.
Recording from external
Microphone or other Devices
The external microphone and other
devices can be connected and the
sound can be recorded.
• When using an external microphone,
select adequate microphone, such
as a Noise-Cancellation microphone
or Electret condenser microphone
(optional).
• To connect the recorder to an
external device, use the connecting
cord KA333 (optional), and the
stereo/monaural converting plug
adapter supplied with KA333.
• The input level cannot be adjusted
on this recorder. When you connect
the recorder to an external device,
execute a test recording and adjust
the output level of the external
device.
1 A audio input terminal of other
devices (Fig. 8)
2 Converting plug adapter of
KA333 (Fig. 8)
LCD Display Information
You can select an option for the display
of the recorder. This will help review
and confirm different recorder settings
and file information.
Operation Display
While the recorder
is during
stop
mode, press and
hold the STOP (4)
button
The total number of
files recorded in the
folder and remaining
recording time appears
on the display
While the
recorder is during
recording mode,
press the DISP/
MENU button
The display switches
between current
recording time and
remaining recording
time
While the recorder
is during stop
mode or playback
mode, press the
DISP/MENU
button
Playing time ➔
Remaining playing time
➔ Recording date of the
file ➔ Recording time
of the file ➔ Playing
time …
Note:
• In LP mode, if the remaining time
is over 1000 hours, the time will be
displayed as 999h 59m 59s.
Playback (Fig. 9)
1 Press the
FOLDER
/
INDEX
button to
select the desired folder.
2 Press the 9 or 0 button to
select the file to playback.
3 Press the
PLAY
(`) button to start
playback.
• The record/play indicator light
turns green, and the elapsed
playing time is indicated on the
display.
4 Press the + or –
button to select the
proper sound volume.
• The display shows the volume
level. You can choose between
[00] to [30].
1 Current folder
2 Current file number
3 Playing time


