


8
EN
Canceling Playback (Fig. p)
To Stop:
Press the
STOP
(4) button.
• The recorder stops in the middle of
the le being played.
To Resume Playback:
Press the
PLAY
(`) button again.
• Playback will resume at the point of
interruption.
Forwarding and Rewinding (
Fig. q)
Fast Forward:
While the recorder is during playback mode,
press and hold the 9 button.
•
When you release the 9 button, the
recorder will resume normal playback.
Rewind:
While the recorder is during playback mode,
press and hold the 0 button.
•
When you release the 0 button,
the recorder will resume normal
playback.
Notes:
• The end of the file is located by
pressing and holding the 9
button during fast forwarding. The
recorder will pause at the end of the
le. If you do not release the 9
button, the recorder will continue
to fast forward.
• The beginning of the le is located
by pressing and holding the 0
button during rewinding. The
recorder will pause at the beginning
of the file. If you do not release
the 0 button, the recorder will
continue to rewinding.
• When the index mark is shown
in the middle of a le, it will stop
temporarily in the position of the
index mark.
Locating the Beginning of the File
While the recorder is during playback mode
(playback or playback in slow/fast mode),
press the 9 or 0 button forwards or
rewinds to the beginning of the next file or
the file being played respectively.
• If an index mark is encountered
midway, playback begins at that
point (See “Index Marks” for
details).
Changing Playback Speed (Fig. w)
While the recorder is during playback mode,
press the PLAY (`) button.
Normal speed
Slow playback
(- 25 )
Fast playback
(50)
• When the slow playback mode is
selected, the [J] appears and, for
the fast playback mode, [K] appears
on the display while the recorder is
playback.
• The recorder stops playback when
you press the STOP (4) button while
playback in the slow/fast mode, or
when it reaches to the end of the
le. If you once press the STOP (4)
button and start playback again, the
record er will p layback les in normal
speed as well.
Listening with Earphone (Fig. e)
You can listen to files by connecting
earphones to the earphone jack. If an
earphone is connected, the speaker
doesn’t emit sound. Sound will be
played back monaurally.
• To avoid irritation to the ear, insert
the earphone after you turn down
the volume level.
• When you listen with the earphone
during playback, do not raise the
volume too much. It may cause
hearing impairment and loss in
hearing ability.
• Earphones are not supplied. You can
use any standard 3.5mm monaural
earphone or headphone.
Erase
You can easily erase unnecessary files.
Sequential file numbers are reassigned
automatically.
Erasing One File at a Time (Fig. r)
1 Press the
FOLDER
/
INDEX
button to
select folder.
2. Press the 9 or 0 button to
select the file to be erased.
3 Press the
ERASE
(s) button.
4 Press the 9 or 0 button to
select [
YES
].
1 File to be erased
5 Press the
PLAY
(`) button.
Erase All Files from a Folder (Fig.
t)
1 Press the
FOLDER
/
INDEX
button to
select the folder to be erased.
2 Press the
ERASE
(s) button twice.
3 Press the 9 or 0 button to
select [
YES
].
1 Folder to be erased
4 Press the
PLAY
(`) button.
Notes:
• An erased le cannot be restored.
• If operation is not executed for 8
seconds during the setting, it will
return to the stop status.
• Completion of erasing may take
several seconds. Do not attempt to
remove, replace battery or attempt
any other functions on the voice
recorder during this period because
data may be corrupted.
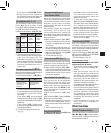
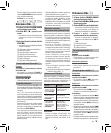
Menu
Basic Operation of the Menu Mode
(Fig. y)
Using the menu function, you can
change various settings according to
your preference.
1 While the recorder is during stop mode,
press and hold the
DISP
/
MENU
but-
ton for 1 second or longer.
2 Press the + or – button to s ele ct w ha t
you would like to set up.
• The selected menu item flashes.
3 Press the 9 or 0 button to
change the setting.
4 Press the
PLAY
(`) button to con-
firm the setting.
5 Press the
STOP
(4) button to close
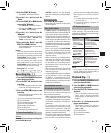
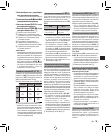
the menu. (Fig. u)
1 Menu setting screen
2 Move the selection one position
up/increase the number
3 Move the selection one position
to the left
4 Confirm the setting
5 Move the selection one position
down/decrease the number
6 Move the selection one position
to the right
Notes:
• The recorder will stop if you leave
it idle for 3 minutes during a menu
setup operation, when a selected
item is not applied.