


PRINCIPLES OF OPERATION
5
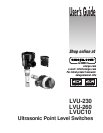
For Ultrasonic Point Level Switches
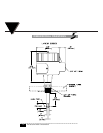
The Level switches operates using ultrasonic sound wave propagation. Ultrasonic
sound waves are greatly attenuated when transmitted through air. Conversely,
when liquid is present, transmission of the sound waves is greatly enhanced. The
electronic control unit, either integral or remote to the sensor, generates electrical
signals that are converted to bursts of ultrasonic energy at the sensor. The ultra-
sonic bursts are transmitted across the liquid sensing gap of the sensor. Upon
receipt of a valid signal at the receiver, the solid state electronics generate a “data
enable” condition indicating liquid is present. This signal energizes a relay and\or
provides an output condition.
2
INSTALLATION
GENERAL
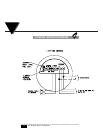
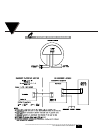
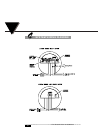
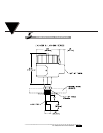
All units are easy to install. A sensor with an integral electronic control unit or a
sensor with a remote control unit can be mounted in any position or orientation
desired.
Make sure that all wiring, conduit and electrical fittings conform to local electrical
codes for the location selected.
VISUAL INSPECTION
Unpack the control unit and sensor assemblies. Visually inspect them for any
damage. Advise Cosense immediately if either assembly is damaged.
PRELIMINARY OPERATIONAL CHECK
Before installing the unit, a simple operational checkout should be performed as
follows:
WARNING: In a hazardous environment never open the housing cover or con-
nect the power leads without first disconnecting the electrical power at its
source.
1. Fill a container with liquid.
2. Open the control unit housing cover and connect the power to the control unit
(see appropriate wiring diagram for your unit).
3. Apply power from the source.
4. Place the sensor in the liquid. The relay should energize, or output will switch
to 20.0±1.0mA.
5. Remove the sensor from the liquid. The relay will de-energize or output will
switch back to 4.0±1.0mA indicating that the system is functioning properly.
If you do not experience the results indicated in Steps 4 and 5, contact
Cosense immediately.
6. Disconnect the power to the control unit.
7. Proceed to final installation.
3