


11
Chapter 6 Error Messages / Analog Output Calibration
6.1 Error Messages
The DPF500 is provided with extensive self checking which assists the user in the location of setup entry errors
and in reporting malfunctions or unusual operating conditions. When an error occurs, the display will fl ash. Press
any key to see the error message corresponding to the error that has occurred. Press any key again to acknowl-
edge the error. (If the error can be eliminated by a change of setup values, the unit will automatically advance to
the MENU so that the appropriate setup changes can be made).
Table - 1 illustrates the warning message, problem, and recommended corrective actions.
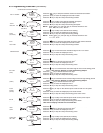
Diagnostic Error Messages Table-1
WARNING MESSAGE CAUSE CORRECTIVE ACTION
RATE ER
Rate Low set Set Rate Hi greater
higher than Rate Hi than Rate Lo
FAC ERR
Factor = 0 Set in correct Factor
“BAT” Descriptor Low Battery Replace battery(ies)
E total
Total rollover None required
E RATE
Rate exceeds 99999 Use lower rate dec point
E pulse
Pulse out Overfl ow Use different pulse scaler or
totalizer decimal point
E FLASH
Save to fl ash Write down displayed total and
memory failed setup values if you are changing
the battery. If total wasn't saved,
it will display an arbitrary total
when new battery is installed. In
this case, reset the total to 0 and
check the setup information.
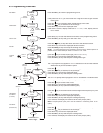
6.2 Analog Output Calibration
CAUTION: Performing the analog output calibration will erase all programming values. Please record all
programmed values before beginning the analog output calibration
If the unit is equipped with the analog output option,
the 4-20 mA has been accurately set to 4.000 and
20.000 mA by the factory. No calibrationshould be required.
The 4-20 mA output may be verifi ed periodically by installing a digital milliamp meter(DMM) in series with the
analog output and simulating a full scale or over range fl ow rate.
If the output is out of calibration, perform the following:
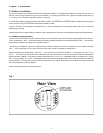
Remove power and/or disconnect battery(ies). Hold down the scroll (
↑
) key and replace the battery. This will
initiallize the unit and advance to the analog output calibration mode. Connect a DMM set to read current in series
with a power supply (8.5 to 30 volts DC) to TB12 (+) and TB11 (–). The output should read 4.000 ma (± 0.005).
If it does not, Adjust the numbers on the display up or down until the output reads 4.000 ma (± 0.005). Press the
"E" key. The DMM should now read 20.000 ma (± 0.005). If it does not, Adjust the numbers on the display up or
down until the output reads 20.000 ma (± 0.005). Press "E" and the unit will return to the "RUN" mode.
WARNING MESSAGE CAUSE CORRECTIVE ACTION
Rate Low set Set Rate Hi greater
higher than Rate Hi than Rate Lo
Factor = 0 Set in correct Factor
“BAT” Descriptor Low Battery Replace battery(ies)
Total rollover None required
Rate exceeds 99999 Use lower rate dec point
Pulse out Overfl ow Use different pulse scaler or
totalizer decimal point
Save to fl ash Write down displayed total and
memory failed setup values if you are changing
the battery. If total wasn't saved,
it will display an arbitrary total
when new battery is installed. In
this case, reset the total to 0 and
check the setup information.