


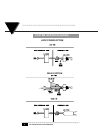

INSTALLATION
5
For Ultrasonic Point Level Switches
FINAL INSTALLATION
Follow the instructions below:
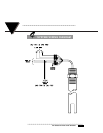
1. Drill a suitable hole in the vessel or pipe wall and tap for 3/4” NPT. If this
walled vessel or material is not suitable for threading, weld or braze a bushing
to accept the sensor.
2. Screw the sensor in the threaded section and make sure that there is a good
seal. Use a pipe compound or sealing tape to avoid excessive tightening.
Do not over tighten.
3. Run the power and control wiring cable to the electronic control unit.
Observe all applicable electrical codes and proper wiring procedures.
MAINTENANCE
Electronics are constructed with solid state components and epoxy potted.
Periodically, check and clean the sensor when used with liquids which cause a
coating build up on the sensor. No other maintenance is required.
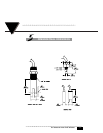
CLEANING
If the pipe or vessel to which the sensor is mounted is to be steam cleaned or
cleaned with abrasive detergents, remove the entire unit before cleaning by:
1. Disconnecting the power at source;
2. Opening the housing cover;
3. Removing power and control wiring cables;
4. Unthreading the sensor.
To reinstall, follow Installation Procedures
SYSTEM MALFUNCTION
Should the system malfunction, notify Omega immediately.
3