


301 Fulling Mill Road, Suite G
Middletown, PA 17057
Phone (800) 321-2343 / Fax (717) 702-2546
www.onqlegrand.com
Page 2 of 3
INSTRUCTION/INSTALLATION SHEET
SINGLE SOURCE 4 ZONE AUDIO
DISTRIBUTION HUB
IS-0320 REV. O
©Copyright 2005 by On-Q/Legrand All Rights Reserved.
A. “Rough-in” steps:
1. Run a Category 5 cable from the room location containing the Single Source Input (typically the
entertainment center location) to the Category 5 Audio Distribution Module located in the Enclosure.
2. Run Category 5 cables from the room locations containing the Volume Controls to the Category 5 Audio
Distribution Module located in the Enclosure.
B. “Trim-out” steps:
NOTE: Make sure that the Power Supply is not connected to the Audio Distribution Hub.
1. Install one or more Audio Distribution Hubs in the enclosure using the 4 corner plungers.
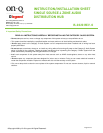
2. Terminate all Category 5 cables
with RJ-45 plugs using the T568A
wiring standard.
Speaker
cable-future
use
To Volume
Controls or Local
Source In
p
uts
To Cat 5 Audio
Distribution Hub
Spare Cat 5
– future use
From Line Level
Output (Tape Out)
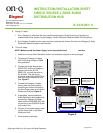
3. Connect the Single Source Input
AUDIO OUT jack via a Category 5
jumper such as the 36” PN
363201-30, to a wall jack with an
RJ-45 insert. This jack in turn
should be wired to the SOURCE IN
jack of the Audio Distribution Hub
(see Figure 2).
4. Connect the Category 5 cables
coming from the room locations
containing the Volume Controls to
the Zone Output jacks on the Audio
Distribution Hub (see Figure 2).
5. If applicable, connect additional
Audio Distribution Hubs together by
connecting a Category 5 jumper
cable from the CASCADE OUT jack
on one Hub to the SOURCE IN jack
on the other Hub.
6. Plug the 24 volt power supply cable
into the Power jack on the Audio
Distribution Hub.
Figure 2
7. Verify system functionality.