


www.oster.com
6
www.oster.com
7
Operating Instructions
Electric Wine Opener Connection and Use
We recommend that you charge your electric wine
opener for at least eight hours before using it for the rst
time. Please follow the instructions for recharging below:
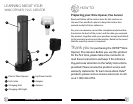
Recharging your Electric Wine Opener
Plug one end of the adapter cord into the base of the
charging unit and the other end into a power outlet.
Place the Electric Wine Opener into charging unit,
ensuring that it is rmly in position and that it is fully
engaged with the charging connection. It will take
approximately 6-8 hours to charge your electric
wine opener. The Charging LED light will illuminate
when unit is charging.
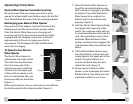
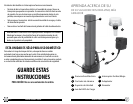
To Operate Your Electric
Wine Opener
The Electric Wine Opener is
operated by one single switch.
The switch has two functions.
Press the lower part of the
switch to remove a cork from
a bottle. Press the upper part
of the switch to release a cork
from the mechanism after you
have removed from the bottle.
(Figure 1)
Before removing the cork you must remove any foil from
the bottle using the foil cutter provided. (Figure 2)
Up
Down
Figure 1
Figure 2
Figure 3
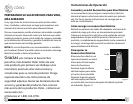
1 Place the Electric Wine Opener on
top of the wine bottle making sure
that it remains as upright as possible
at all times. If you hold the Electric
Wine Opener at an angle to the
bottle it will not remove the cork
properly. (Figure 3)
2 Hold the Electric Wine Opener rmly
and depress the lower part of the
switch. The corkscrew spiral will turn
in a clockwise direction and enter the
cork, then gradually remove it from
the bottle. When the Electric Wine
Opener mechanism has stopped, the
cork has been fully removed from the
bottle.
3 Lift the Electric Wine Opener away
from the bottle. To remove the cork
simply depress the upper part of the
switch. The spiral will turn in a
counter-clockwise direction and
release the cork. (Figure 4)
4 Always return the Electric Wine
Opener to the recharging unit when
nished with it. This will protect the
mechanism while it is not in use.
Figure 4