


Operating Instructions Form No. 102841
Hydraulic Fluid Level
WARNING: Cylinder(s) must be fully retracted before checking the fluid level. Release all system pressure
before breaking any hydraulic connection in the system.
C
heck the hydraulic fluid level in the reservoir periodically. Use a funnel with a filter to add hydraulic fluid if needed.
Refer to Table 1 for your reservoir type.
For models with Reservoir Type A: Place the pump in a
vertical position with the pump head facing upward. Unscrew
and remove the pump head from the reservoir. The fluid level
within the reservoir should come to the fluid level mark
indicated on the reservoir body decal. Before replacing the
pump head, visually inspect the o-ring which seals the pump
head/reservoir assembly. Replace this o-ring if it is worn or
damaged. Reinstall pump head to reservoir and tighten
securely. Check for leaks.
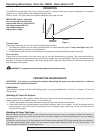
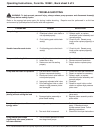
For models with Reservoir Type B: Remove the filler cap.
The fluid level should come to the bottom edge of the filler hole
when the pump is level and resting horizontally on its base and
the cylinders are retracted (see Figure 2 - appropriate view
depends on model of pump).
For models with Reservoir Type C: Remove the filler cap.
The fluid level should be 1/2 inch (12.7 mm) from the cover plate when the pump is level and resting horizontally
on its base and the cylinders are retracted.
Draining And Flushing The Reservoir
Drain, clean and replenish the reservoir with high-grade, approved hydraulic fluid yearly or more often if necessary.
The frequency of fluid change will depend upon the general working conditions, severity of use and
overall cleanliness and care given the pump.
IMPORTANT: Clean the exterior of the pump first. After draining and flushing the reservoir, drain and clean
the other hydraulic system components (hoses, cylinders, etc.) before connecting them to the pump again.
This will help prevent contaminated fluid from entering the pump.
Refer to Table 1 for your reservoir type.
For models with Reservoir Type A:
1. Unthread and separate the pump head from the reservoir. Drain the reservoir of the used hydraulic fluid.
2. Flush out reservoir with a small amount of clean hydraulic fluid. Clean the pump intake filter.
IMPORT
ANT
: Removing the filter from the pump assembly could result in its breakage. Attempt to clean it
as well as possible with it installed.
3. Refill the reservoir and reassemble the pump head to the reservoir. Tighten securely. Check for leaks.
For models with Reservoir Type B:
1. Remove the filler cap. Drain the hydraulic fluid through filler hole.
2.
Remove the nut from the tie rod. Separate the reservoir from the pump body
. Clean the reservoir and filter
.
IMPORTANT
: Removing the filter from the pump assembly could result in its breakage. Attempt to clean it
as well as possible with it installed.
3. Reassemble and fill the reservoir with hydraulic fluid. Replace the filler cap.
For models with Reservoir Type C:
1.
Remove the ten screws fastening the reservoir cover to the reservoir
, and lift the pump and valve assemblies off.
2.
Drain all hydraulic fluid and flush reservoir with a small amount of clean hydraulic fluid.
3.
Remove the pump assembly filter
, rinse it clean, and reassemble.
4. Refill the reservoir with hydraulic fluid. Place the pump and valve assembly
(with gasket) on the reservoir
, and thread the ten screws.
T
ighten securely and evenly
.
Figure 2
OIL
LEVEL
OIL
LEVEL
Sheet No. 3 of 3
Rev
. 4
Date: 23 Jan. 2001
Note: Refer
to appro-
priate end
view for
your pump
model