


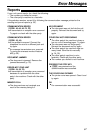

75
7
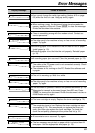
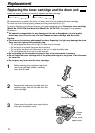
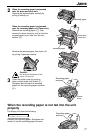
If you replace the drum unit at the same
time, remove the new drum unit from the
protection bag. Remove the protection
bar from the drum unit.
With “Panasonic” face up on the toner
cartridge, match the red arrows on the
cartridge and the drum unit.
Replacement
Used toner cartridge
1
2
Drum unit
Green drum surface
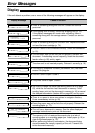
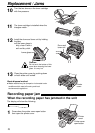
6
Pull up the right edge of the used toner
cartridge (
#
). Remove the cartridge from
the drum unit (
$
).
●
The toner may stick to the cartridge and
the drum unit. Be careful when handling.
See page 7 for details.
●
Do not drop the toner on the green drum
surface.
●
Put the used toner cartridge into the
protection bag.
8
Slide the tab on the toner cartridge into
the slot of the drum unit.
Tab
Slot
9
Firmly press down on the right side of the
toner cartridge to snap into position.
Protection bar
New drum unit
New toner
cartridge
Drum unit
Hold here.
Red
arrows
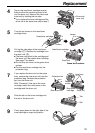
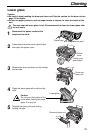
4
Tap on the used toner cartridge several
times to allow the remaining toner to fall
into the drum unit. Remove the drum and
toner unit by holding the two tabs.
●
If you replace the toner cartridge and the
drum unit at the same time, skip to step 7.
Drum and
toner unit
5
Turn the two levers on the used toner
cartridge firmly.
Levers
Used toner cartridge
Levers