


1
2
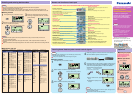
Selecting and entering device codes
■ Setting method
PT-AE900U/E LCD Projector
Remote Control
Quick Reference Guide
TQDJ19023
■ Equipment code list
Manufacturer name
Equipment code
Manufacturer name
Equipment code
Manufacturer name
Equipment code
Two or more equipment codes cannot be entered for the same item of equipment.
Note:
Note:
Note:
Note:
Equipment codes cannot be entered for “PJ”.
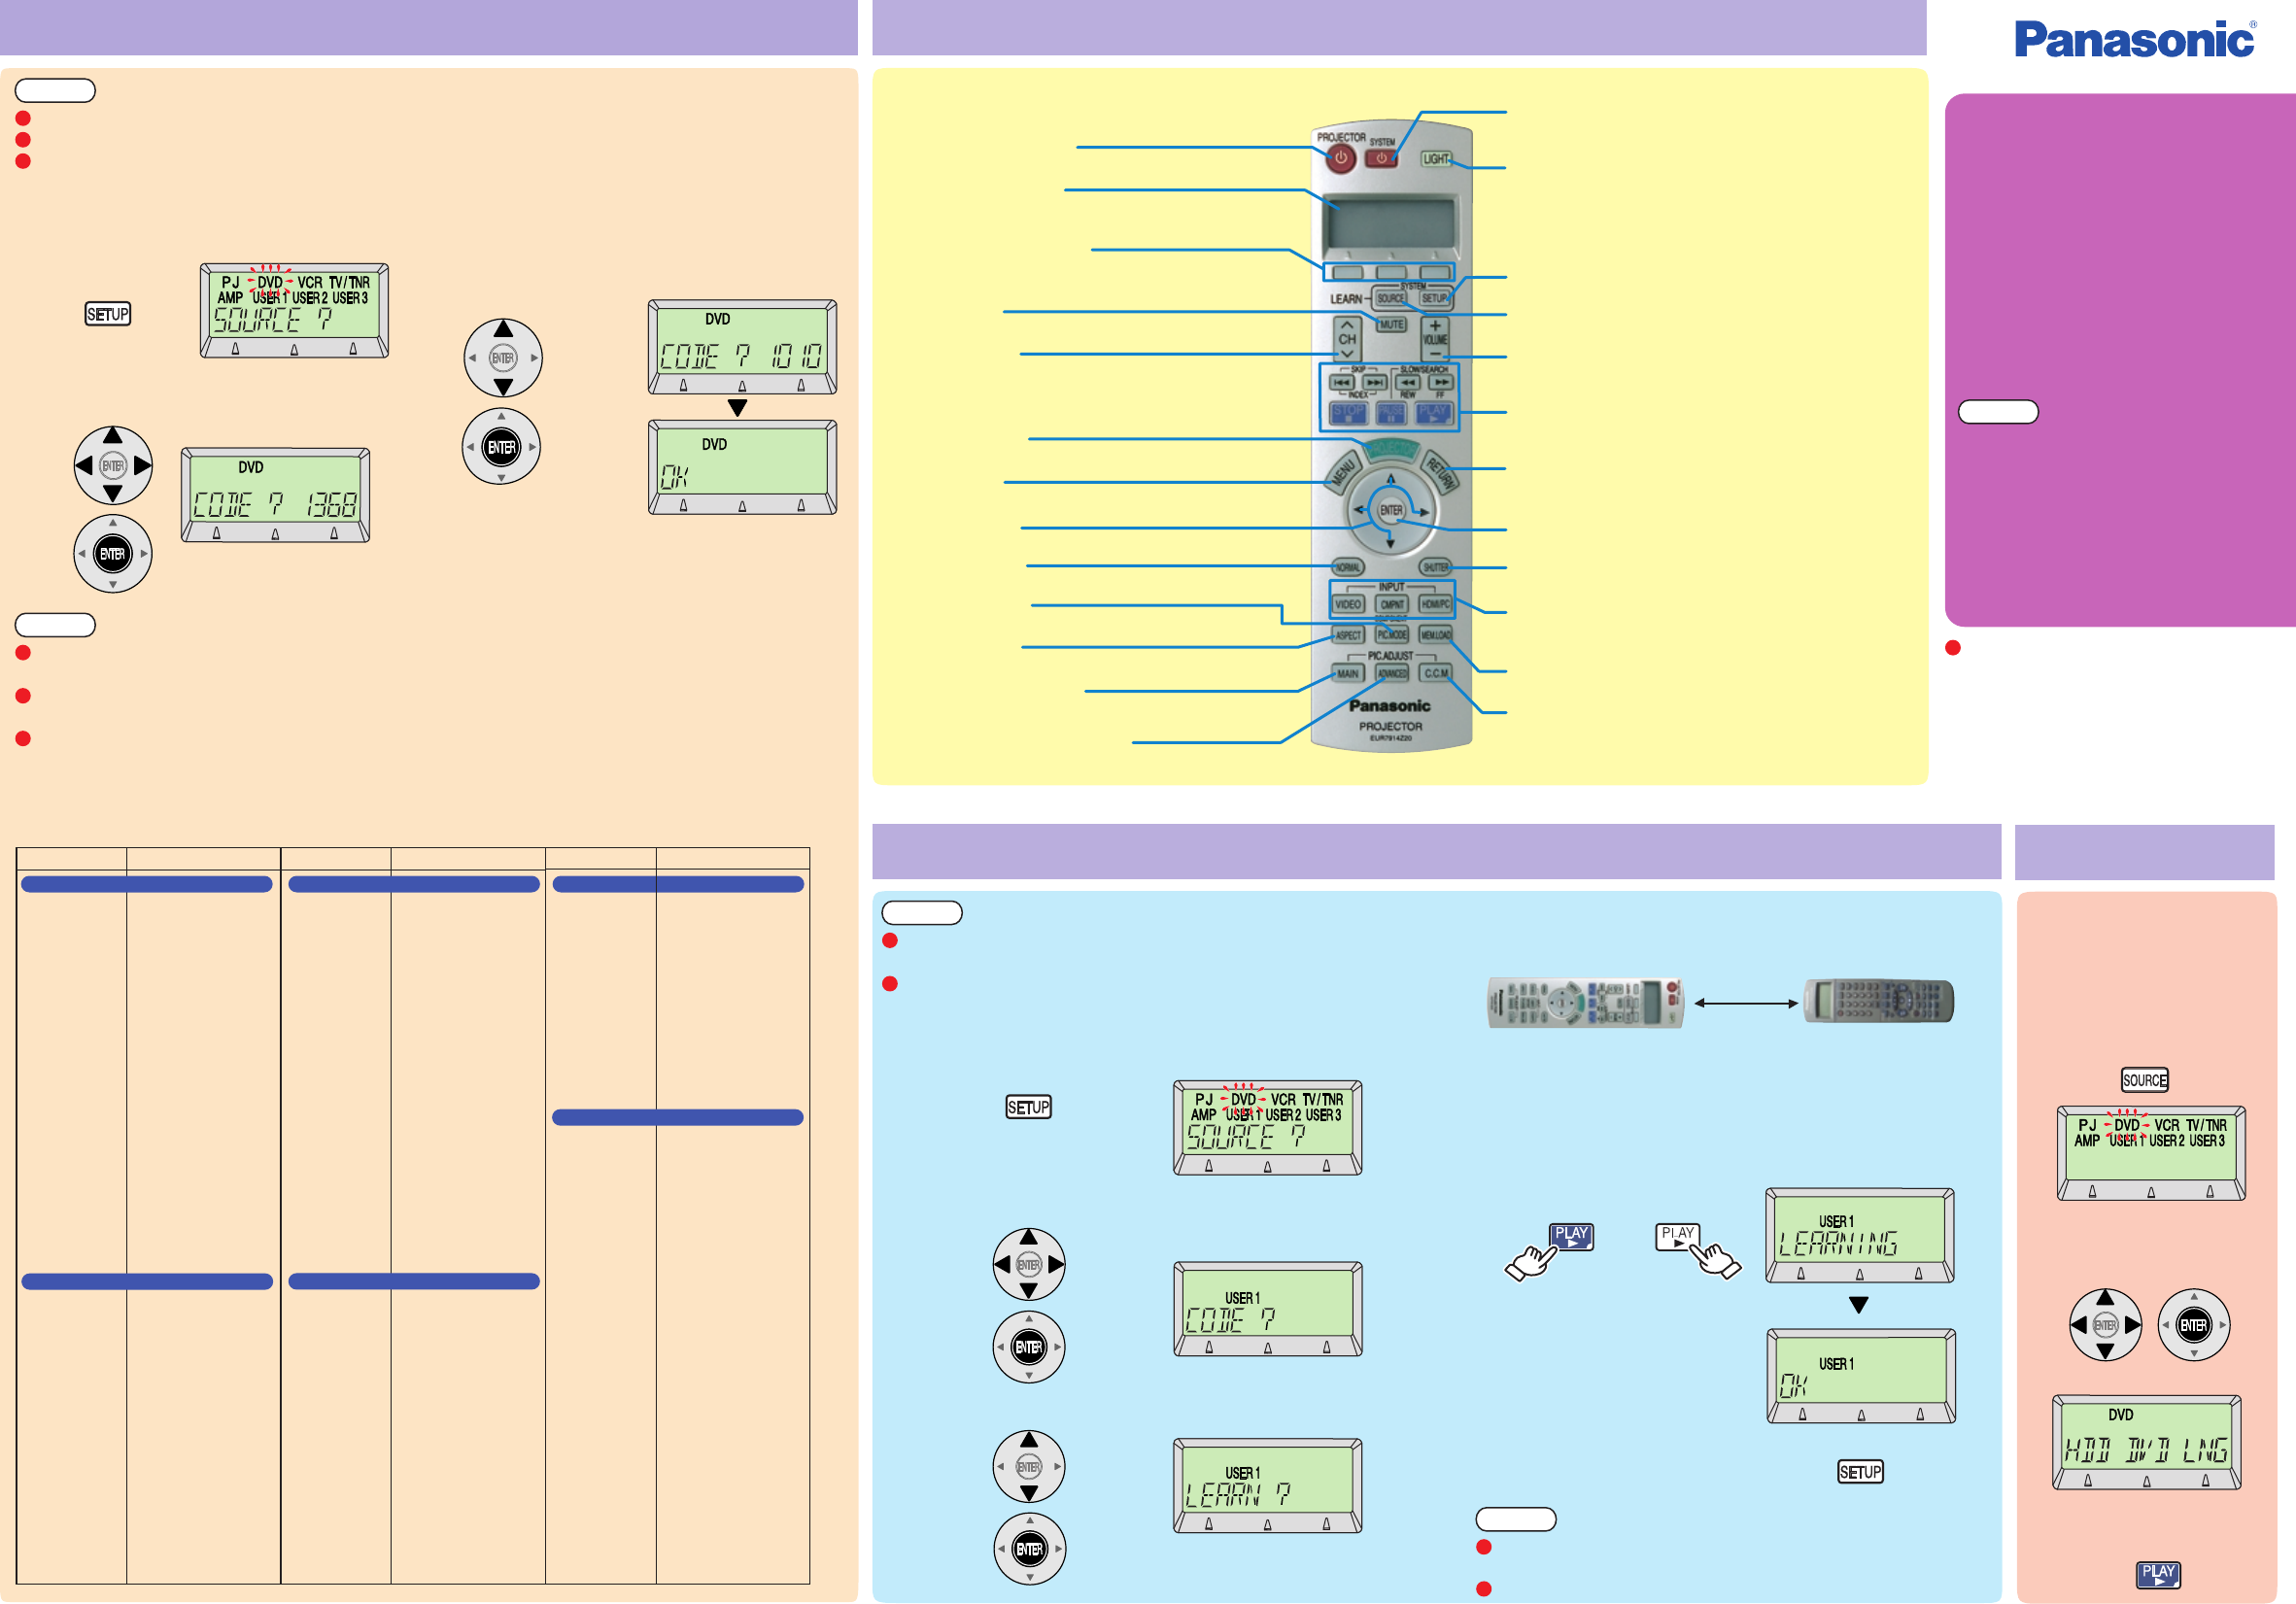
Names and functions of each part
2
3
4
5
Learning home theatre system remote control signals
■ Setting method
(Example: When selecting “USER1”)
Approx. 5 cm
After
5 seconds
✱ Buttons shown in this colour are buttons that can be used for learnt functions.
Operation
1
2
(Example: When selecting “DVD”)
3
Projector’s
remote control
()
Home theatre system’s
remote control
()
■ Other operations
■
Operating the projector
Select the equipment that you would like
to set, and then press [Enter].
Press [SETUP] for 3 seconds or more.
3
Select the desired equipment code while
referring to “Equipment code list”, and then
press [ENTER].
● (Example: When selecting “DVD”)
If the home theatre system cannot be operated with the code you have entered, enter the next
equipment code that is listed.
If the home theatre system does not support this function, it will not operate when the buttons are
pressed.
Refer to the Remote Control Operating Guide for the remote control for details on other setting methods.
Projector power button
This turns the projector power on and off.
System power button
This turns the power supply for equipment other than the
projector on and off.
LIGHT button
This turns on the backlight for the remote control.
SETUP button
This switches to setup mode for the selected system equipment.
SOURCE button
This selects the equipment to be operated.
VOLUME button
This adjusts the sound volume.
ENTER button
This button accepts the selected item.
SHUTTER button
This button lets you momentarily hide images.
Input select buttons
These buttons select the input signals from connected
equipment.
MEM.LOAD button
This displays the “MEMORY LOAD” menu.
C.C.M. (Cinema Colour Management) button
This displays the “COLOUR MANAGEMENT” menu.
DVD/video playback buttons
These buttons are used for functions related to DVD and video
playback.
RETURN button
When a menu is displayed, this button returns to the previous
menu.
Function buttons (A/B/C)
These operate the displayed functions for the selected
equipment.
MUTE button
This mutes the sound.
Channel button
This selects the channel.
Projector button
This switches the remote control functions to projector mode.
MENU button
This switches to menu mode for the selected equipment.
FGHI button
This moves the selection up or down or to the left or right.
NORMAL button
This returns setting values to their factory defaults.
PIC.MODE button
This switches to the image menu.
ASPECT button
This switches the aspect ratio.
MAIN adjustment button
This displays the “PICTURE” menu.
ADVANCED adjustment button
This displays the “ADVANCED” menu.
Liquid crystal display
The top shows the selected device, the bottom shows the
functions of that device that can be operated.
Remote control signals that are not infrared-type (wave format)
signals cannot be recorded.
It may not be possible to record some types of signal.
If the batteries of the remote control are spent, the signals will
not be recorded correctly.
Each button must be recorded separately.
1
Press [SETUP] for 3 seconds or more.
Select “USER 1-3” and then press [ENTER].
Select “LEARN?” and then press [ENTER].
Place the projector’s remote control next to the emitter of
the home theatre system’s remote control.
Press “Select”.
Select the device to be
operated and then
press “ENTER”.
Press the button to
operate.
Press the button on the projector’s remote control that you
would like to learn, and after “LEARNING?” is displayed,
press the corresponding button on the home theatre
system device’s remote control.
✱ To learn another button, repeat
step 5.
✱ If “ERROR” is displayed, return
to step 5.
Note:
In addition to operating the
projector, this remote control can
also be used to make simple
settings for your home theatre
system.
● This remote control is only to be used
for operating home theatre system.
Do not use it for any other type of
equipment.
● It may not be possible to record all
home theatre system operations.
● Refer to the Remote Control
Operating Guide for details on
operation.
Be sure to read the Operating
Instructions for the projector and the
home theatre system also when using
the remote control.
To operate the projector,
press the buttons for the
desired operations.
For device codes that have a power remote control signal, the power remote control signal for the
device will be transmitted when the device code is selected. Turn the power for the device on as a test.
Panasonic 0490, 0503, 0703, 1010,
1011, 1362, 1462, 1490,
1762, 1834, 1905, 1908
DENON 0490, 1634
GE 0522, 0717
HITACHI 0573, 0664, 0695, 0713
JVC 0503, 0539, 0623, 0867,
1164, 1940
LG 0591, 0741, 0790, 0869
Marantz
MITSUBISHI 0521, 0713, 1403
ONKYO 0503, 0627
Philips 0503, 0539, 0646, 0675,
1158, 1818
Pioneer 0490, 0525, 0571, 0631,
SAMSUNG 0490, 0573, 1075, 1928
SANYO 0670, 0695, 0713
SHARP 0630, 0675, 0713, 0752,
1256, 2015, 2024
SONY 0533, 0573, 0864, 1033,
1070, 1431, 1981, 2020
TOSHIBA 0503, 0695, 1045, 2006
YAMAHA 0490, 0539, 0545, 0646
Panasonic 0226, 0616, 0836, 1244,
1515, 1516, 1562
GE 0048, 0226, 0320
HITACHI 0000, 0037, 0042, 0081
JVC 0045, 0067, 0081
Kenwood 0067
LG 0037, 0042, 0045
MITSUBISHI 0000, 0043, 0048, 0067,
0081, 0642
Philips 0000, 0081, 0226, 0618,
0739
Pioneer 0042, 0067, 0081
SAMSUNG 0045, 0432, 0739
SANYO 0048, 0067, 0104, 0348
SHARP 0037, 0048
SONY 0000, 0032, 0034, 0636,
1972
TOSHIBA 0042, 0043, 0045, 0067,
0081, 0352, 0432, 1503,
1972
Victor 0067
Panasonic 0037, 0108, 0208, 0226,
0508, 0548, 0650, 0853,
1333, 1334, 1650
GE 0093, 0178, 0560, 0625
HITACHI 0037, 0108, 0178, 0480,
0481, 0508, 0548, 0578,
0634, 1037
JVC 0093, 0508, 0606, 0650,
0653
LG 0037, 0108, 0178, 0556,
0714
MITSUBISHI 0037, 0093, 0108, 0178,
0512, 0556, 1037
Philips 0037, 0108, 0178, 0512,
0556
Pioneer 0037, 0170, 0486, 0512,
0760
SAMSUNG 0037, 0093, 0178, 0208,
0226, 0370, 0556, 0587,
0618
SANYO 0108, 0170, 0208, 0370,
0508
SHARP 0093, 0650, 1163, 1193
SONY 0037, 0093, 0170, 0650,
1505, 1651
Thomson 0037, 0335, 0560, 0625
TOSHIBA 0093, 0195, 0508, 0618,
0650, 0714, 1163, 1508
Victor 0650, 0653
Panasonic 0000, 0008, 0107, 0375,
1488
Fujitsu 1497
LG 0144
Motorola 0476, 1376, 1483
NEC 1496
Pioneer 0144, 0533, 1500, 1877
Scientific Atlanta 0008, 0237, 0477, 1877
SONY 1006
TOSHIBA 0000
Panasonic 0247, 0500, 0701, 0847,
1508
GE 0392
HITACHI 0819, 1284
JVC 0775, 1507
Marantz 0200
Pionnier 0329, 0352, 0853, 1308
SAMSUNG 0853, 1017, 1108, 1142,
1243, 1244, 1293, 1458,
1570
SONY 0282, 0500, 0639, 0847,
0853, 1639
Thomson 0392, 0713, 0820, 0847,
0853, 1175, 1291, 1498
TOSHIBA 0819, 1749
Panasonic 0309, 1288, 1308, 1316,
1518, 1548, 1633, 1763,
1764, 1765
Aiwa 0121, 1089
BOSE 1357, 1629
DENON 0121, 1104, 1360
JVC 0074, 1495
KENWOOD 0186, 0712, 1313
Marantz 0891, 1089, 1189, 1269,
1289
ONKYO 0135, 1298, 1320
Philips 0891, 1089, 1189, 1269,
1289, 1673
Pioneer 0186, 1023, 1459, 1623,
1656
SAMSUNG 1424
SANYO 1801
SHARP 0186, 1614
SONY 1112, 1158, 1441, 1622,
1658, 1722, 1759, 1822,
1858
Technics 0309, 1308, 1309, 1518,
1633, 1763, 1765
Victor 0074
YAMAHA 0176, 0186, 0712, 1276,
1331
<DVD> DVD/DVD-R
<VCR> VCR
<TV> TV <SAT> Satellite Receiver
<AMP>/<RCV> Audio Amplifier/Receiver
<CBL> Cable Converter
0539
1965
Bang & Olufsen 0565
Bang & Olufsen 0799
To finish, press [SETUP].