


5
Installation Ask your dealer to install the card in the camera.
Bear in mind the following points when installing the card.
≥ Be absolutely sure to ask your dealer to install the card.
≥ Before installing the card, disconnect the camera’s power supply.
≥ Before handling the card, touch a metal part of the camera to release any static stored in
the body.
Wearing anti-static wrist straps is even safer.
Touching the card without first releasing this static may cause malfunctioning.
≥ Do not allow the metal parts of the card come in contact with any other metal parts.
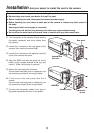
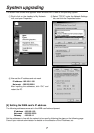
1. Turn the power to the camera off and remove
the power connector and other cables from
the camera.
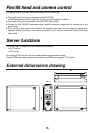
2. Loosen the 4 screws on the rear panel of the
camera, then remove the panel itself.
3. Loosen the 2 screws on the optional card slot
cover, then remove the cover.
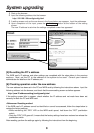
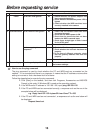
4. Align the WEB card with the guide rail at the
bottom of the camera and tab at the top, and
insert it. Slide it all the way in securely.
5. Secure the card using the 2 screws.
If the screws have been lost or misplaced, use
the accessory screws (6 mm long) instead.
6. Firmly secure the rear panel with the 4
screws.
If the screws have been lost or misplaced, use
the accessory screws (8 mm long) instead.
7. Connect the necessary cables, then plug in
the power connector and turn on the power.
M
E
N
U
O
P
T
IO
N
C
A
R
D
V
ID
E
O
O
U
T
G/L
IN
IR
IS
D
C
1
2
V
IN
I/F
R
E
M
O
TE
I
T
E
M
/
A
W
C
YES/ABC
NO/BAR
M
E
N
U
O
PTIO
N CA
R
D
VID
EO
O
U
T
G/L IN
IR
IS
DC12V IN
I/F REMOTE
IT
E
M
/A
W
C
Y
E
S
/
A
B
C
N
O
/
B
A
R
R
S
T
LIN
K/R
X
1
0
B
A
S
E
–
T
R
S
2
3
2
C
R
D
Y
Rear panel
Optional card
slot cover
Screws
(8 mm)
Screws (6 mm)
WEB card