


4300 Remote Broadband Access Concentrator Installation Instructions
Have the following equipment ready before beginning this procedure:
One drill
One 3/4” x 12” drill bit
One 9/16” wrench
Two 15/16” wrenches
One 7/16” wrench
A pencil
Optional pole mounting kit
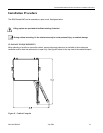
Follow the sequence below for pole mounting.
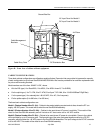
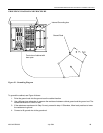
1. Pre-assemble the upper and lower horizontal brackets to the vertical bracket as shown in the above Figure.
2. Select a convenient mounting location on the pole.
3. Position the mounting bracket assembly against the pole and mark on the pole the location of the two (2) 5/8 “
bolts (item 18).
4. Place the mounting bracket assembly out of the way.
5. Drill two (2) 3/4” (19 mm) diameter holes completely through the pole at the locations marked in step 2.
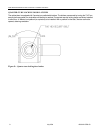
6. Insert machine bolt (item 18) through mounting bracket and into the top mounting hole and press bolt and
bracket flush against the pole.
7. Place round-cupped washer (item 21), with the concave side in, on bolt and finger tighten nut.
8. Repeat step 6 for remaining bolt.
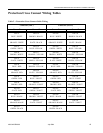
9. Secure the mounting bracket assembly to the pole by securely tightening the machine bolts to 40 ft-lbs for
wooden posts and 100 ft-lbs for metal posts.
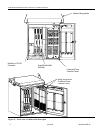
10. Using proper lifting and safety equipment, place cabinet on mounting bracket assembly using supplied 3/8”
hardware and tighten to 45 ft-lbs. Lifting eyelets are provided on the cabinet for hoisting it in place.
11. If the cable stubs connect to an underground cable, dress the cable down the pole. If the cable stubs connect to
an aerial cable, form a drip loop in the cable and dress it up the pole to the splice case.
For mounting heights less than 7’ above grade, excess bolt length may need to cut off in order to prevent
a hazardous protrusion.
Lifting eyelets are provided to facilitate hoisting if desired.
4300-A2-GZ40-00 July 2004 11