


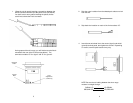
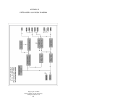

4. Place the 2 halves of the strain relief assembly on either side
of the telephone wire and press together very lightly. Slide the
assembly until it is 2 inches from the terminal posts and press
together firmly.
5. Insert the strain relief assembly and connected wire into the
slot in the bottom half of the modem case; set it into the recess
in the case. (If the telephone wire does not fit into the strain
relief assembly, call Patton’s sales department to obtain a new
assembly).
6. BEND the top half of the case to place it over the strain relief
assembly. Do not snap the case together yet.
7. Insert one captive screw through a saddle washer and then
insert the entire piece through the hole in the DB-25 end of the
case. Snap that side of the case closed. Repeat on other
side. This completes installation.
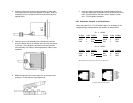
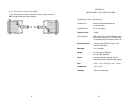
3.2.2 Connection Using RJ-11 and RJ-45 Jacks
When using the RJ-11 or RJ-45 modular jacks it is necessary to use
“straight through” cabling between the modems as shown below:
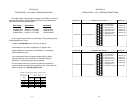
RJ-11 JACKS
SIGNAL PIN# COLOR
†
COLOR PIN# SIGNAL
DATA 3 Green Green 3 DATA
GND 4 Red Red 4 GND
RJ-45 JACKS
SIGNAL PIN# COLOR
†
COLOR PIN# SIGNAL
DATA 4 Red Red 4 DATA
GND 5 Green Green 5 GND
†
Standard color codes—yours may be different
AT &T standard color codes:
7 8
1 - Blue
2 - Yellow
3 - Green
4 - Red
5 - Black
6 - White
1 - Blue
2 - Orange
3 - Black
4 - Red
5 - Green
6 - Yellow
7 - Brown
8 - Slate