


8
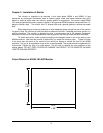
15.0"
±.02"
12.0"
±.02"
Chapter 2 - Installation of Monitor
This monitor is intended to be mounted in and used where NEMA 4 and NEMA 12 type
enclosures are employed. Enclosures made of heavier gauge metal work better because they won’t
deform or bend as easily when the monitor’s sealing gasket is compressed. The monitor meets NEMA
4/12 sealing specifications when properly installed in an approved NEMA enclosure constructed from 14-
gauge or heavier steel. The monitor uses “U”-shaped clips and a special gasket to achieve the proper
seal.
When selecting an enclosure remember to allow adequate space around the rear of the monitor
for good air flow. Do not block air flow from below or above the monitor. If possible mount the monitor in a
vertical orientation. The monitor is designed to work in environments up to 50 degrees Centigrade.
Remember to account for heat dissipated from other equipment that may be inside the same enclosure.
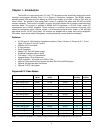
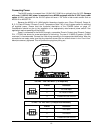
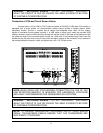
To install the monitor, make a cutout according to the diagram below in one of the walls of your
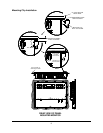
NEMA enclosure. Next hold the monitor in place while you install the mounting clips. Tighten the clips
to the point were the back of the monitor’s front bezel just begins to contact the front of the NEMA
enclosure. The use of an adjustable torque driver is recommended. The screws should be tightened to 8
inch-pounds. Tighten the clips in a cross pattern. This will help to develop an even pressure on the
sealing gasket. DO NOT OVER TIGHTEN AS DAMAGE CAN RESULT IN THE MONITOR CAUSING
LOSS OF SEALING INTEGRITY.
Cutout Pattern for M1500 / M1500T Monitor