


E-14
The Procedure Up to Projecting to the Screen
Perform setup adjustments in the following order.
1 Position the projector
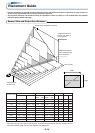
Determine the locations to set up the screen and the projector.
See “Placement Guide” on Page E-15.
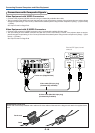
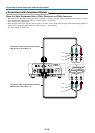
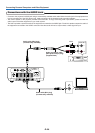
2 Connect the video equipment and personal computer
Connect your equipment to the projector.
When making connections with the personal computer’s RGB connector, see “Connections with
Personal Computer” on Page E-16.
When making connections with the video equipment’s video connector or an S-video connector,
see “Connections with Composite Signals” on Page E-18.
When making connections with the video equipment’s YCbCr connector or YPbPr connector,
see “Connections with Component Signals” on Page E-19.
When playing the audio through the built-in speaker of the projector, see “Connections with the
AUDIO Jack” on Page E-20.
About DLP
®
projectors
Though careful attention is paid to providing optimum quality, please note that with DLP
®
type projectors, in rare cases there may
be black spots or bright spots among the picture elements.
Note:
* Please purchase a screen.
* A component cable, which is commercially available, is required to connect a DVD player or other equipment having YCbCr connectors.
* A component cable, which is commercially available, is required to connect high definition (HD) video equipment or other equipment
having YPbPr connectors.
3 Open the lens cover
5 When selecting the language of menu displays, etc.
(Only when the power is first switched on following purchase)
See “When [Menu Language Select] is Displayed Upon Switching On the Power” on Page E-22.
6 Switching on the power of the personal computer and video equipment
7 Properly adjust the projection image to the screen
See “Adjustment of the Projection Screen” on Page E-24.
8 Selecting input equipment
See “Input Selection” on Page E-26.
9 Adjust the screen or video image
Adjust the image to the optimum condition as required.
See the Table of Contents for the adjustment items.
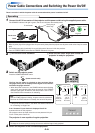
4 Connect the power cable and switch on the projector power
See “Operating” on Page E-21.
See “Finishing” on Page E-23.