


E – 26
Setting the Cinema Mode
This is the setting for enjoying video in a dark or light
room.
This feature emphasizes the White which is available on
Video and S-Video input.
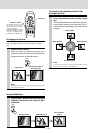
1 With the FLIP COVER of the remote con-
trol open, press the MENU button to dis-
play the Advanced menu, then use the
cursor ̇ / ̈ keys to select “COLOR”.
2 Use the cursor ̆ / ̄ keys to select “CIN-
EMA”.
3 Use the cursor ̇ / ̈ keys to set the
“CINEMA”.
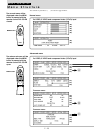
The following can be selected.
"ON" is for a darkened room. Color around white
portion is natural and smooth.
"OFF" is for a bright-lit room. White is empha-
sized.
Selecting the Color System
The following color systems can be used with this device.
● NTSC 3.58 ● NTSC 4.43
● PAL ● PAL-M ● PAL-N ● PAL60
● SECAM
Only NTSC 3.58 and PAL can be used for component
video.
Selection is automatic when AUTO is used.
1 Select an input for the color system to be
selected (page 16).
2 With the FLIP COVER of the remote con-
trol open, press the MENU button to dis-
play the Advanced menu, then use the
cursor ̇ / ̈ keys to select “COLOR”.
3 Use the cursor ̆ / ̄ keys to select
“COLOR SYSTEM” and then press the
ENTER button.
4 Use the cursor ̆ / ̄ keys to select the
color system and then press the ENTER
button.
Setting Narrow Images (Advanced
Menu)
Set the colors as desired in accordance
with the image contents.
Subtle color settings are possible, as desired. Setting is
possible for each input.
1 Select the image to be input (page 16).
2 With the FLIP COVER of the remote con-
trol open, press the MENU button to dis-
play the Advanced menu, then use the
cursor ̇ / ̈ keys to select “COLOR”.
3 Use the cursor ̆ / ̄ keys to select
“GAMMA”.
4 Use the cursor ̇ / ̈ keys to set the
“GAMMA”.
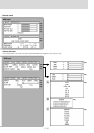
The following can be selected.
● Normal ● Natural ● Real ● Custom
Normal is standard settings; Natural stresses
coloring; Real stresses (brightness). Custom is
used to adjust freely as desired.
5 Use the cursor ̇ / ̈ keys to select “CUS-
TOM”, press the ENTER button to display
the sub-menu and then set the gamma
value. There are 31 index values.
Adjusting Color Balance
Color balance (white balance) can be set for each input.
1 Select the image to be input (page 16).
2 With the FLIP COVER of the remote con-
trol open, press the MENU button to dis-
play the Advanced menu, then use the
cursor ̇ / ̈ keys to select “COLOR”.
3 Use the cursor ̆ / ̄ keys to select
“COLOR TEMP”.
4 Use the cursor ̇ / ̈ keys to select the
“COLOR TEMP”.
Four different types of color balance can be set
beforehand: Low, Medium, Standard and High.
When the ENTER button is pressed, the
sub-menu will be displayed to enable fine
adjustment.
To select other menu names
Press the MENU button. The cursor will disappear and the menu
selection screen will be displayed.
To close the menu
Press the CANCEL button.