


E – 13
Changing the computer’s video
resolutions
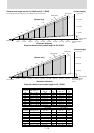
Depending on your computer's graphics capability, you may be
able to select one of several resolutions. Generally a computer-
either a PC or Macintosh- with 1 MB VRAM will generally run:
640 × 480 at 16.7 million colors (24 bit true color)
800 × 600 at 65,000 colors.
1024 × 768 at 256 colors.
As the resolution increases, the number of colors you can run
decreases. With 2 MB VRAM a computer will generally run:
640 × 480 at 16.7 million colors (24 bit true color).
800 × 600 at 16.7 million colors (24 bit true color).
1024 × 768 at 65,000 colors.
1280 × 1024 at 256 colors.
Windows 98/Windows 95
There are two methods you can use to change your resolution.
Method 1
1Move your cursor to the background image and R-click.
2 In the “Properties” menu, select “Settings.”
3 Change your resolution and click “OK.”
4You may be asked to reboot for the changes to take effect,
or a message may appear saying that “Windows is about
to resize your display.” You’ll be asked if you want to
keep your settings. Select “Yes.”
Method 2
1 Click on your “My Computer” icon.
2 Open “Control Panel” and select “Display.”
3 Change your resolution and click “OK.” after the new
resolution is selected.
4You may be asked to reboot for the changes to take effect,
or a message may appear saying that “Windows is about
to resize your display.” You’ll be asked if you want to
keep your settings. Select “Yes.”
Windows 3.1
1 Click on the “Main” icon and open “Control Panel.”
2 Select “Change System Settings” and click on “Option.”
3 Choose “Change Display Settings.”
4 Select the resolution you want.
5 Choose the current or desired drive.
6 Restart Windows for the changes to take effect.
Macintosh
1 Under the Apple menu, select “Control Panels” and open
“Monitors.”
2 Click and open “Options.”
3 Select your new resolution and click “OK.”
Notebook computers and resolution
standards
(U3-1100WZ, U3-1100W, U3-1100SF)
The unit is designed to project industry standardized video such as
VESA (Video Electronics Standards Association) or XGA
(eXtended Graphics Array). Notebook computers do not use indus-
try standards. They use whatever timing is necessary to match their
local LCD display. The end result is typically not standard. By
turning off your notebook's display, the timing parameters are a bit
more like the real VESA or XGA signal.
(U3-810WZ, U3-810W, U3-810SF)
The unit is designed to project industry standardized video such as
VESA (Video Electronics Standards Association) or VGA (Video
Graphics Array). Notebook computers do not use industry stan-
dards. They use whatever timing is necessary to match their local
LCD display. The end result is typically not standard. By turning off
your notebook display, the timing parameters are a bit more like the
real VESA or VGA signal.
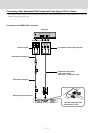
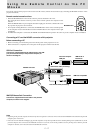
Outputting Notebook Type Personal
Computer External Output Signals
When a notebook type personal computer is connected for use in
projecting, a certain amount of knowledge is necessary for cable
connection, startup and the succeeding operations. Please refer to
the instruction manual of your notebook type personal computer
when performing the following operations.
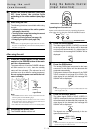
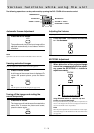
1. Make sure that this device is receiving signals
from your notebook type personal computer.
The external signal may not be output even though the LCD
screen of the notebook type personal computer indicates such
output. Check by using the INFORMATION menu displayed
by this device (page 20, 21).
If 0kHz is displayed, there is no external output signal from the
personal computer.
2. If the notebook type personal computer is not
outputting the external signal, perform the fol-
lowing operation.
For IBM PC/AT machines, press either the [Fn] key or one of
the [F1] - [F12] keys.
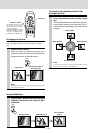
Note
When displayed on the LCD screen of a notebook type personal
computer and this device at the same time, the projected video
may not be correct even the LCD screen display is normal. In
such case, turn off the notebook type personal computer display
and try using only the external output mode. (In some cases,
external output only can be set by performing step 2 above or by
closing the LCD panel.)