


PBM-070L
Page - 7 - Installation Manual
If installing a PBM-070L from the ceiling structure, please refer to the installation instructions that are included with
those mounts.
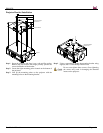
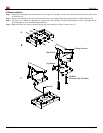
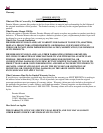
Step 10. Install the jam screw all the way up to the end of the threads of the threaded PBM-070L.
Step 11. Screw in the 1½" bridge opening to the PBM-070L all the way up to the jam screw.
Step 12. Tighten the jam screw and the base box together.
Step 13. Loosely install the hinge pin screws, flat washer and conical spacer to each side of the base box.
Step 14. Slide the conical spacer and the flat washer to the back of the screws.
Step 15. Raise the projector mount, attached to the projector’s chassis, and insert the hinge-pins through the hinge-pin openings.
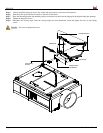
Step 16. Raise the rear of the projector and install the four (4) M6 x 12 mm tilt locking screws to the rear of the base box; adjust the
tilt and lock it.
Step 17. Tighten the two (2) M6 x 12 mm hinge pin screws.
Step 18. At this time, use the M3 Allen wrench to tighten the M6 x 6mm set screw.
Projector Adjustment
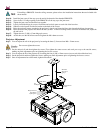
Step 1. You can adjust the roll of the projector by loosening the three (3) front and rear M6 x 12mm screws.
Do not over-tighten the screws.
Step 2. Set the desired roll and then tighten the screws. First tighten the center screws and work your way to the outside screws,
making any final adjustments prior to tightening the last two screws.
Step 3. You can adjust the tilt of the projector by loosening the four (4) M6 x 12mm screws (two on each side of the base box).
Step 4. Set the desired tilt and then tighten the screws, making any final adjustments prior to tightening the last two screws.
Step 5. Once all adjustments have been made, tighten all hardware.
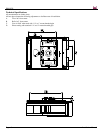
AST-2446,
AST-1321 or
1
2
" Pipe
M6SetScrew
Tilt
Locking Screws
H
inge Pin Screw
Flat Washer
NylonSpacer
Roll Adjustment
Screws