


This sheet describes the installation and use of the CD-R Business Card
Adapter Kit for the Composer™ Optical Disc Duplicator and the
Conductor™ Optical Disc Autoloader (referred to hereafter as the
“Duplicator”).
NOTE: The Business Card Adapter Kit is designed to work best with the
Signature
®
IV and SignaturePro
®
CD Color Printers from Primera
(referred to hereafter as “Printer”).
SECTION I: SETUP
1.
Check to make sure the following items are enclosed:
• CD-R Business Card Input Bin
• Output Spindle
• CD-R Drive Ring
• CD Business Card Tray Template Assembly (2 pieces)
• 5 Printable Surface CD Business Cards
•
Card CD-R Containing Software Templates
Figure 1: Input /Output Bins
2.
Place the Output Spindle in the center of the Output Bin on the left
side of the Duplicator.
3.
Remove the original Input Bin and place the CD-R Business Card
Input Bin on the right side of the Duplicator.
4. Install the CD-R Business Card Clamp Assembly in the Printer Tray
as shown below. The Front Template has molded pegs that mate
with holes found toward the front of the printer tray. The Hook on
the underside of the Rear Template rests on the metal clamp locat
e
to the rear of the printer tray. When properly installed, the metal
clamp adjusts the Rear Template forward to hold the card in place
when the tray retracts into the printer.
Front
Template
Rear
Template
Metal Clamp
Figure 2: CD Business Card Clamp Assembly
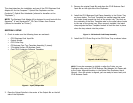
5. Install the CD-R Drive Ring in the CD-R Drive Tray as shown below
NOTE: It may be necessary to slightly re-align the Printer on your
Duplicator when using the CD-R Business Card Adapter Kit. Please ref
e
to the Printer Alignment section in the Optical Disc Duplicator User’s
Manual. Once the printer is aligned, you are ready to record and print
CD-R Business Cards.
Figure 3: CD-R Drive Ring