


3
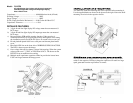
To Charge the capacitor:
1. Make Capacitor positive terminal connections with amplifier and
tighten the bolt. Do not over-tighten the bolts!
Caution:
Stripped terminals are not covered under the capacitor’s warranty.
2. Connect the ground cable with battery, amplifier, then refer to the
attached drawing.
3. Place the supplied charging bulb or resistor between the positive
terminal of the capacitor and the battery’s positive terminal. Do this for
30 seconds or until the charging bulb goes out.
Caution:
The charging bulb will get hot!
4. Immediately after the charging process, take out the charging bulb from
the connecting wire. And connect the positive cable of the battery
directly to the positive terminal on the capacitor.
DISCHARGING THE CAPACITOR:
WHEN YOU WANT TO MOVE THE CAPACITOR FROM ORIGINAL
INSTALLED CAR AUDIO SYSTEM,
YOU MUST FIRST FOLLOW
DISCHARGING PROCESS AFTER TAKING OUT THE CAPACITOR
FROM THE CAR AUDIO SYSTEM.
To Discharge the capacitor: With battery power disconnected, place the light
bulb or resistor across the capacitor’s positive and negative terminals until
light goes out or for three minutes if using a resistor.
4
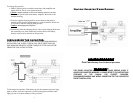
Multiple Capacitor Wiring Diagram:
LIMITED WARRANTY
One Year Warranty from the date of purchase.
WARNING!!
THIS POWER CAPACITOR MAY EXPLODE AND CAUSE SERIOUS INJURY IF
ABUSED OR CONNECTED IMPROPERLY. PLEASE REFER TO THE INSTRUCTIONS
CONTAINED IN THIS MANUAL FOR CORRECT MOUNTING,
CHARGING/DISCHARGING AND WIRING CONNECTION FOR THIS CAPAPCITOR
PRIOR TO INSTALLATION.