


SANbox 5000/9000 Series Stackable Chassis Switch Stacking Cable Instructions
© 2008 QLogic Corporation. Specifications are subject to change without notice. All rights reserved worldwide. QLogic, QLogic logo and SANbox are trademarks or registered trademarks of
QLogic Corporation. All other brand and product names are trademarks or registered trademarks of their respective owners. Information supplied by QLogic Corporation is believed to be
accurate and reliable. QLogic Corporation assumes no responsibility for any errors in this brochure. QLogic Corporation reserves the right, without notice, to make changes in product design
or specifications.
D
D
Corporate Headquarters QLogic Corporation 26650 Aliso Viejo Parkway Aliso Viejo, CA 92656 949.389.6000 www.qlogic.com
Europe Headquarters QLogic (UK) LTD. Quatro House Lyon Way, Frimley Camberley Surrey, GU16 7ER UK +44 (0) 1276 804 670
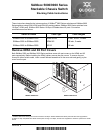
Connect SANbox 5000 Series Switches
Using an XPAK-XPAK connector, install the cable connectors with the circuit board toward the mid line
of the respective switch faceplates. The cable connector will fit only one way. When installing the
3-inch XPAK cable, insert the cable connectors into the XPAK ports at the same time as shown.
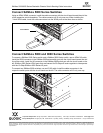
Connect SANbox 5000 and 9000 Series Switches
To connect a SANbox 5000 Series switch and a SANbox 9000 Series switch, use an XPAK-X2 cable.
Install the XPAK connector in the SANbox 5000 series switch port with the circuit board toward the mid
line of the switch. Install the X2 connector in the SANbox 9000 switch port with the circuit board on the
left. SANbox 5800 Series XPAK ports that are licensed for 20-Gbps will auto-negotiate to interoperate
with the 10-Gbps SANbox 9000 Series X2 ports.
To connect two SANbox 9000 switches, use an X2-X2 cable. Install the cable connectors in the
respective switch ports with the circuit boards on the left. The cable connector will fit only one way.
Circuit Board