Quick Installation Guide Applicable models: 4/8/16-port 19” Rackmount PS/2 KVM Switch
Rev. 1.6 Copyright© All rights reserved.
AGDI FEATURING HOT-PLUGGING & PLUG-AND-PLAY
4/8/16-port 19” Rackmount PS/2 KVM Switch
Quick Installation Guide
Thank you for purchasing the 4/8/16-port 19” Rackmount PS/2 KVM
Switch! This Rackmount KVM Switch is designed for computer/server
management on a centralized single admin desk in corporate, factory as
well as in campus computing environment. It features a console port to
connect your shared keyboard, video and mouse, and 4/8/16 PC ports to
connect to your computers/servers. You can simply place it on desktop or
mount it on a standard 19” rack for more secured and centralized
management.
This KVM Switch features a metal enclosure for better shielding against
electromagnetic interference commonly seen in lab or factory floor
environment. It also features a hot-plugging capability that allows you to
plug off and on the KVM cablings without powering down a whole rack of
servers, especially convenient when you are working on a sever rack.
With our highly reliable and quality product, user can enjoy countless
benefits from using it.
4-port
8-port
16-port
Before you install
The default setting of the 4/8/16-port 19” Rackmount PS/2 KVM Switch
is appropriate for most systems. In fact, you do not have to make any
configuration before installation. It’s an out-of-the-box installation: Just
connect and set up the cable connections for the KVM switch and your
computers, boot them up in correct sequence and you can start to
operate immediately!
For a quick start on installation and operation, please follow the
instructions below.
Out-of-the-box Installation
Take the KVM Switch out of the box and begin installation...
If you are using only window PCs: for the first-time
installation, you don’t even need to power down all the
computers that are going to be connected to the KVM Switch…..
The hot-pluggability of this KVM Switch allows “hot-plugging” of the
KVM cables while the computer is powered on, and your mouse will stay
alive throughout. It is especially convenient when you have to change or
rearrange the KVM cablings of your computers while still want to keep the
computers working.
If you are using any Linux PCs: you might possibly experience a
lock on mouse if hot-plugging it to the KVM switch (since Linux is not a
PnP OS somehow)… If your mouse gets locked, you can try to use the
mouse reset hotkeys (see the Quick Reference Sheet) to bring it back
to normal. Another alternative is to turn the Linux PC off before
connecting it to KVM Switch.
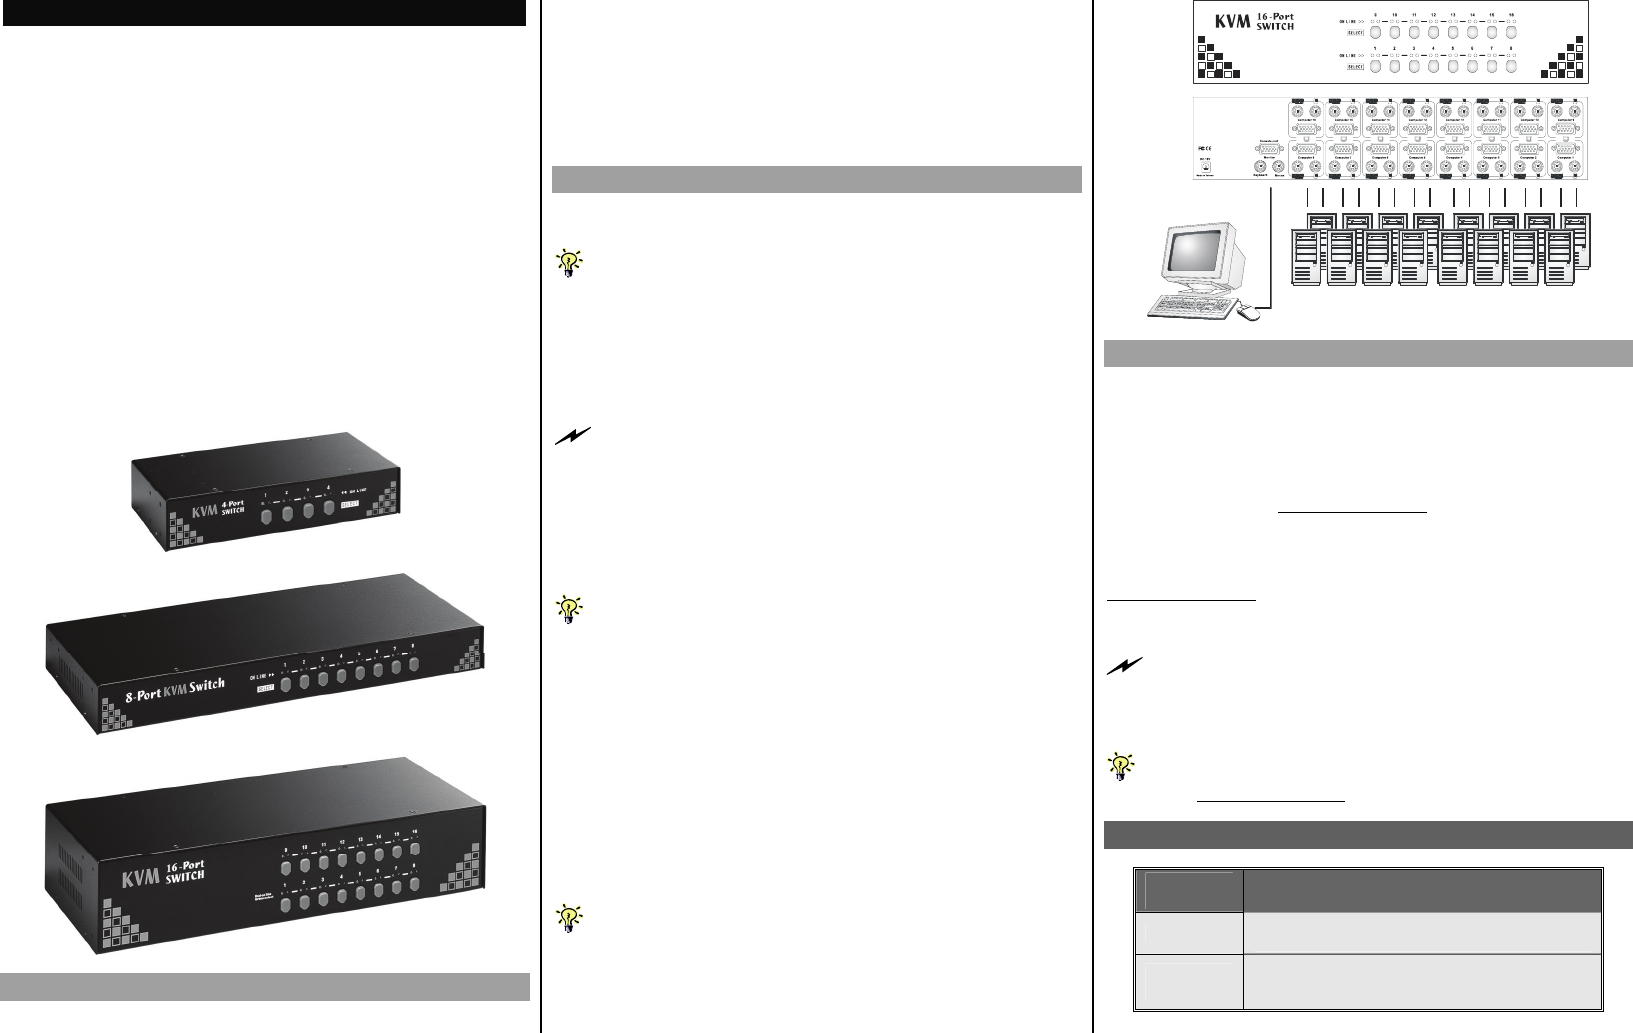
Step 1. Connect the shared mouse, keyboard and monitor to the console
port connectors on the backpanel of your KVM Switch.
Note that since the KVM Switch is powered through the PS/2
interface, it is powered on immediately when connected to the PS/2
keyboard/mouse port of your PC (nonetheless even when the PC being in
powered off state, the PS/2 interface is still live with electricity).
Step 2. Just connect your computers (no matter they are powered on or
off!) to the PC ports at the backpanel of the KVM Switch using
the KVM combo cables. You can use individual standard
keyboard, mouse and video cables for connection, although the
3-in-1 combo cable is highly recommended for your
convenience.
Step 3. If your computer is still not powered up, then power them up.
Once the computers are powered up (or they are already
powered on before connecting to KVM Switch), you can
manage all of them through the KVM Switch.
If you experience mouse lock on any of your computer, You can use
the mouse reset hotkey sequence to regain the mouse control (see the
Quick Reference Sheet).
Easy Operation
There are two methods to select a specific computer, using a front-panel
push button or a hotkey sequence.
Front-panel push buttons
The front-panel buttons let you have direct control over KVM switch
operation and channel switching. Simply press a button to switch to its
corresponding channel.
See Quick Reference Sheet
Keyboard hotkeys
A keyboard hotkey sequence consists of at least three specific keystrokes:
See Quick Reference Sheet
Hotkey sequence = ScrLk + ScrLk + Command key(s)
The two consecutive ScrLk keystrokes should be pressed within 2
seconds and the following command key(s) should also be pressed within
2 seconds in likewise manner. Otherwise, the hotkey sequence will not be
validated.
For detailed Hotkey sequences and their corresponding functional
commands.
See Quick Reference Sheet
System Requirements
Model
Number
4/8/16-port Rackmount PS/2 KVM
PC Side
4/8/16 x KVM Combo Cable ( PS/2-PS/2-
HDB-15 interface, all-male)
Console
Side
1 x PS/2 Keyboard
1 x PS/2 Mouse
1 x Monitor


