


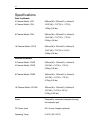
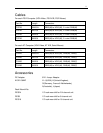

3
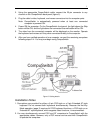
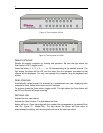
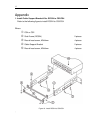
2. Using the appropriate CompuSwitch cable, connect the 25-pin connector to any
channel on the CompuSwitch back panel (figure 5).
3. Plug the cable’s video, keyboard, and mouse connectors into the computer ports.
Note: CompuSwitch is automatically powered when at least one connected
computer is powered ON.
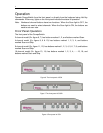
4. Power ON the computer. On the CompuSwitch front panel, the light above the Skip
button will be ON, and the light above the connected channel button will be ON.
5. The video from the connected computer will be displayed on the monitor. Operate
the keyboard and mouse as if they were connected directly to the computer.
6. After you have verified operation of one computer, connect the remaining computers
following steps 2–4. You may now begin using CompuSwitch.
Figure 5. Cabling details
Installation Notes
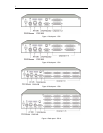
1. Connections are provided for either a 6-pin PS/2-style or a 5-pin Extended AT-style
keyboard. Do not connect both keyboards simultaneously. Because the Hot Key
Mode operation (page 9) requires full PS/2 keyboard functions, a PS/2-style or an
Extended AT-style keyboard, which supports these functions, is recommended.
2. You may simultaneously connect PS/2 and AT computers to CompuSwitch with the
appropriate cables. However, only a PS/2 mouse can be used with CompuSwitch
to operate the computers.