


1. Installation
Do not connect the E8a emulator hardware until the software support has been installed.
1. Insert the CD into your computer’s CD-ROM drive. The CD should automatically run the installation program. If
the installer does not start, browse to the CD root folder and double click on “setup.exe”.
2. The installer will ask you which language is to be used, please choose the appropriate one.
3. On the first screen of the installer proper, click <Next>.
4. The License Agreement will be shown, click <Yes>.
5. The next screen asks you to pick the world region – please select and click <Next>.
6. Select the Renesas Starter Kit you wish to install and click <Next>.
7. The destination folders are specified on the next screens. It is recommended to accept the default settings.
Click <Next> to continue.
8. Click <Next> on all screens until the installation process commences.
9. After the installation the machine’s site code will be shown, this is not important at this stage, click <Next>.
10. Ensure ‘Launch AutoUpdate’ is selected and click <Finish>.
11. Configure Auto-Update to finish the installation.
2. Connection
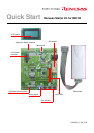
12. Now connect the E8a to J6 on the board using the ribbon cable, also connect the LCD module to J8 on the
board ensuring that the pin 1 designation corresponds to the marking on the board.
13. Connect the E8a emulator to a spare USB port.
The “Found New Hardware” Wizard will appear. Please follow the steps below to install the drivers. Note that
administrator privileges are required for a Windows
TM
2000/XP machine.
14. Select ‘No, not this time’ if dialog appears and click <Next>.
15. Verify the “Recommended” option is selected and click <Next>.
16. If using Windows XP, skip to step 18; otherwise click <Next>.
17. Click <Next> to install the driver.
18. Click <Finish> to close the wizard.
Note: The Windows driver signing dialog may be displayed. Please accept the driver to continue.
3. High-performance Embedded Workshop Workspace
High-performance Embedded Workshop integrates various tools such as compiler, assembler, debugger and editor
into a common graphical user interface. To learn more on how to use High-performance Embedded Workshop, open
the High-performance Embedded Workshop manual installed on your computer (Start Menu > All Programs >
Renesas > High-performance Embedded Workshop > Manual Navigator).
19. Launch High-performance Embedded Workshop from the Start Menu. (Start Menu > All Programs > Renesas >
High-performance Embedded Workshop > High-performance Embedded Workshop)
20. In the “Welcome” dialog box: Verify “Create New Workspace” is selected. Click <OK>.
21. In the “New Project Workspace” dialog box: Set the “CPU Family” to “M16C”, and verify the “Tool chain” is set to
“Renesas M16C Standard”. Select “E8A_RSKR8C1B” from the left hand pane.
22. Enter a name for the workspace. The project name will be automatically completed with the Workspace name.
You can change this name to “Tutorial” if required. Click <OK>.
23. On the “E8A_RSKR8C1B- Step 1” window: Select “Tutorial” and click <Next>.
24. On the “E8A_RSKR8C1B- Step 2” window: Click <Finish>.
25. On the Project Generator Information window: Click <OK>.
The project that is created has two configurations. The Release configuration can be used for the final release code
version. The Debug configuration allows modifications to the configuration for debugging.