


5RF-700WPS
4 Disconnect all PSU connectors from the motherboard and the
peripherals devices such as case fans, HDD, FDD, DVD, CD-ROM, and so
on.
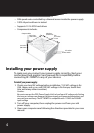
5 Remove the old power supply from your computer case and install your
new Rocketfish power supply.
6 Connect the 24-pin Main Power Connector to your motherboard.
Note:
Use 24-pin to 20-pin adaptor if your motherboard requires 20-pin power connector.
7
Connect the Serial ATA connectors to the peripheral devices.
8 Connect the peripheral 4-pin power connectors if you are still using an
IDE connector for hard drives or a DVD/CD drive.
9 Connect the PCI Express power connector to your PCI Express graphics
cards, as needed.
10 Connect your case fans to the regular 4-pin peripheral connectors if you
are using these fans.
Caution:
Make sure that all connectors are correctly connected. Incorrect connection could
prevent your computer from booting and some components might even be
damaged.
11 Close your computer case and connect the AC power cord to the power
supply.
Booting your system
To boot your system:
1 Turn on the power supply by setting the I/O switch on the power supply
to the "I" position.
2 Turn on your computer by pushing the power button on the front of
your system.