Q-1500d Series LED Home Theater Projection System Quick Setup Guide Page 2 020-1091-02 Rev. A (March 2014)
Table 2. Q-1500d Optical Alignment Procedure (with Anamorphic Lenses)
Dimension Digital Controller
1. Leave system off for now.
2. Connect an active 1080p source to the HDMI 1
connector.
Projector
1. Mount the projector (refer to Mounting
the Q-1500d on page 34).
2. Mount the Dimension Digital Controller
(refer to Mounting the Dimension
Digital Controller on page 35).
3. Connect system components to each
other and to external equipment (refer to
System Interconnections on page 36).
4. Q-1500d/CineWide with AutoScope
only: Install anamorphic lenses in
retracted position (out of the light path)
and ensure that the AutoScope transport
motor AC switch is in the “off” position.
5. Loosen the lock screw for both primary
lenses.
Note: All page references given here are
to the Q-1500d Series Installation/
Operation Manual.
Note: At this point the anamorphic lenses
are simply used as weight to maintain the
correct center of gravity while you adjust the
primary lens, so that the projector won’t shift
when you add the anamorphic lenses later.
Dimension Digital Controller
1. Turn on system and select the HDMI 1 input.
2. Select Calibration -> Adjustment Mode and
set it to Primary.
3. Select Service -> Test Video and choose
Primary Alignment.
Projector (Align Primary Image with
Screen)
1. Adjust the ceiling mount to correct for
image keystone and clocking.
2. Align the image to the screen by
adjusting the top primary lens zoom,
focus and H/V offset.
3. Tighten the top primary lens lock screw.
Notes:
1. You must enter a passcode to access
the Calibration or Service menu.
2. The lock screw locks all lens
adjustments except for focus.
Dimension Digital Controller
1. Select Calibration -> Adjustment Mode and
set it to Secondary.
2. Select Service -> Test Video and choose
Secondary Alignment.
Projector (Align Secondary Image with
Screen)
1. Align the image to the screen by
adjusting the bottom primary lens zoom,
focus and H/V offset.
2. Tighten the bottom primary lens lock
screw.
3. Q-1500d/CineWide with AutoScope
only: Remove anamorphic lenses.
Set the AutoScope transport motor AC
switch to the “on” position.
Note:
The default warp is 46 pixels on the
left and right sides (x) and 26 pixels at the
top and bottom (y). If more is needed, use
the “Image Alignment” controls to increase
it.
Dimension Digital Controller
1. For a ceiling-mounted (inverted) and/or rear-
projection installation, select Service ->
Display Device -> Configure ->
Installation -> Picture Orientation and set it
as needed.
2. Select Aspect Ratio and set it to Cinema. On
a Q-1500d/CineWide with AutoScope, this
should position the anamorphic lens transport
in front of the primary lenses.
3. Select Calibration -> Adjustment Mode and
set it to Primary.
4. Select Service -> Test Video and choose
Primary Alignment.
Projector
1. (Re-)install anamorphic lenses.
2. Align the primary image with the screen
by adjusting the top anamorphic lens to
produce the least amount of distortion.
Dimension Digital Controller
1. Select Calibration -> Adjustment Mode and
set it to Secondary.
2. Select Service -> Test Video and choose
Secondary Alignment.
Projector
1. Align the secondary image to the screen
by adjusting the bottom anamorphic lens
to produce the least amount of
distortion.
Dimension Digital Controller (Align Secondary
Image with Primary Image)
1. Select Aspect Ratio and set it to 16:9.
2. Select Calibration -> Adjustment Mode and
set it to Secondary.
3. Select Calibration -> Image Alignment ->
Corner Alignment, check the Primary Test
Pattern and Secondary Test Pattern boxes
and adjust corners.
4. Select Calibration -> Image Alignment ->
Midpoint Alignment, check the Primary Test
Pattern and Secondary Test Pattern boxes
and adjust midpoints.
Projector
No adjustment needed.
Note: The Primary lens image is usually left
un-warped. This provides the best image
quality and will be un-scaled for 1080p
sources. You can adjust the Primary image
if needed, however, by setting the
Adjustment Mode to Primary, checking
the Primary Test Pattern and Secondary
Test Pattern boxes and adjusting the cor-
ners and/or midpoints prior to this step.
Dimension Digital Controller
1. Select Aspect Ratio and set it to Cinema.
2. Select Calibration -> Image Alignment ->
Corner Alignment and adjust corners.
3. Select Calibration -> Image Alignment ->
Midpoint Alignment and adjust midpoints.
Projector
No adjustment needed.
Note: The Dimension Digital Controller
saves the Image Alignment (warp) settings
for each aspect ratio. To program additional
aspect ratios, select each one and use the
controls in the Corner Alignment and
Midpoint Alignment menus. Or, select
Calibration -> Copy/Paste -> Aspect
Ratio -> Copy Settings, select a different
aspect ratio and choose Paste Settings.
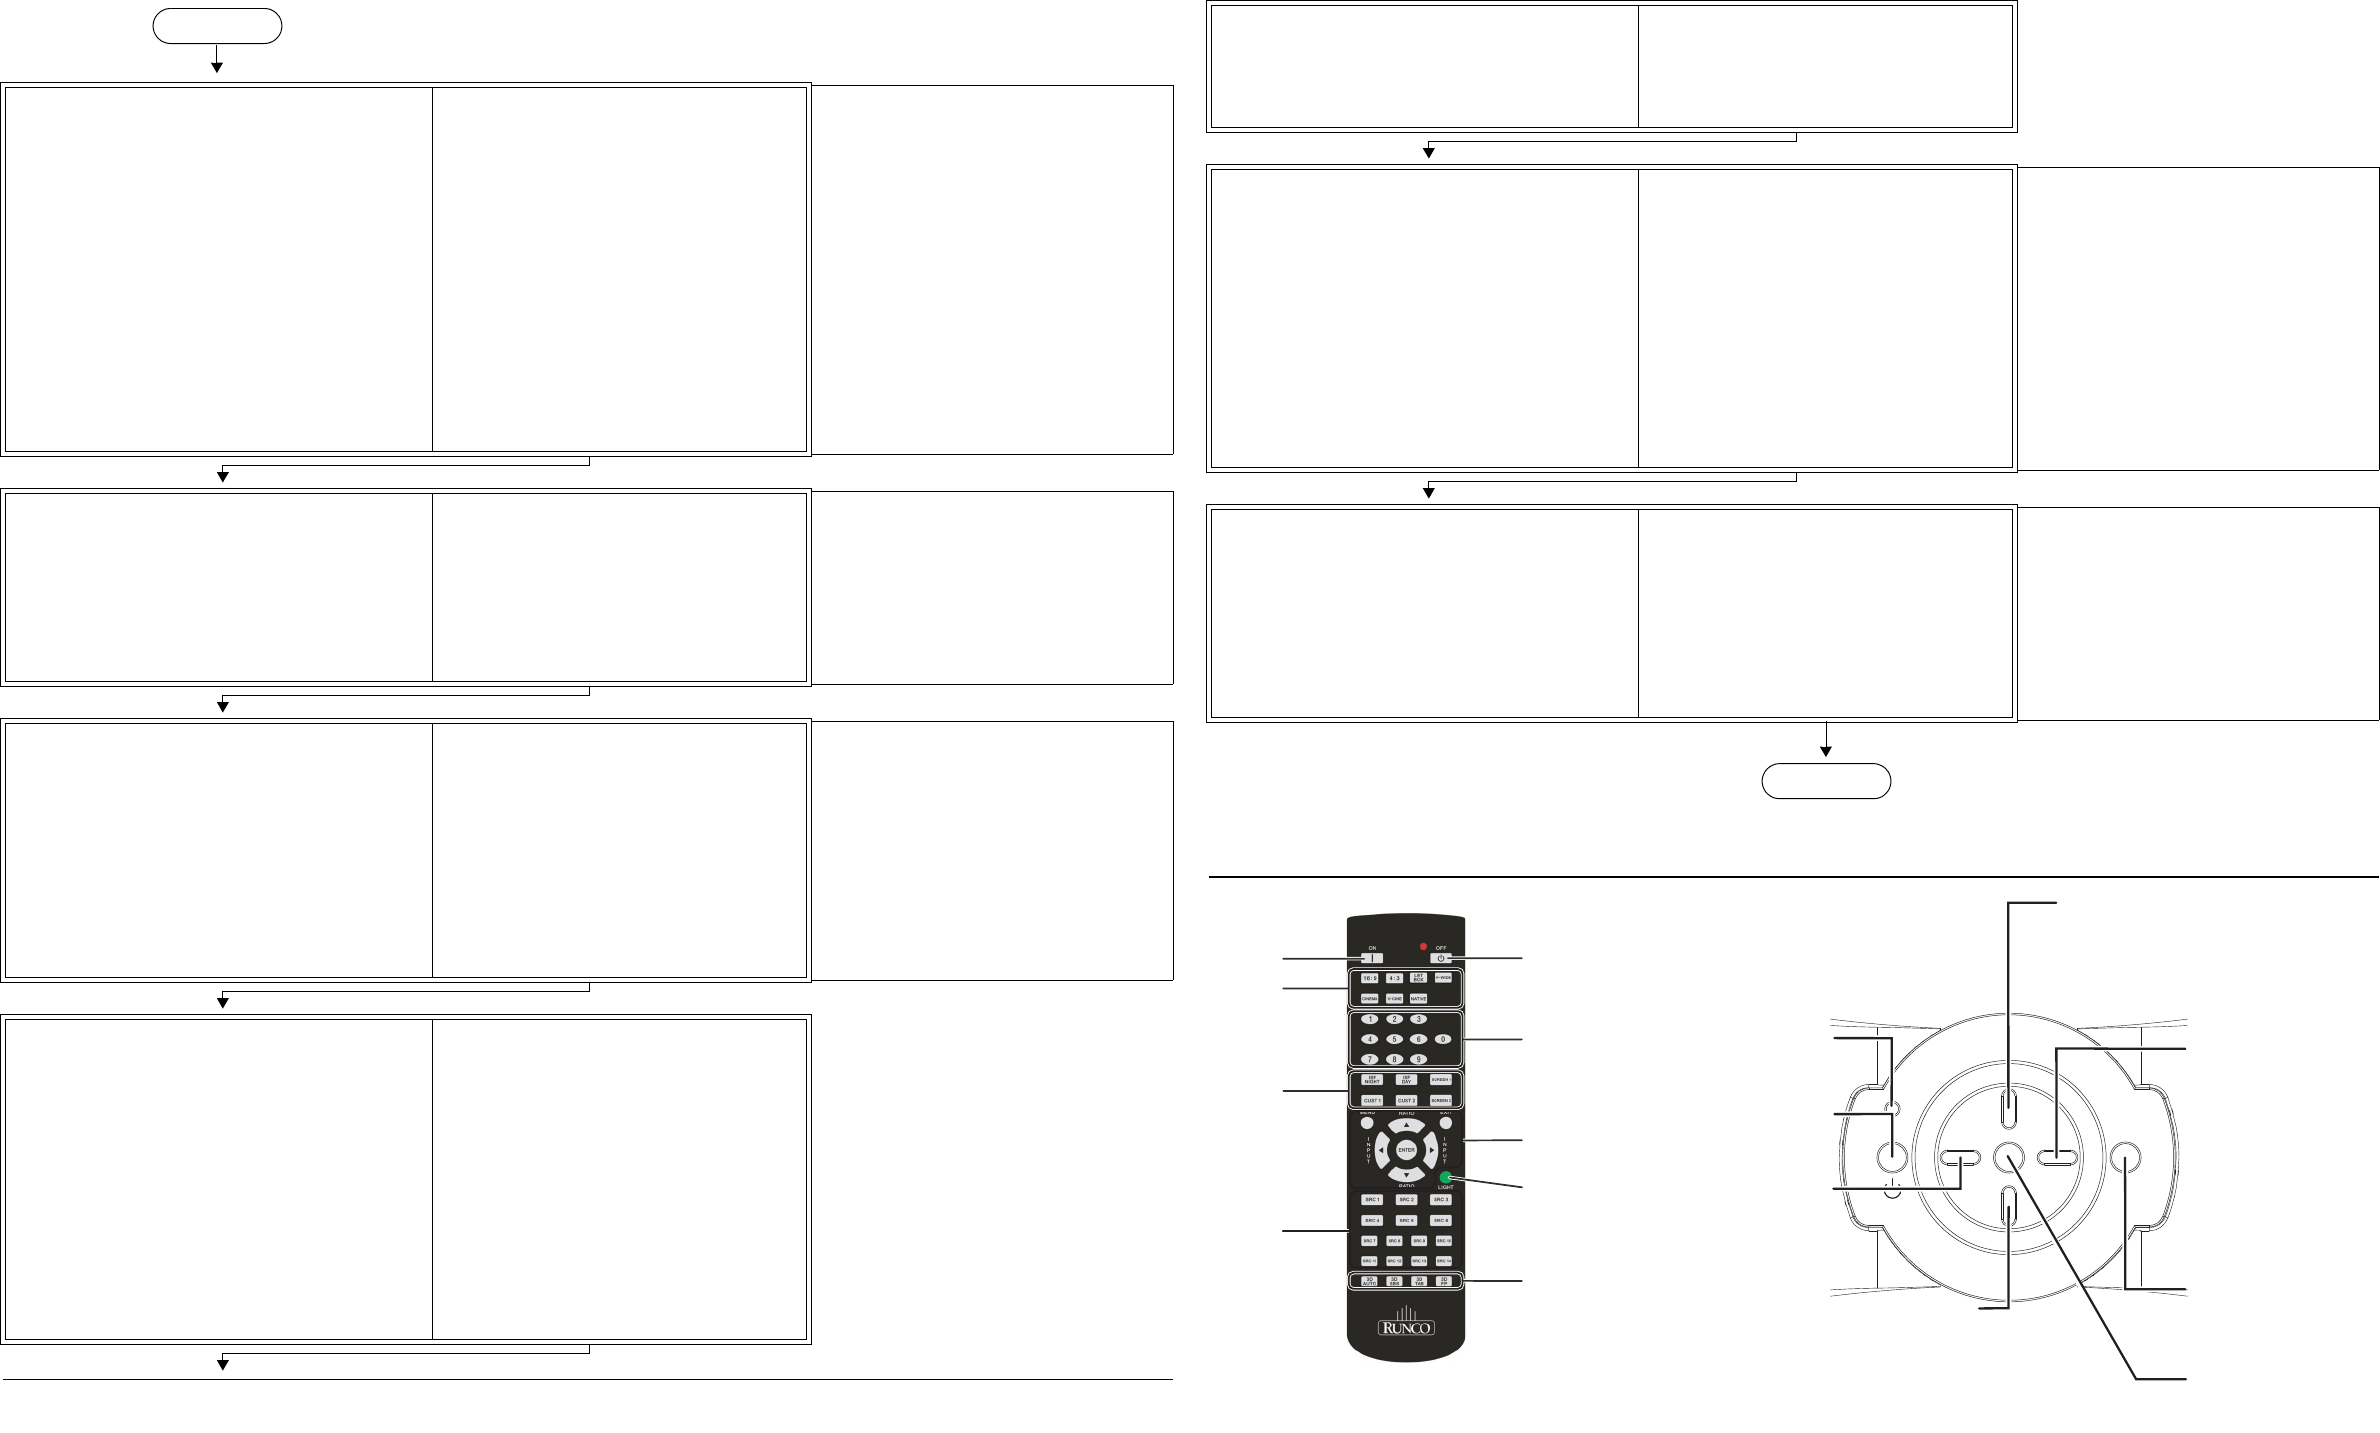
Dimension Digital Controller Remote Control and Front-Panel Keypad
Table 2. Q-1500d Optical Alignment Procedure (with Anamorphic Lenses) (Continued)
Image
Memory
Preset
Buttons
Aspect
Ratio
Selection
Power On
Video
Source
Selection
3D Mode
Selection
(not used)
Press to
illuminate
the remote
control
buttons
Power O
Number
Buttons
Menu Navigation
Buttons
r
a
t
i
o
r
a
t
i
o
i
n
p
u
t
standby
m
e
n
u
i
n
p
u
t
e
n
t
e
r
STANDBY LED
Lights amber when
the controller is in
standby mode.
ON/STANDBY BUTTON
Press to go from standby
mode to on mode
or vice versa.
LEFT BUTTON
Used to direct-select an
input or move the OSD
menu cursor to the left.
When no menus are
present on-screen,
this button cycles
through the dierent
sources in this order:
DisplayPort - HDMI 8 -
HDMI 7 - HDMI 6 - HDMI 5 -
HDMI 4 - HDMI 3 - HDMI 2 -
HDMI 1 - SCART - HD 2 -
HD 1 - Component -
Composite 3 - Composite 2 -
Composite 1
DOWN BUTTON
Used to direct-select an aspect ratio
or move the OSD menu cursor down.
When no menus are present on-screen,
this button toggles through
aspect ratios in the following order:
16:9 - 4:3 - Letterbox - VirtualWide - Cinema -
Virtual Cinema - Native - Auto Cinema
RIGHT BUTTON
Used to direct-select an
input or move the OSD
menu cursor to the right.
When no menus are
present on-screen,
this button cycles
through the dierent
sources in this order:
Composite 1 - Composite 2 -
Composite 3 - Component -
HD 1 - HD 2 - SCART -
HDMI 1 - HDMI 2 - HDMI 3 -
HDMI 4 - HDMI 5 - HDMI 6 -
HDMI 7 - HDMI 8 - DisplayPort
MENU BUTTON
Press MENU to bring up the
main menu, or to exit the
current menu and return
to the previous one.
ENTER BUTTON
When an item is highlighted
on the OSD, press ENTER
to select that item.
UP BUTTON
Used to direct-select an aspect ratio
or move the OSD menu cursor up.
When no menus are present on-screen,
this button toggles through
aspect ratios in the following order:
Auto Cinema - Native - Virtual Cinema -
Cinema - VirtualWide - Letterbox - 4:3 - 16:9


