


6
USING THE AIR COMPRESSOR
CAUTION: Read instructions of the
product being inated before using the air
compressor. The air compressor is rated
250 PSI. Avoid over ination. Do NOT
exceed the manufacturer’s recommended
pressures. Do NOT leave the air compres-
sor unattended during use.
1. Remove air compressor hose
wrapped in the back storage com-
partment.
2. To inate a tire, attach the permanent
nozzle connected to the end of the air
compressor hose and attach to tire
stem. Flip down lever.
3. To inate items other than tires, use
one of the three nozzles stored in the
center back left compartment. Slide
the panel to the left to open. Attach
nozzle to end of air compressor
hose, attach to product and ip down
lever.
4. The 3-way air compressor ON switch
is located on the back lower left side.
NOTE: There are two speeds of ina-
tion: SLOW – push switch left (I) or
FAST, push switch right (II). Inate
product and be careful to monitor the
air pressure on air compressor gauge
located on upper right back side. DO
NOT OVER INFLATE.
5. When product is inated to proper air
pressure, turn OFF air compressor
by pushing air compressor switch to
OFF (O).
6. Remove nozzle and hose from prod-
uct. Store hose and nozzles in their
compartments.
NOTE: Do not run for more than 10 min-
utes maximum at a time. If you do, allow
the PP-18400CI to cool down for 10 min-
utes before using again. If the compressor
overheats, the built-in thermal protection
will turn the PP-18400CI off. Wait a few
minutes and it will automatically restart.
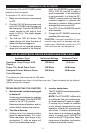
ESTIMATED TIME FOR INFLATING
Vehicle Tires
13" to 16" 6 to 24 minutes
Bike Tire 1 to 3 minutes
Sports Balls 30 seconds
The built-in swivel light is located on the
left side of the back of the PP-18400CI.
With a fully charged internal battery, the
built-in light should provide 18 to 26 hours
of continuous useful light, depending on
ambient conditions.
1. Position the PP-18400CI on a at,
stable surface near the intended work
area.
2. Pull tab up to remove light from stor-
age. Turn light in direction needed.
3. To turn light ON, push red button in
back of light. The light and green LED
will light.
4. To turn OFF, push red button. The
light and green LED will turn off.
IMPORTANT: Turn off light before
placing light in its storage space
otherwise battery drain occurs.
5. Charge PP-18400CI as soon as pos-
sible after using built-in light.
LIGHT BULB
1. Turn light off.
2. Pop out protective plastic lens
cover.
3. Gently grasp the bulb and twist until
notch in bulb lines up with retaining
tab.
4. Insert a replacement bulb of same
type and rating, and twist clockwise
one quarter-turn to screw in new
bulb.
5. Test light by switching light on and
off.
6. Replace lens cover.