


• 6 •
ASSEMBLY INSTRUCTIONS8.4
This charger can be operated on a stable surface either upright or lying
down (brackets not installed). Rubber strips have been provided to help
prevent scratching and denting of the channels. If you would like to perma-
nently mount the charger, use the following instructions:
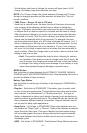
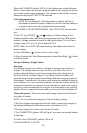
Slide all 4 brackets (Item 1) into the track on the back, from the right 8.5
side, as shown above. Make sure the set screws (Item 2) are unscrewed
enough so they do not scratch the surface of the housing.
Measure what you are mounting the charger to before deciding where to 8.6
locate the brackets (add an additional ¼ to ½ inch). Use the ruler on the
label (Item 3) to mount the brackets (Item 1) in the correct position (posi-
tion each bracket an equal distance from the center of the charger). Note
that the inches shown are for both bracket dimensions combined (mean-
ing the dimensions are doubled), this is for easier reference. Make sure
the ¼-28 set screws (Item 4) are unscrewed enough so the pointed end is
almost ush with the bracket. Mount the brackets (Item 1) by tightening all
8 set screws (Item 2).
Lift the charger by its handle and set it against your mounting location, 8.7