


INSTALLATION PROCEDURE:
Configuring the drive
1. Turn off your computer and remove the cover.
2. Configure the master/slave jumpers as appropriate for your
system. If you have two hard discs, you must configure one as a
master and the other as a slave. Refer to the illustrations below for
details.
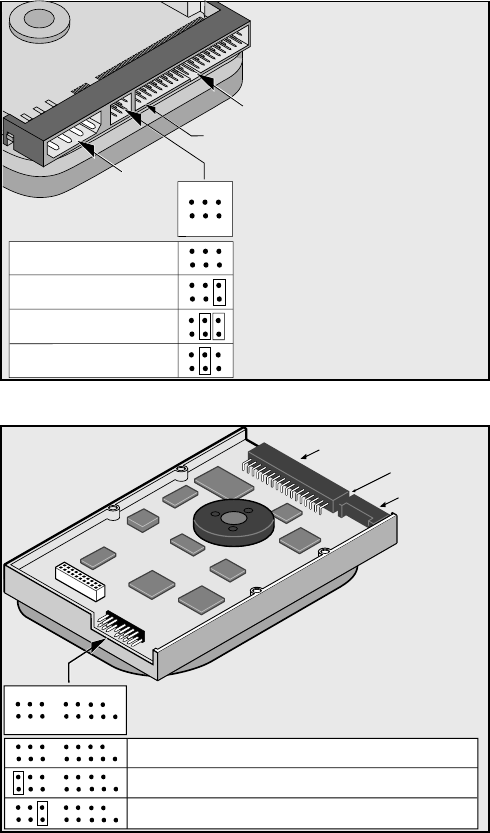
Jumper settings for the ST31276A and ST3636A:
Jumper settings for the ST3541A, ST31081A and ST31621A:
Connecting cables and mounting the drive
1. Connect the interface cable to the drive. Make sure that pin 1 on the
interface cable (colored stripe) is attached to pin 1 on the drive and
pin 1 on the host adapter.
2. Partially insert the drive into the drive bay. Select an unused power
connector from the power supply and connect it to the drive. If there
are no unused power connections on the power supply, you can
purchase a “Y” cable adapter from your dealer.
3. Secure the drive with four 6-32 x 0.25 screws. CAUTION: If you use
screws longer than 0.25 inch when mounting the drive, you may
damage the drive’s circuit board. The maximum insertion depth for
the bottom mounting holes is 0.25 inch; the maximum insertion
depth for the side holes is 0.125 inch.
About Disk Manager Software
This Seagate drive is shipped with free Disk Manager software. This
software partitions and formats the drive and allows older computers
to access the drive’s full capacity.
Running Disk Manager
1. Insert a bootable DOS diskette in your A drive and restart your
computer. During the start-up process, enter your computer’s
System Setup program (sometimes called BIOS or CMOS setup).
This is usually done by pressing a special key, such as [DELETE],
[ESC], or [F1], during startup. See your computer manual for
system-specific instructions.
2. Within the System Setup program, make sure that a drive type is
listed for each ATA hard drive in your computer. Some newer
computers can automatically determine drive-type characteristics,
using the
Auto
drive-type setting. If your computer does not provide
this option, you must manually enter the number of cylinders, heads,
and sectors per track for your new drive, as shown in the table below.
Model Heads Cylinders Sectors Capacity*
ST3541A 16 1048 63 540 Mbytes
ST3636A 16 1241 63 635 Mbytes
ST31081A 16 2097 63 1082 Mbytes
ST31276A 16 2482 63 1275 Mbytes
ST31621A 16 3146 63 1623 Mbytes
*1 Mbyte = 1,000,000 bytes
3. Save the drive-type settings and exit the system setup program. You
will have to reboot your computer for the changes to take effect.
4. Insert your Disk Manager diskette. At the DOS prompt, type A:\DM.
Press [ENTER] to run Disk Manager
5. Follow the instructions on your computer screen. From the main
menu, select
(E)asy Disk Installation
. Then press [ENTER].
6. At this point, Disk Manager lists all the hard drives that it can
recognize. You should see your new Seagate drive and your old hard
drive (if any). If Disk Manager recognizes all your drives, select the
new drive you wish to install and press [ENTER]. Disk Manager will
format and partition your new drive.
If Disk Manager does not recognize a hard drive, exit Disk Manager
and turn off your computer. Check all cables, jumpers and BIOS
settings. Then run Disk Manager again.
7. Follow the instructions on the Disk Manager post-installation
screens. You're done!
NOTES:
1) If your computer does not require software support for large hard
drives, Disk Manager will optimize your system BIOS settings, then
quickly partition and format your new hard disc.
2) If Disk Manager has installed software to help your computer
access a large hard drive, you should see a blue Disk Manager banner
each time you boot your computer. In this case, if you need to boot
from a diskette instead of from your hard drive, see the Disk Manager
online manual for instructions.
3) To view the Disk Manager online manual, insert the Disk Manager
diskette and type A:\DM /H. Then press [ENTER]. You can also view
the online manual from within Disk Manager by selecting
(V)iew/Print
Online Manual
in the main menu.
135
24
6
Drive is slave
Drive is master in single-
or dual-drive system
Drive is master with
non-ATA-compatible slave
1
Enable Cable Select
2
2
Consult your computer manual to determine
if your system supports cable select.
Master/slave
jumper settings
pin 1
4-pin power
connector
40-pin ATA
interface
connector
1
Use this jumper setting
only
if the drive does
not work with a single jumper on pins 5 and 6.
J4
Drive is slave
Drive is master or single drive (default)
Enable cable select*
135
9
11
24
6
1012
14
16
13
15
17
40-pin ATA
interface connector
4-pin power
connector
pin 1
*Consult your computer
manual to determine if your
system supports cable select