


ENFORCER RACKMOUNT POWER SUPPLY
4 SECO-LARM U.S.A., Inc.
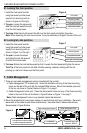
A2. Wall mounting (For 32-channel, see A4)
4. Use screws or bolts (not included) to mount the unit in the desired location.
Note: Make sure that the screws/bolts and mounting surface can support the weight of the unit.
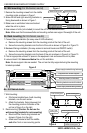
1. Remove the mounting screws from the middle
mounting points as shown in Figure 1.
2. Screw the left and right mounting brackets on,
facing downward as shown in Figure 1.
3. Make sure no ventilation holes are blocked
when the unit is in place.
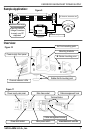
A3. Rack mounting (For 32-channel, see A4)
1. Forward facing installation (for easy view of LED indicators):
a. Remove the mounting screws from the mounting points at the front of the unit.
b. Screw the mounting brackets onto the front of the unit as shown in Figure 2 or Figure 10.
2. Backward facing installation (for easy access to terminal blocks and ON/OFF switch):
a. Remove the mounting screws from the mounting points at the back of the unit.
b. Screw the mounting brackets onto the back of the unit as shown in Figure 2 or Figure 10.
3. Find an appropriate unused 1U space in the equipment rack and screw the unit in place.
4. Leave at least 0.5U above and below the unit for ventilation.
Note: No rear support rails are needed. The unit can be fully supported using the mounting
brackets provided.
Mounting screws (not included)
Power supply mounted facing forward
Mounting brackets mounted front/back
Power supply mounted facing backward
Equipment rack vertical supports
Figure 1
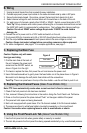
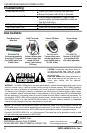
A4. 32-Channel model
1. Wall mounting:
a. 32-channel models have 4 wall mounting
brackets, one for each corner.
b. Attach the brackets, facing downward, at
the mounting points on the sides of the
unit as in Figure 3 on the right.
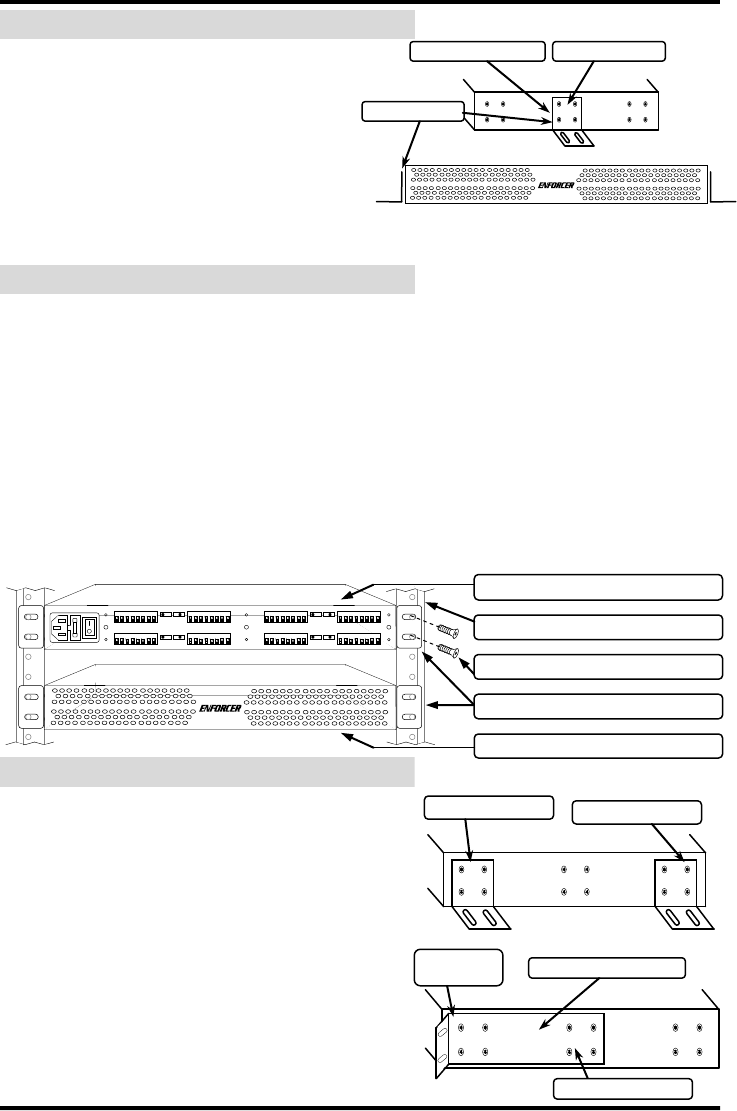
2. Rack mounting: (Caution: Do not use the
wall-mounting brackets for rack mounting)
a. Mount with the 2 extra-long brackets as
shown in Figure 4 on the right.
b. Attach each bracket at both the middle
and either front or rear mounting points.
Front mounting point
Rear mounting point
Front or rear
mounting point
Extra long mounting bracket
Middle mounting point
Figure 2
Figure 3
Figure 4
Middle mounting point
Bracket facing down
Mounting bracket