


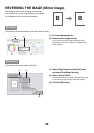
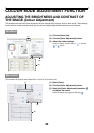


47
Mac OS X
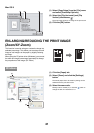
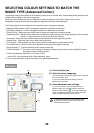
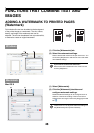
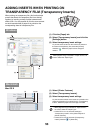
(1) Select [Color].
(2) Select colour print settings.
• To use the Mac OS Colour Management function,
select the [ColorSync] checkbox . When this is
done, "Image Type" cannot be selected.
• If you selected [4 Colors] from the "Neutral Gray"
menu, select [Pure Black Print].
(3) Select the colour image type.
A image type to match your purpose can be selected from
the pull-down menu.
If you wish to select detailed settings, click the [Advanced
Color] button.
(4) Select advanced colour settings.
To configure advanced colour management settings,
select the desired settings from the menus. To use
"CMYK Simulation", select the [CMYK Simulation]
checkbox and then select the desired setting.
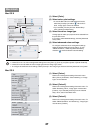
Mac OS 9
(1) Select [Colour].
Select colour management settings from each menu.
When [Colour] is selected, "Colour Matching" or "Image
Type" can be selected.
(2) Select [Colour2].
Select colour management settings from each menu. To
select "Rendering Intent", "Image Type" must be set to
[Custom]. If you selected [4Colours] from the "Neutral
Grey" menu, select "Pure Black Print".
(3) Select [Colour3].
Select colour management settings from each menu. To
select "CMYK Simulation" and "Screening", "Image Type"
must be set to [Custom].
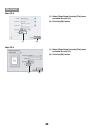
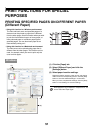
Macintosh
(3)
(2)
(1)
(4)
• In Mac OS X v10.1.5, colour management settings are on the [Color 1], [Color 2], and [Color 3] tabs of [Printer Features].
• In Mac OS X v10.2.8, select the colour image type from the "Image Type" menu.
• To configure all advanced colour settings, select [Custom] in the "Image Type" field and click the [Advanced Color] button.