


E-21
Setup & Connections
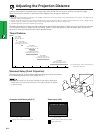
Adjusting the Projection Distance
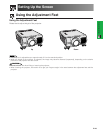
Position the projector perpendicular to the screen with all feet flat and level to achieve an optimal image.
Move the projector forward or backward if the edges of the image are distorted.
• The projector lens should be centered in the middle of the screen. If the lens center is not perpendicular to the screen, the image will be
distorted, making viewing difficult.
• Position the screen so that it is not in direct sunlight or room light. Light falling directly onto the screen washes out colors, making viewing
difficult. Close the curtains and dim the lights when setting up the screen in a sunny or bright room.
• A polarizing screen cannot be used with this projector.
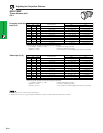
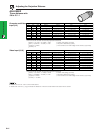
Six optional lenses from Sharp are also available for specialized application. Please see your local Sharp Industrial
LCD Products Dealer to details on all the lenses. (Refer to the lens operation manual when attaching a lens.)
Be sure to have service personnel install optional lenses.
Screen
AN-LV80EZ
26Ј3Љ–37Ј1Љ (8.0–11.3 m)
Throw distance ratio 3.8–5.3:1
AN-LV55EZ
18Ј1Љ–25Ј7Љ (5.5–7.8 m)
Throw distance ratio 2.6–3.7:1
AN-LV36EZ
11Ј10Љ–19Ј0Љ (3.6–5.8 m)
Throw distance ratio 1.7–2.7:1
AN-LV40EZ
13Ј5Љ–17Ј5Љ (4.1–5.3 m)
Throw distance ratio 1.9–2.5:1
AN-LV26EZ
8Ј6Љ–9Ј10Љ (2.6–3.0 m)
Throw distance ratio 1.2–1.4:1
AN-LV18MX
5Ј11Љ (1.8 m)
Throw distance ratio 0.9:1
5 10 15 20 25 30 35 (ft)
Throw Distance
Place the projector at the required distance from the screen according
to the desired picture size. (See pages 22–27.)
• Six optional lenses from Sharp are available for specialized application.
Please see your local Sharp Industrial LCD Products Dealer for details
on all the lenses.
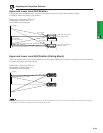
Standard Setup (Front Projection)
H
L
X
e.g. Screen size: 100 inches (254 cm)
Computer Input: 4:3
: Screen size and Picture size (16:9)
: Signal mask area
Video Input (16:9)
: Screen size and Picture size (4:3)
4
16
9 3
Computer and Video Input (4:3)
4
3