


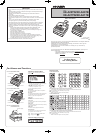

Basic Sales Entry
Listed below is a basic sales entry example when
selling items by cash. For details, refer to “FULL
DETAILED INSTRUCTUION MANUAL”.
1. Enter the clerk code and press the
L
key.
By default, the clerk 1 is signed on.
2. Enter the unit price and press the appropriate
department key.
For details, refer to the item below.
3. Repeat step 2 for all department items.
4. When the item entry is completed, press the
z
key. The total amount due is displayed.
5. Receive the amount from your customer, and
enter the amount by the numeric keys.
6. Press the
A
key. The change due is
displayed, and the drawer is opened.
7. Close the drawer.
z
4000
A
Item entries
Clerk assignment
Displaying subtotal
Amount tendered
Finalizing the transaction
Key operation example
*
! "
: indicate department keys.
1 L
1500 !
*
2300 "
*
Entries
Correction
Correction of Entered Number
When you enter an incorrect number, delete it by
pressing the
L
key immediately after the entry.
Correction of the Last Entry
If you make a mistake when making a department
entry, PLU entry, percentage (
0
) and discount (
J
),
you can correct this entry by pressing the
~
key
immediately.
Correction of Earlier Entries
You can correct any incorrect entry made during
a transaction if you nd it before nalizing the
transaction by pressing the
A
key.
Move the cursor to the item to be voided and press
the
~
key.
Subtotal Void
You can void an entry transaction. Once subtotal
void is executed, the transaction is aborted and the
register issues an receipt.
Press the
~
key immediately after pressing the
z
key.
And then press the
z
key again.
Correction of Incorrect Entries Not
Handled by the Direct, Indirect or
Subtotal Void Function
Any errors found after the entry of a transaction has
been completed or during an amount tendered entry
cannot be voided. These errors must be handled by
the manager.
The following steps should be taken.
1. If you are making the amount tendered entry,
nalize the transaction.
2. Make correct entries from the beginning.
3. Hand the incorrect receipt to your manager for
its cancellation.
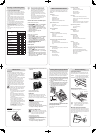
Department Entries
The register provides a maximum of 99 departments for a merchandise classication. Group attributes, such as
taxable status, are applied to items when they are entered to the departments.
For XE-A207W/XE-A207B
A) For the department 1 to 16, enter the unit price and press the department key. If you use the programmed unit
price, press the department key only.
B) For department 17 to 32, enter the unit price, press the
d
key and press the department key. If you use the
programmed unit price, press the
d
key and press the department key.
Department keyUnit price (max. 8 digits)
When using a programmed unit price
d
C) For department 33 and above, enter the department code using the numeric keys and press the
d
key, then
enter the unit price and press the
A
key.
If you use the programmed unit price, enter the department code and press the
d
key.
Dept. code
(1 to 99)
Unit price (max. 8 digits)
When using a programmed unit price
(In case only preset price entry is allowed.)
d A
For XE-A217W/XE-A217B
A) For the department 1 to 6, enter the unit price and press the department key. If you use the programmed unit
price, press the department key only.
Department keyUnit price(max. 8 digits)
When using a programmed unit price
B) For department 7 and above, enter a department code using the numeric keys and press the
d
key, then
enter the unit price and press the
A
key.
If you use the programmed unit price, enter a department code and press the
d
key.
Dept. code
(1 to 99)
Unit price (max. 8 digits)
When using a programmed unit price
(In case only preset price entry is allowed.)
d A
Setting the Mode Pass Code
1. Select the mode to set the pass code using
the
F
or
I
keys.
2. Enter the code in 4 digits using the numeric
keys.
3. Press the
A
key to set the mode pass code.
If no pass code is set, press the
A
key.
Setting the Manager Pass Code
1. Enter the code in 4 digits using the numeric
keys.
2. Press the
A
key to set the manager pass
code.
If no pass code is set, press the
A
key.
Setting the Receipt Logo
1. To change the default logo text, press the
D
key to delete the texts in each line.
Enter the text using the character keys to
print on the receipt.
2. Press the
A
key to set the receipt logo.
Text entry method
For XE-A207W/XE-A207B
There are two ways for programming text; using
character keys on the keyboard or entering
character codes with numeric keys on the keyboard.
You can enter characters according to the small
gures printed in the lower position of the numeric
keys. For the layout, please refer to “keyboard
Layout” for XE-A207W/XE-A207B.
For example to enter “A”, press the 8 key. To enter
“B”, press the 8 key twice.
For XE-A217W/XE-A217B
There are two ways for programming text; using
character keys (on the programming key sheet) or
entering character codes with numeric keys on the
keyboard.
To enter numerals, letters and symbols, simply press
the corresponding character on the programming
key sheet.
For the Layout, please refer to “FULL DETAILED
INSTRUCTION MANUAL”.
D
• For details of the receipt logo, refer
to “FULL DETAILED INSTRUCTION
MANUAL”.
• The HELP function instructs you how to
set the logo message. After entering “13”,
press the
HELP
key to access the HELP.
Initializing the Cash Register
For your cash register to operate properly, you must
initialize it before programming for the rst time.
Follow this procedure.
1. Remove the register from its packing carton.
2. Insert the plug into the AC outlet.
IMPORTANT: This operation must be performed
without batteries loaded.
Never install the batteries into the cash register
before initializing it. Before you start operating the
cash register, you must rst initialize it, then install
two new alkaline batteries LR6 (“AA” size) on the
register. Otherwise, distorted memory contents and
malfunction of the cash register will occur.
Language Selection
1. Display the “Language Selection” after turning
on the power.
2. Press the numeric key for the number of your
language.
After selecting the language, the register is initialized.
According to the displayed instruction, perform the
setting.
Setting the Date and Time
1. Display the “DATE/TIME setting”.
2. Enter the date in 6 digits. For example, enter
“050611” for June 5, 2011.
3. Press the key to select the time setting.
4. Enter the time in 4 digits. For example, enter
“1430” for 2:30pm.
5. Press the
A
key to set the date and time.
Setting the Tax Rate
1. Select the tax number (1 to 4) to set the tax rate.
2. Enter the tax rate in 7 digits (leading zeros may
be omitted). For example, press the “7” key to
set 7%.
3. To set the second and later tax rates, press the
I
key.
4. Press the
A
key to set the tax rate.
For details, refer to “FULL DETAILED INSTRUCTION
MANUAL”.
Calculation of VAT rate
VAT is included in the entered price, and the tax
amount is calculated when tendered according to the
VAT rate programmed.
By default, VAT1 is assigned to all items.
The HELP function instructs you how to assign VAT to
department. After pressing the “7” key, press the
HELP
key to access the HELP.
Getting Started
Installing Batteries
Batteries must be installed in the cash register
to prevent data and programmed contents from
being lost from the memory in case of accidental
disconnection of the AC cord or power failure. Please
install two new LR6 (“AA” size) batteries before
programming and operating the cash register.
1. Remove the printer cover.
2. Open the battery cover next to the paper roll
cradle.
3. Install two new LR6 (“AA” size) batteries.
4. Close the battery cover.
5. Replace the printer cover.
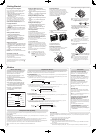
Installing a Paper Roll
Always install the paper roll even when you set the
register for not printing receipt in REG mode.
1. Remove the printer cover.
2. Lift up the print roller arm.
Print roller arm
3. Set the paper correctly in the paper roll cradle.
D
Before placing a new paper roll in the paper
roll cradle, cut off the pasted (taped) part of
the paper and conrm that the cut end of
the paper is straight.
4. Feed the end of the paper along with the paper
positioning guides as per the diagram.
5. While holding down the paper, slowly close
the print roller arm.
Paper positioning
guides
D
If the print roller arm is not securely locked,
printing is not done right. If this problem
occurs, open the arm, and close the arm as
instructed above.
6. Cut off the excess paper and replace the
printer cover.
7. Press the key to make sure the paper end
comes out of the printer cover and clean paper
appears.
D
If the paper end does not come out, open
the printer cover, and pass the paper end
between the paper cutter and the paper
guide of the printer cover, and replace the
printer cover.
PLU (Price Look Up) Entry
The PLU function allows speedy key entries. The cash register allows you two ways of entering PLUs; PLU Code
Entry and Direct PLU Entry.
PLU Code Entry
Enter the PLU code using the numeric keys, and press the
p
key. For example, enter “71” and press the
p
key
for “PLU 00071”.
Direct PLU Entry (For XE-A217W/XE-A217B only)
Enter the assigned PLU code using the direct PLU keys provided in the keyboard. Here you can simply press the
assigned direct PLU keys. The price assigned to the selected PLU code is displayed on the screen.
The direct PLU keys are the numerical keys (1-70) arranged on the right side of the keyboard. For specically which
keys can be assigned as the direct PLU keys, refer to “FULL DETAILED INSTRUCTION MANUAL”.
D
The direct PLU entry function is availbale only for XE-A217W/XE-A217B.
Error Warning
In the following examples, your register will go into an error state accompanied with a warning beep and the error
message on the display. Clear the error state by pressing the
L
key and then take the proper action to remedy
the problem.
- When you exceed a 32-digit number (entry limit overow):
Cancel the entry and re-enter a correct number.
- When you make an error in key operation:
Clear the error and try the entry again.
- When you make an entry beyond a programmable amount entry limit:
Check to see if the entered amount is correct. If it is correct, it can be rung up in the MGR mode. Contact
your manager.
- When an including-tax subtotal exceeds eight digits:
Clear the error message by pressing the
L
key and then press a media key to nalize the transaction.