


-17
Quick Start
Pages 31, 32
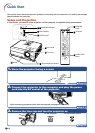
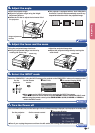
4. Adjust the angle
5. Adjust the focus and the zoom
7. Turn the Power off
Page 30
6. Select the INPUT mode
Page 34
••
••
•
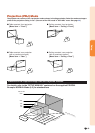
This projector is equipped with an “Auto V-Keystone
Correction” function that automatically corrects any
trapezoidal distortion within the projected image.
Bring the projected image into focus
••
••
• Bring the projected image into focus by
rotating the focus ring.
Adjust the projected image size
••
••
• Adjust the projected image size by moving the
zoom knob.
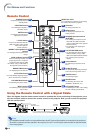
Select the “COMPUTER 1” using the INPUT buttons on the projector or the COMPUTER 1 button on the remote control.
••
••
•
When you press the INPUT buttons on the projector, the INPUT list appears.
Press
''
''
'/
""
""
" to select an item on the list, and press ENTER to switch to the selected INPUT mode.
••
••
• When using the remote control, press COMPUTER1/2, DVI, S-VIDEO or VIDEO to
switch the INPUT mode.
On the remote
control
On the
projector
""
""
" INPUT list
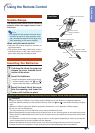
Press the STANDBY button, then press that button again while the confirmation message is displayed, to put the projector into standby mode.
••
••
• Even if you unplug the power cord from the AC outlet, the cooling fan continues to run for a while.
On the remote controlOn the projector
""
""
" On-screen Display
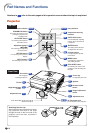
Adjust the projector angle
••
••
•
Adjust the projector angle using the Height
Adjustment buttons.
••
••
•
Rotate the Tilt dial to adjust the horizontal tilt of
the projector.
Height Adjustment
buttons
Tilt dial
Focus ring
Zoom knob
Zoom in
Zoom out
""
""
" On-screen Display (RGB)
RGB
1024 × 768
COMPUTER1
INPUT
COMPUTER1
COMPUTER2
DVI-D Computer
D
Page 33