


50
3
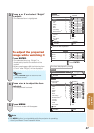
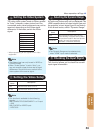
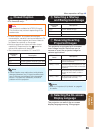
Set or adjust each item in the
C.M.S. color adjustment screen.
C.M.S.1
Select Color
Hue
Saturation
Valu e
Effect
C.M.S.1 On
Reset
Return
SEL./ADJ.
RETURN
ENTER
END
0
0
0
0
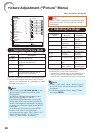
C.M.S. color adjustment screen:
Selectable items
Description
Select Color Starts over the selection of
the color to be corrected.
Hue Sets the hue of the main
colors.
Saturation Sets the saturation of the
main colors.
Value Sets the value of the main
colors.
Effect
*1
Specifi es the range of color
correction.
C.M.S.1
*2
(or C.M.S.2)
Checks the appearance of
the projected image after
above correction.
Reset Sets “Hue”, “Saturation”,
“Value”, and “Effect” to their
default values.
Return Completes the correction
and closes the C.M.S. color
adjustment screen.
*1 To specify the range of color correction,
select “Effect” and press
O or Q button.
O button Specifi es smaller range.
Q button Specifi es larger range.
*2 To check the appearance of the projected
image, select “C.M.S.1” (or “C.M.S.2”) and
set to “On” or “Off”.
On The appearance of the
projected image after above
color adjustment refl ected
can be checked.
Off The appearance of the pro-
jected image in former color
adjustment can be checked.
3
4
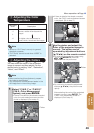
To complete the C.M.S. color
adjustment, select “Return” and
press ENTER.
The C.M.S. color adjustment can be made to
one color each in “C.M.S.1” and “C.M.S.2”.
“C.M.S.1” and “C.M.S.2” cannot be set when
“sRGB” is selected.
•
•
Note
5
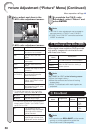
Reducing Image Noise (DNR)
Video digital noise reduction (DNR) provides
high quality images with minimal dot crawl
and cross color noise.
Selectable
items
Description
Off The DNR function is not activated.
Level 1
Sets the DNR level for viewing a
clearer picture.
Level 2
Level 3
Set “DNR” to “Off” in the following cases:
When the image is blurry.
When the contours and colors of moving
images drag.
When TV broadcasts with weak signals are
projected.
•
•
•
Note
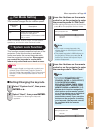
6
Eco+Quiet
Selectable
items
Brightness
Fan
Sound
Lamp life
On Approx. 80% Low Approx.
2,500
hours
Off 100% Normal Approx.
1,500
hours
You can also use ECO+QUIET on the remote
control or on the projector to switch the
Eco+Quiet mode. (See page
40.)
•
Note
4
Picture Adjustment (“Picture” Menu) (Continued)
Menu operation n Page 46