


5. ON / OFF OPERATION
Use a Transmitter
When the programmed button of a transmitter is activated, it will transmit
a signal to toggle the status of the load. For example, if a toggle signal is
received when the light is off, that signal will turn on the light.
7. ZONE OPERATION
7. ZONE OPERATION (CONT)
6. COUNTDOWN TIMER OPERATING MODE
If a transmitter or a sensor is programmed to the Wall Switch under the
timer mode, when that transmitter is activated, the light connected will be
on for the predetermined timer interval. After the timer interval, the light
will be off.
Pressing a programmed button can override the count-
down timer operation.
for Switch Mode
Note: The Countdown Timer Operation is also applicable to loads other
than lights.
Use the Wall Switch
To turn on / off the load, simply push the button of the wall switch once,
it will toggle the status of the light, i.e. from on to off or from off to on.
Note: Once the number of flashes reaches 5, it will stay at this setting. If
you would like to go back to other settings, such as 1 minute, release the
button and repeat from step 1 to start over.
Once a transmitter (button) is programmed for timer mode, activating this
programmed transmitter (button) will turn on the load for the specified timer
duration.
During a timer count down, if the Wall Switch receives another signal for
timer operation, the timer will start again and overrides the previous timer,
therefore, extending the On period by another timer interval.
To stop timer count down, press a programmed button for Switch mode.
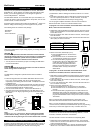
4. SET TIMER DURATION (CONT)
Number of Flashes
1
2
3
4
5
Timer Duration
1 min.
5 min.
15 min.
30 min.
60 min.
3. Continue to hold the SET button until it reaches the desired setting. The
status will change every 6 seconds, i.e. hold the SET button for another
6 seconds, you will see the number of flashes changes from 1 to 2, 2 to
3, etc.
Input Voltage: 120V AC, 60Hz
Maximum Load: 1000W at 120VAC
Operating Frequency: 318MHz
Range: Up to 500 feet in open area
Standby Current: 0.2mA
Minimum Load: 10W
Operational Temperature: -4° F - 140° F (-20° C - 60° C)
Humidity: 5%-95%
9. TECHNICAL SPECIFICATIONS
10. FCC
The device is approved by the FCC and it complies with Part 15 of the
FCC Rules. Its operation is subject to the following two conditions :
1. This device may not cause harmful interference.
2. This device must accept any interference that may cause undesired operation.
WARNING:
Changes or modifications to this unit not expressly approved by the party responsible
of compliance could void the user’s authority to operate the equipment.
12. CUSTOMER SERVICE
8. ERASING TRANSMITTERS FROM WALL SWITCH
You may erase a transmitter or sensor from the wall switch, but you cannot
erase a specific device directly, you must erase all the wireless devices,
then program the ones you want to keep. Follow the instructions below to
erase programmed TC transmitter.
1.Turn on the connected load with a programmed TC remote, and the two
blue LEDs on the switch are off.
2.Press the PROG button on the back of the TC remote, and the red LED
on the front of the remote will be on.
3.Press and hold the programmed button on the front of the TC remote,
the LED on the remote will flash quickly. Do not release the button until
Step 6.
4.Press and hold the “SET” button on the switch about 3 seconds until the
upper blue led flash.
5.You may release the “SET” button.
6.Release the remote button, and now you have successfully erased all
the devices.
13. ACCESSORIES
CUSTOMER SERVICE
17 Sheard Avenue, Brampton, Ontario, Canada L6Y 1J3
Email:support@skylinkhome.com
http://www.skylinkhome.com
P/N. 101Z713
Patent Pending
©2010 SKYLINK GROUP
The Skylink System consists of many other devices such as
SkylinkHome Remotes, Motion Sensor, ON/OFF Wall Switch, Wall
Dimmer, Plug-In Dimmer with or without Repeater, Plug-In ON/OFF
Control (Outdoor/Indoor), Screw-In Dimmer, ON/OFF/Dimming Control,
ON/OFF Control, Smart Button Garage Door Control, etc. Please visit
Skylink website at www.skylinkhome.com for more information.
TM
Home
TM
TM
V2.0
11. WARRANTY
If, within one year from date of purchase, this product should become defective
(except battery), due to faulty workmanship or materials, it will be repaired or
replaced, without charge. Proof of purchase and a Return Authorization are required.
If you have a deluxe remote, you can make sure that you will actually turn
on a light by pressing [ ] first, then the programmed button. Similarly,
you can make sure that you will turn off a light by pressing [ ] first, then
the programmed button.
If you have a deluxe remote and you press [ ], all those receivers to
which the remote is programmed will turn on their loads. If you press
[ ], all those receivers to which the remote is programmed will turn
off their loads.
An optional deluxe remote is needed for zone operation. A Zone Command
allows you to operate multiple lights altogether in the same zone.
A zone command must first be programmed to the receiver before zone
operation. To program a zone command, please refer to the user's
instructions of the deluxe remote.
Zone Operation - On / Off
To turn on or off a zone, hold [ ] or [ ] until the red LED flashes
three times and keeps on, then release the held button and press the
zone number.
Hold [ ] until the red LED flashes three times and keeps on, then
release [ ] and press [1], all lights in zone 1 will be turned off.
Note: The Zone Operation is also applicable to loads other than lights.
For example:
Hold [ ] until the red LED flashes three times and keeps on, then
release [ ] and press [1], all lights in zone 1 will be turned on.
If you would like to
- find out the up-to-date specifications
- know more about features and applications
- download documents, i.e. user’s instructions
- order Skylink products
or if you have difficulty getting products to work, please:
1. visit our FAQ section at www.skylinkhome.com, or
2. email us at support@skylinkhome.com, or
3. call our toll free at 1-800-304-1187 from Monday to Friday, 9 am to 5 pm EST.
Fax (800) 286-1320