


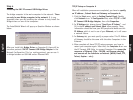


5. A window will appear asking if you want to set the IP address
for the USB Network Adapter. Click NO to for the IP address to
be set up automatically. Only set your own IP address if you are
an experienced network administrator or if you are connecting
to an Ethernet network. (See Step 4 for more details)
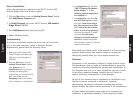
6. During the installations, the system may ask you to insert
system disk(i.e Win98 CD-ROM) please insert your system disk
your CD-ROM drive then click OK.
7. If the system cannot find any file, please direct to your CD-ROM
drive and click OK.
8. The system will ask you to reboot the computer when the
installation is complete. Please remove the driver from your
CD-ROM drive, connect the EZ Connect USB cable and restart
your computer.
Now go through the same process on the other computer(s).
Your USB network environment is set up automatically when the
installation is complete. Now you can see all the computers in
your network in Network Neighborhood and you can share
programs, files and other peripheral devices through the standard
Windows interfaces, e.g. Windows Explorer and Network
Neighborhood.
English
English
Step 1
Install the software on your computers –
1. Switch on the computers that you will connecting the SMC EZ
Connect USB Cable and make sure that the USB ports are
enabled and working properly.
2. Insert the SMC CD-Rom into the CD-ROM drive and find the
installation program. (This should be in directory D:\SMC.exe)
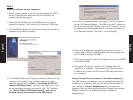
3. The InstallShield Wizard will guide you through step-by-step to
complete the installation process.
4. The InstallShield Wizard will pop-up a Question Window. If the
computer you installed is not a bridge computer or main
computer. (please refer to Step 4 – Installaing the SMC EZ
Connect USB Bridge Driver) you must click “No”, but if you
are on the bridge computer, you have to click ”Yes”. Because
this “SMC EZ Connect USB Bridge Protocal” must not be
installed on only one computer in the USB network.