


DUAL ALARM CLOCK WITH ADJUSTABLE TONE, VOLUME, AND
VIBRATOR
MODEL SBD375ss
OPERATION INSTRUCTIONS
IMPORTANT- Please read these instructions carefully before use and retain for future
reference.
Warning: To prevent fire or shock hazard do not expose this appliance to rain or moisture. Before
connecting to mains make sure that the requirements specified on the apparatus corresponds to the
available power supply i.e. USA: AC 110V / 60Hz .
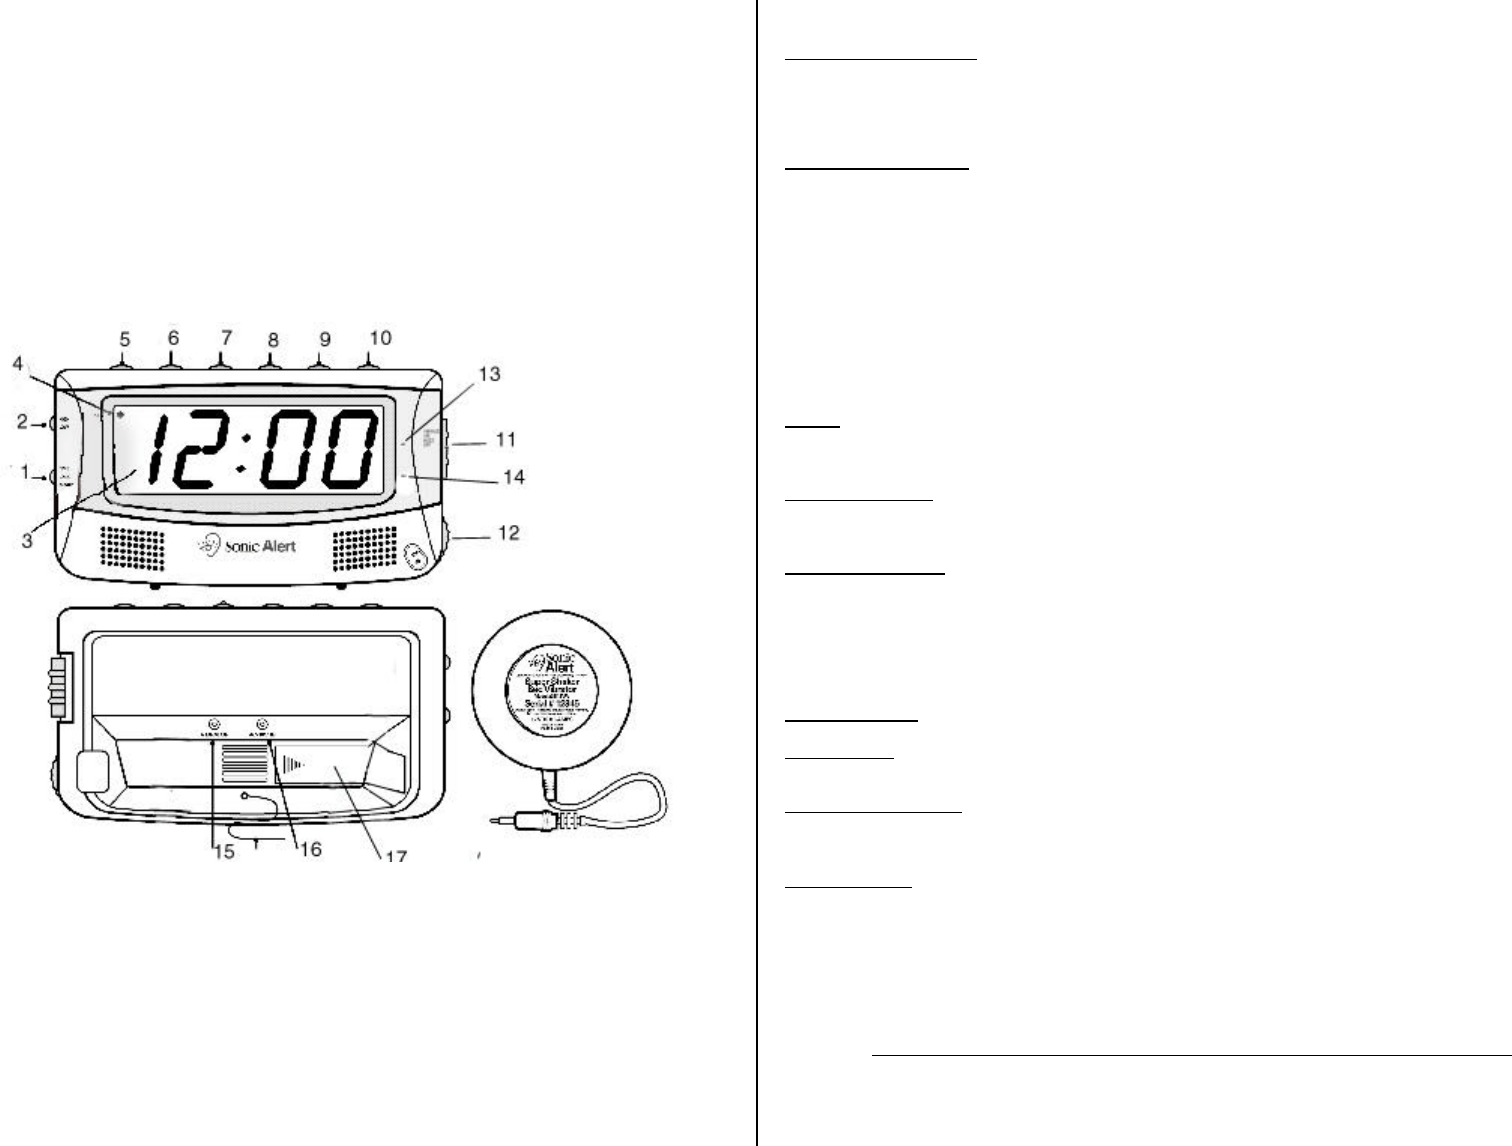
Features shown on diagrams above:
1) Dual Alarm Setting 7) Slow Min/Hour Button 13) Alarm 1 (AL1) Indicator
Switch 8) Snooze Button 14) Alarm 2 (AL2) Indicator
2) Dimmer Switch 9) Time Set Switch 15) Vibrator/Bed Shaker Input
3) Clock Display 10) Tone Control Wheel 16) AC Power Input
4) PM Indicator (12 hr. only) 11) Function Switch 17) Backup Battery Compartment
5) Alarm SET/OFF Switch 12) Volume Control Wheel
6) Fast Min/Hour Button
GENERAL DATA
Power: Consumption: USA: AC 110V / 60Hz
UL listed transformer (Underwriters Laboratories)
Setting the correct time-
1) Depress “TIME SET” button (9)
2) As you depress the “TIME” button
(9) at the same time depressing the “FAST” (6) or the “SLOW”
(7) minute/hour button to advance clock display until you have desired time.
3)
Lighted dot (4) located in upper left corner of clock display indicates time is PM, no light indicates
time is AM.
Setting the alarm time-
1) To set alarm AL1 slide “DUAL ALARM SETTING SWITCH” (1) to AL1 position.
2)
Depress “ALARM SET/OFF” (5) button at the same time depressing “FAST” (6) or the “SLOW”
(7) minute/hour button until you reach desired alarm setting.
NOTE: when se
tting the alarm time if you advance more than 24 hours the display (3) will begin to
flash and alarm will sound. To stop flashing, move “FUNCTION SWITCH” (11) up then back to
OFF position. When alarm sounds display (3) will also flash.
3) Make sure alarm time is correctly set for AM or PM (4).
4)
Once alarm AL1 has been set, slide the “DUAL SETTING SWITCH” (1) to the AL2 position.
Follow the same steps that were taken when setting alarm AL1.
5) Once both AL1 and AL2 have been set, slide the “DUAL SETTING SWITCH” to
the middle
position AL1+AL2 for both alarms.
6)
You will see two dots on the right side of the LED display; AL1 (13) and AL2 (14) to show alarms
have been enabled. Lighted dots indicate which alarm is set.
Alarm-
1) To enable the alarm function, slide the “FUNCT
ION SWITCH” (11) up to the position that you
desire to wake to, you can choose “VIB” for bed shaker, “BUZZ” for sound, and “VIB/BUZZ” for
both. NOTE: whichever function you choose to wake to, will be the same function for both alarms.
Snooze Operation-
1) “SNOOZE” button (8) – press after alarm has gone off. The alarm will re-
set for an additional 9
minutes for extra sleep. You may repeat up to 54 minutes.
2) When using “SNOOZE” (8) if alarm AL1 uses snooze, it will not affect alarm AL2.
Shutting Off Alarm-
Alarm can be shut off temporary for the day or permanently shut off.
1)
When alarm AL1 goes off, press the “ALARM SET/OFF” (5) button to turn off for the day.
2)
Once both alarms go off and the “ALARM SET/OFF” (5) button has been pressed, alarms will shut
off for the day and come back on the next day at the same time if alarm settings have not changed.
3)
To shut the alarm off permanently, slide the “FUNCTION SWITCH” (11) down to the OFF
position. Alarm will not come on until “FUNCTION SWITCH” (11) is set to “VIB/B
UZZ”, “VIB”,
or “BUZZ” position.
Volume Control-
1) To adjust volume, rotate wheel located on the lower right bottom corner of the clock (12).
Tone Control-
1)
To adjust “TONE CONTROL” (10) turn the wheel on the top right corner of the clock to the
desired tone sound.
Bed Shaker / Vibrator-
1) Attach the bed shaker jack to the back of clock at “VIBRATOR INPUT” (15).
2) To turn on vibrator slide “FUNCTION SWITCH” (11) to “VIB” or “VIB/BUZZ” position.
3) Place vibrator between mattress and box spring.
Battery Backup-
1) To use battery back up, install a 9-
volt alkaline battery in back of clock located
under the “BACKUP BATTERY COMPARTMENT COVER” (17). Battery
not included. NOTE: the LED display will not show during power failure, but
the clock will still be running and keeping
proper time until the power comes
back.AC_9V Power Input-
1) Attach the “AC POWER INPUT” (16) to the back of AC-
9V IN next to “VIBRATOR INPUT”
(15); it is the smaller input of the two.
NOTE: IMPORTANT: do not confuse “AC POWER INPUT” (16) with the “VIBRATOR INPUT” (15).