


Table of
contents
Operation
Search
MENU/Settings
Search
Index
87
GB
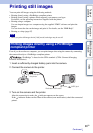
4 MENU t (Print) t desired mode t z on the control button
5 Desired item t [Start] t z
• Movies cannot be printed.
• If the camera could not be connected to the printer, be sure to set [USB Connect] under (Main
Settings) to [PictBridge].
• Do not disconnect the dedicated USB cable while the (PictBridge Connecting) indicator appears on
the screen.
You can take a memory card containing images shot with the camera to a photo printing service
shop. As long as the shop supports photo printing services conforming to DPOF, you can make a
(Print order) mark on images in advance in the playback mode so that you do not have to
reselect them when you print them out at the shop.
• You cannot print images stored in the internal memory at a print shop directly from the camera. Copy the
images to a memory card (page 74), then take the memory card to the print shop.
• Consult your photo printing service shop as to what types of memory card they handle.
• A memory card adaptor (sold separately) may be necessary. Consult your photo printing service shop.
• Before you take image data to a shop, always copy (back up) your data to a disk.
• You cannot set the number of prints.
• If you want to superimpose dates on images, consult your photo printing service shop.
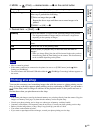
This Image Prints the currently displayed image in single-image mode.
Multiple Images You can select and print multiple images.
After step 4, perform the following.
1Select an image then press z.
Repeat the above steps until there are no more images to be
printed.
2MENU t [OK] t z
Quantity Selects the number of copies of the specified image to be printed.
• The designated number of images may not all fit onto a single sheet
depending on the quantity of images.
Layout Selects the number of images you want to print side by side on a
sheet.
Size Selects the size of the printing sheet.
Date Selects [Date] or [Day&Time] to insert the date and time on
images.
• When you choose [Date], the date will be inserted in the order you have
selected using [Date & Time Setting] on the camera. This function may
not be available depending on the printer.
Notes
Printing at a shop
Notes