ICD-BX022
This device complies with part 15 of the FCC Rules.
Operation is subject to the following two conditions:
(1) this device may not cause harmful interference,
and (2) this device must accept any interference
received, including interference that may cause
undesired operation.
You are cautioned that any changes or modifications
not expressly approved in this manual could void
your authority to operate this equipment.
The following FCC statement applies only to the
version of this model manufactured for sale in the
USA. Other versions may not comply with FCC
technical regulations.
INFORMATION
This equipment has been tested and found to
comply with the limits for a Class B digital device,
pursuant to Part 15 of the FCC Rules. These limits
are designed to provide reasonable protection against
harmful interference in a residential installation.
This equipment generates, uses and can radiate radio
frequency energy and, if not installed and used in
accordance with the instructions, may cause harmful
interference to radio communications.
However, there is no guarantee that interference
will not occur in a particular installation. If this
equipment does cause harmful interference to radio
or television reception, which can be determined
by turning the equipment off and on, the user is
encouraged to try to correct the interference by one
or more of the following measures:
Reorient or relocate the receiving antenna.
Increase the separation between the equipment and
receiver.
Connect the equipment into an outlet on a circuit
different from that to which the receiver is connected.
Consult the dealer or an experienced radio/TV
technician for help.
For the customers in Canada
This class B digital apparatus complies with Canadian
ICES-003.
Troubleshooting
Troubleshooting
Before taking the IC recorder for repair,
check the following sections. Should any
problem persist after you have made these
checks, consult your nearest Sony dealer.
Please note that recorded messages may be
erased during service or repair work.
Display does not disappear.
Display appears blurred.
Remove the protective film on the display
window before you use the IC recorder.
The IC recorder does not operate.
The batteries have been inserted with
incorrect polarity.
The batteries are weak.
No sound comes from the speaker.
The volume is turned down completely.
Headphones are plugged in.
NO DATA
The selected folder does not have any
messages. You cannot move a message, etc.,
because of this.
LOCK ( flashes at the same time)
You selected a message that has been locked.
You cannot move it, erase it. Set “LOCK”
to “OFF” in the menu before editing the
message.
ERR ACCESS
ERR 01 – ERR 06
A system error other than the above has
occurred. Remove the batteries and re-insert
them.
HOLD
The HOLD function is activated. Slide the
HOLD switch in the direction opposite
that of the arrow. For details on the HOLD
function, see “Preventing Accidental
Operation (HOLD).”
System Limitations
There are some system limitations of the IC
recorder. Items as mentioned below are not
malfunctions of the IC recorder.
You cannot record messages up to the
maximum recording time.
If you record messages in a mixture of HQ,
SP and LP modes, the recordable time varies
from the maximum HQ mode recording
time to the maximum LP mode recording
time.
The sum of the number on the counter
(elapsed recording time) and the remaining
recording time may be less than the IC
recorder’s maximum recording time.
Getting Started
Step 1: Checking the
Contents of the
Package
IC Recorder (1)
LR03 (size AAA) alkaline batteries (2)
Operating Instructions
Index to parts and controls
Front
Built-in microphone
(microphone) jack*
Display window
FOLDER button
MENU button
(stop) button
PLAY/STOP•ENTER button*
–
(review/fast backward),
+ (cue/fast forward) button
Speaker
(headphone) jack
Operation indicator
ERASE button
VOL (volume) –/+* button
REC/PAUSE button
These buttons and the jack have a tactile dot.
Use it as a reference point for operations, or
to identify each terminal.
*
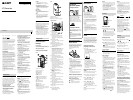
Rear
HOLD switch
Battery compartment
Strap hole (A strap is not supplied.)
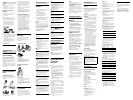
Display window
Folder indicator
Displays the folder ( , , or ) you
have selected.
Microphone sensitivity
Displays the microphone sensitivity.
For details about the settings, see
“Menu settings” on the reverse side of
this paper.
Repeat play indicator
Appears when a message is played back
repeatedly.
Selected message number
REC DATE (recorded date) indicator
The recorded date or time is displayed
with the REC DATE indicator.
REMAIN indicator
When the IC recorder is in the
recording or stop mode, the remaining
recording time is displayed with the
REMAIN indicator, or when the IC
recorder is in the playback mode,
the remaining time of the current
message is displayed with the REMAIN
indicator.
Remaining memory indicator
Displays the remaining memory and
decreases one by one during recording.
Battery indicator
Displays the remaining battery power.
Recording mode indicator
Displays the recording mode set using
the menu when the IC recorder is in
the stop mode, and displays the current
recording mode when the IC recorder
is in the playback mode.
For details about the settings, see
“Menu settings” on the reverse side of
this paper.
(recording) indicator
Appears while the IC recorder is
recording.
N-CUT (noise cut) indicator
Appears when “N-CUT” is set to “ON”
in the menu.
Lock indicator
Appears when “LOCK” is set to “ON”
in the menu.
EASY-S (easy search) indicator
Appears when the “EASY-S” is set to
“ON” in the menu.
DPC (Digital Pitch Control) indicator
Appears when the “DPC” is set to “ON”
in the menu.
Total number of messages in the folder/
DPC setting
Elapsed time/Remaining
time/Recorded date or time
indication/Message
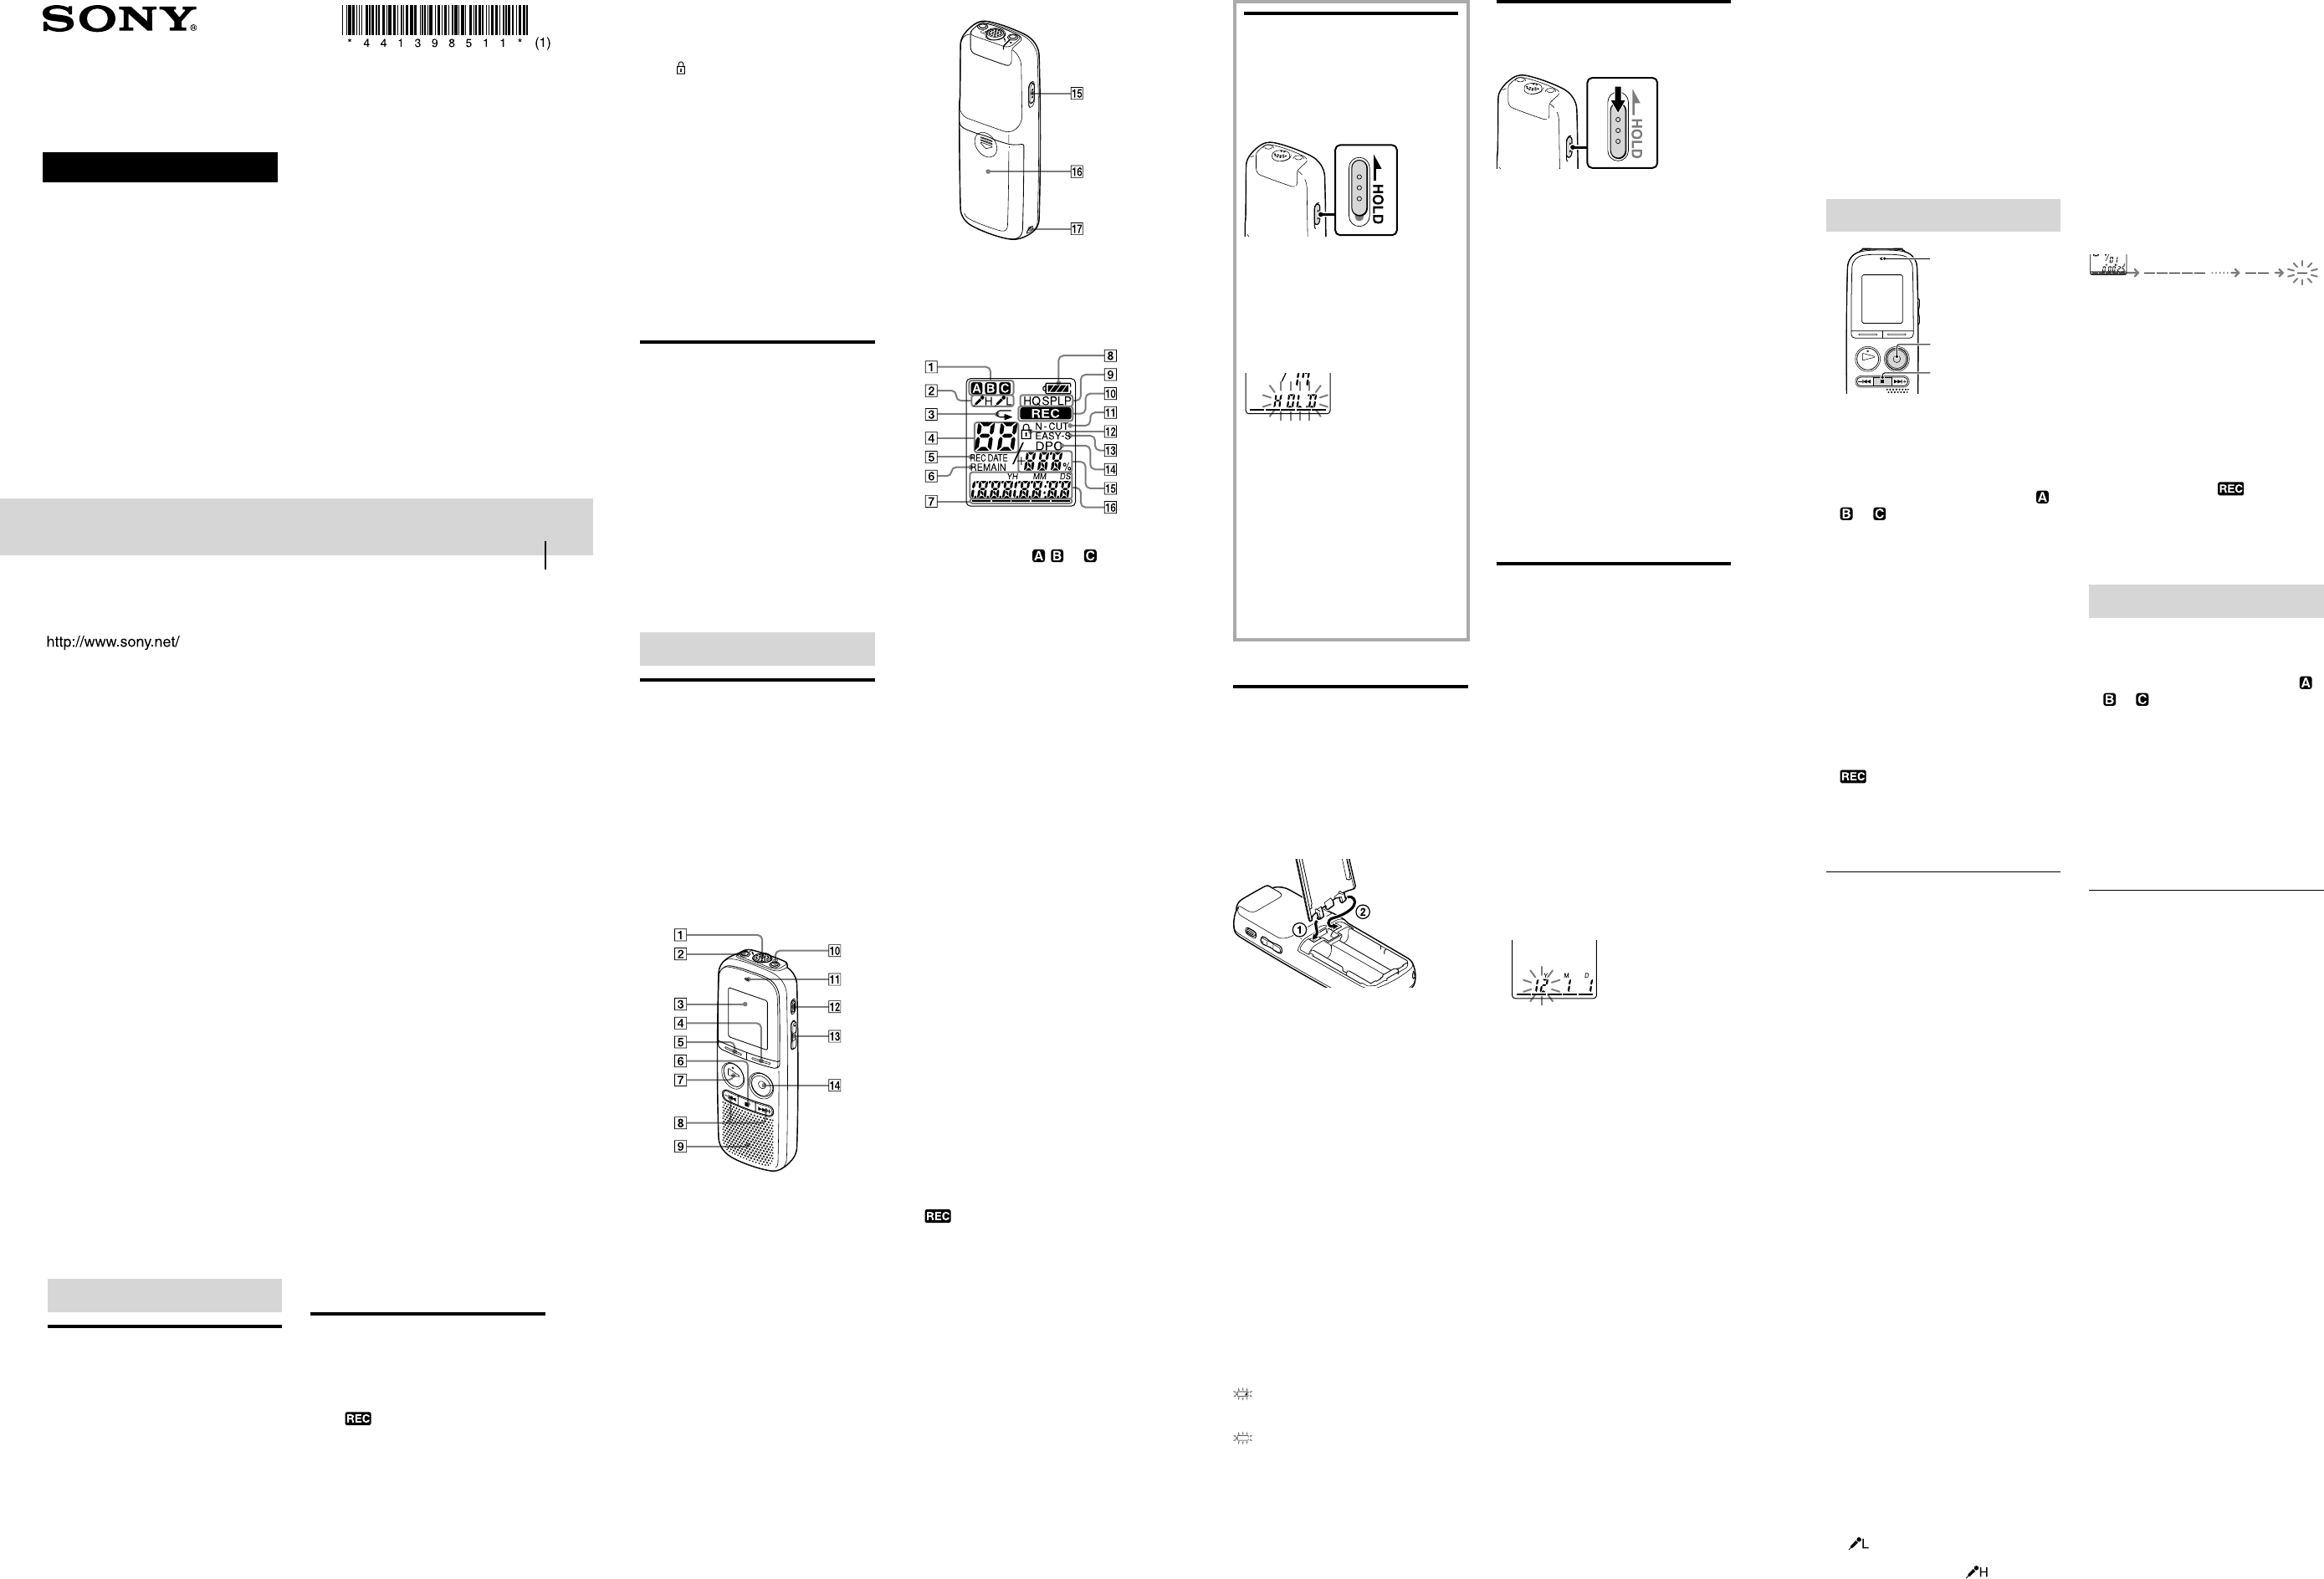
Preventing
Accidental
Operation (HOLD)
Locking the buttons
Slide the HOLD switch in the directionHOLD switch in the direction
of the arrow in the recording or
playback mode. When the HOLD
function is activated, the yellow
marking appears beside the switch.
“HOLD” will flash, indicating that all
the functions of the buttons are locked.
Unlocking the buttons
Slide the HOLD switch in the opposite
direction from that of the arrow so that
all buttons will be unlocked.
Note
When the HOLD function is activated
during recording, all the functions of the
buttons are locked to prevent accidental
operation. To stop recording, cancel the
HOLD function first.
Step 2: Preparing a
Power Source
Slide and lift the battery compartment lid,
insert LR03 (size AAA) alkaline batteries
with correct polarity, and close the lid.
If the battery compartment lid is
accidentally detached, attach it as
illustrated.
Tips
Messages recorded are not erased even when
you replace the batteries.
Even if you do not use the IC recorder,
the batteries are consumed slightly. The
battery life in this case varies depending
on humidity or other environmental
conditions. Usually, the batteries last about
2 months. If you do not intend to use the IC
recorder for an extended period of time, it is
recommended that you turn the power off or
remove the batteries.
Notes
Do not use manganese batteries for this IC
recorder.
When replacing the batteries, be sure to
replace both batteries with new ones.
When to replace the batteries
The battery indicator in the display window
shows the battery condition.
Battery remain indication
: Replace the current batteries with
new ones.
: “LO BATT” flashes and the IC
recorder will stop operation.
Step 3: Turning the IC
Recorder On
Slide the HOLD switch down in the
direction of an arrow.
To turn the power off
When you are not using the IC recorder,
you can prevent the batteries from getting
weak quickly by turning the power off.
Slide the HOLD switch in the direction ofHOLD switch in the direction of
the arrow in the stop mode. “OFF” flashes.
The IC recorder turns off within a few
seconds.
Tips
When you are not going to use the IC
recorder for a long time, we recommend to
turn off the IC recorder.
When 10 minutes have passed after you
have turned on the IC recorder and leave it
without doing anything, the display goes off
automatically. (Press any button to show the
display.)
Step 4: Setting the
Clock
Remove the protective film on the display
window before you use the IC recorder.
The clock setting display appears every time
you replace batteries, and the approximate
time when you last operated the unit before
replacing the batteries is displayed. You
must set the clock to the current time again.
Setting the clock after
preparing a power source
1 Set the year.
Press [–
] or [
+] to set the year.
Select the last two digits of the year.
When you press [ PLAY/
STOP•ENTER], the cursor moves to the
month section.
2 Set the month, day, hour, and
minutes in sequence in the same way.
Press [–
] or [
+] to select
the desired figures, and then press
[ PLAY/STOP•ENTER].
When [
(stop)] is unintentionally
pressed during clock setting mode, the
clock setting is canceled. Use the menu
to set the clock.
Setting the clock using the
menu
While the IC recorder is in the stop mode,
you can set the clock using the menu.
1 Press [MENU] to enter the menu mode.
The menu mode will be displayed.
2 Press [–
] or [
+] to select
“SET DATE,” and then press
[ PLAY/STOP•ENTER].
3 Press [–
] or [
+] to set
the year, month, day, hour, and
minute in sequence, and then press
[ PLAY/STOP•ENTER].
4 Press [
(stop)] to exit the menu mode.
Tip
Press [MENU] to return to the previous
operation.
Notes
You can set the time display for the clock to
“12H” (12-hour display) or “24H” (24-hour
display) in the “HOUR” menu. When “12H”
(12-hour display) is set, “AM” or “PM”
appears in the display window.
If you do not press [ PLAY/
STOP•ENTER] within 1 minute of entering
the clock setting data, the clock setting mode
is canceled and the window will return to the
stop mode display.
Recording
Operation indicator
REC/PAUSE
Selecting a folder
1 Press [FOLDER] to select the folder in
which you want to record messages ( ,
, or ).
There are 3 folders already available
when you purchase the IC recorder.
If you do not change the folder after you
stop recording, the next time you record
you will record in the same folder.
Starting to record
1 Turn the built-in microphone in the
direction of the source to be recorded.
2 Press [
REC/PAUSE] in the stop mode.
The operation indicator lights in red and
(recording) indicator appears in the
display window.
The new message will be automatically
recorded after the last recorded message.
To stop recording
1 Press [
(stop)].
The IC recorder stops at the beginning of
the current recording.
Other operations
To pause recording*
Press [
REC/PAUSE]. During recording
pause, the operation indicator flashes in
red and “PAUSE” flashes in the display
window.
To release pause and resume recording
Press [
REC/PAUSE] again. Recording
resumes from that point. (To stop
recording after pausing recording, press
[
(stop)].)
To review the current recording instantly
Press [ PLAY/STOP•ENTER].
Recording stops and playback starts
from the beginning of the message just
recorded.
To review during recording
Press and hold [–
] during recording
or recording pause. Recording stops and
you can search backwards while listening
to fast playback sound. After you release
[–
], playback starts from that point.
1 hour after you pause recording, recording
pause is automatically released and the IC
recorder enters the stop mode.
Tips
Messages recorded using this IC recorder
will be recorded as MP3 files.
You can record up to 99 messages in each
folder.
Before you start recording, we recommend
you make a trial recording first, or monitor
the recording.
If the recorded sound is too loud and
distorted, set the microphone sensitivity
to (Low). On the other hand, if
the recorded sound is too little, set the
microphone sensitivity to (High).
*
Notes
While the operation indicator is flashing in
red, do not remove the batteries. Doing so
may damage the data.
Before making a recording, be sure to check
the battery indicator.
If the IC recorder is accidentally rubbed or
scratched with an object, such as your finger,
etc., during recording, noise is recorded. Try
to avoid touching the IC recorder until the
recording ends.
Remaining memory indication
During recording, the remaining memory
indicator decreases one by one.
The memory is
nearly full.
Flashing
When the remaining time of recording
reaches 10 minutes, the last one of the
indication flashes.
If the remaining recording time display
mode is selected, the remaining recording
time display will also flash when the
remaining time reaches 1 minute. The
display will be changed automatically to the
remaining time display.
When the memory is full, recording
automatically stops and and “FULL”
will flash in the display window for about 3
seconds. To continue recording, erase some
of the messages first.
Listening
Starting playback
1 Press [FOLDER] to select the folder ( ,
, or ).
2 Press [–
] or [
+] to select the
message you want to play.
3 Press [ PLAY/STOP•ENTER].
Playback will start soon.
4 Press [VOL –/+] to adjust the volume.
To stop playback
1 Press [
(stop)].
Other operations
The following operations are for when
“EASY-S” (Easy Search function) is set to
“OFF.”
To stop at the current position (Playbackstop at the current position (Playback
Pause function)
Press [ PLAY/STOP•ENTER] or
[
(stop)]. To resume playback from that
point, press [ PLAY/STOP•ENTER]
again.
To go back to the beginning of the current
message
Press [–
] once*.
To go back to previous messages
Press [–
] repeatedly. (During stop
mode, keep the button pressed to go back
the messages continuously.)
To skip to the next message
Press [
+] once*.
To skip to the succeeding messages
Press [
+] repeatedly. (During stop
mode, keep the button pressed to skip the
messages continuously.)
Searching forward/backward
during playback (Cue/Review)
To search forward (Cue):
Press and hold [
+] during playback and
release it at the point you wish to resume
playback.
To search backward (Review):
Press and hold [–
] during playback and
release it at the point you wish to resume
playback.
The IC recorder searches at slow speed with
playback sound first. This is useful to check
one word forward or back. Then, if you
press and hold the button, the IC recorder
starts to search at higher speed.
*
IC Recorder
Operating Instructions
© 2011 Sony Corporation Printed in China
Sound comes from the speaker even when
the headphones are plugged in.
If you plug in the headphones not securely
during playback, the sound may come from
the speaker. Unplug the headphones, and
then insert them securely.
Recording is interrupted.
The VOR function is activated. Set “VOR” to
“OFF” in the menu. For details, see “Menu
settings” on the reverse side of this paper.
Noise is heard.
Plug of the connected microphone was dirty
when recording. Clean the plug.
The plug of the connected headphones is
dirty. Clean the plug.
Playback speed is too fast or too slow.
The playback speed is adjusted in DPC.
Adjust the speed in DPC again in the menu.
For details, see “Menu settings” on the
reverse side of this paper.
“--:--” is displayed.
You have not set the clock.
“--Y--M--D” or “--:--” is displayed on the
REC DATE display.
The date of recording will not be displayed
if you recorded the message when the clock
was not set. For details, see “Menu settings”
on the reverse side of this paper.
The clock setting is reset.
You must set the clock every time you
replace batteries.
There are fewer menu items displayed in
the menu mode.
The menu items displayed are different
depending on the operation modes (stop
mode, playback mode and recording mode).
The IC recorder does not operate
correctly.
Take out the batteries and insert them again.
You cannot erase a message.
You selected a message that has been locked.
Set “LOCK” to “OFF” in the menu before
erasing the message.
Message List
LO BATT
Batteries are exhausted. Replace the old
batteries with new ones.
FULL ( flashes at the same time)
The remaining memory capacity of the IC
recorder is insufficient. Erase some messages
before recording.
FULL (“99” flashes at the same time)
As there are already 99 messages in the
current folder, you cannot record a new
message. Erase some messages or move
some messages to other folder before
recording.
FULL (folder indicator flashes at the same
time)
As there are already 99 messages in the
folder to which you want to move a message,
you cannot move the message. Erase some
messages before moving.