


16
Installing and Connecting the Projection TV (continued)
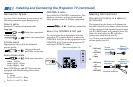
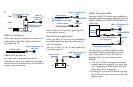
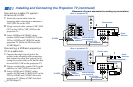
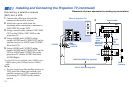
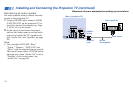
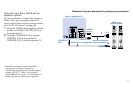
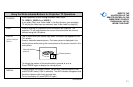
(Rear of projection TV)
RK-74A
(not supplied)
Line inputs
AUDIO-L
(white)
Stereo amplifier
AUDIO-R
(red)
S VIDEO
CONTROL S
OUT
VIDEO
AUDIO
L
R
VIDEO
(MONO)
IN
VIDEO 1 VIDEO 3
OUT
MONITOR AUDIO
(VAR/FIX)
Y
P
B
P
R
R
L
(MONO)
AUDIO
COMPONENT
HRD
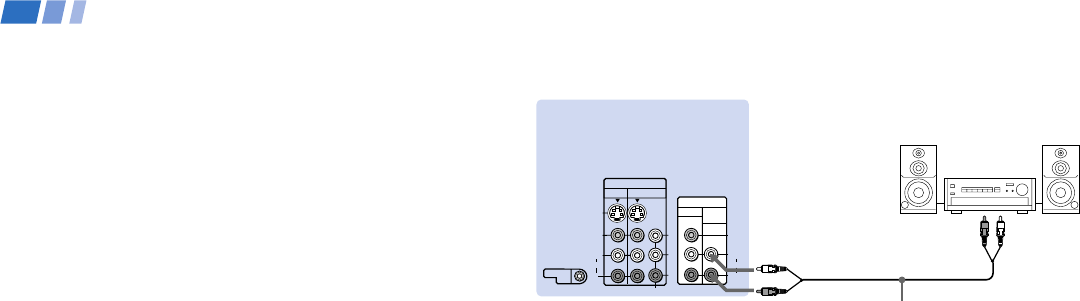
Disconnect all power sources before making any connections.
Connecting an audio system
For more dynamic sound, connect an audio
system to the projection TV.
1 Using an AUDIO cable, connect AUDIO
(VAR/FIX) OUT on the projection TV to
one of the unused Line inputs (e.g. Tape-
2, AUX1, etc.) on the stereo.
2 Set the stereo to the chosen Line input
and use the Audio menu to set the audio
output and switch the TV’s speakers off.
(see “Audio Out” and “Speaker” on page
28)
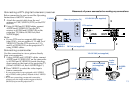
Note:
• You can adjust VOLUME, “Bass,”
“Treble,” “Balance,” “MTS/SAP” and
“Effect” with the supplied remote control.
The control items except VOLUME can be
adjusted only when “Audio Out” is set to
“Variable” in the Audio menu. (see
“Audio Out” on page 28)